fbpx
October 23, 2019

XCTrack Pro Widgets – Flying

This page gives details on the widgets that are in the “Flying” subsection. They can be accessed by customizing the XCTrack Pro pages pre-installed on AIR³. Remember that your customisations will be lost if you reset XCTrack Pro interface with AIR³ Manager, if you change the profile (Kiss, Easy, Expert, Paramotor) or if you load a different configuration file ‘xcfg’.

Click on the + sign to read the details of the widget.

Time

You can decide to diplay seconds or not.

Time will be displayed only after GPS connection.

Time is the gps UTC time adjusted to time zone (according to your Android settings), so exactly the time that is written into the igc file (track file of your flight in UTC).

The “time” displayed in the status line (see System subsection) is the same time, except if there is no GPS signal.

Speed

Ground speed based on GPS information

System units can be changed in Menu/Preferences/Display/Units/Speed

You can also decide to choose a different unit for a specific widget.

You can for example have your speed widgets that use system units set to km/h… but have a speed widget in an Airspace page, set to kt.

When flying in a certain direction, you can call the control tower for clearance. The control tower will probably ask you for your altitude and your speed expressed in Kt. This way, you don’t need to convert your speed from one unit to the other.

Airspeed

Current airspeed estimated from current groundspeed and computed wind. Computed wind will only appear after completion of a full circle.

It is the speed that would have been indicated if the pilot had a airspeed sensor (tube). It actually depends on your braking/accelerating position.

If your ground speed is 60 km/h and you are heading in the same direction as the 15 km/h wind, this means that your airspeed is 45 km/h.

Units can be changed  in Menu/Preferences/Display/Units/Speed.

Wind and Airspeed can also be obtained from an external sensor. Read more details about Wind and Airspeed data coming from an external source in the Connection & Sensors section of the Preferences page of XCTrack Pro Manual.

Bearing

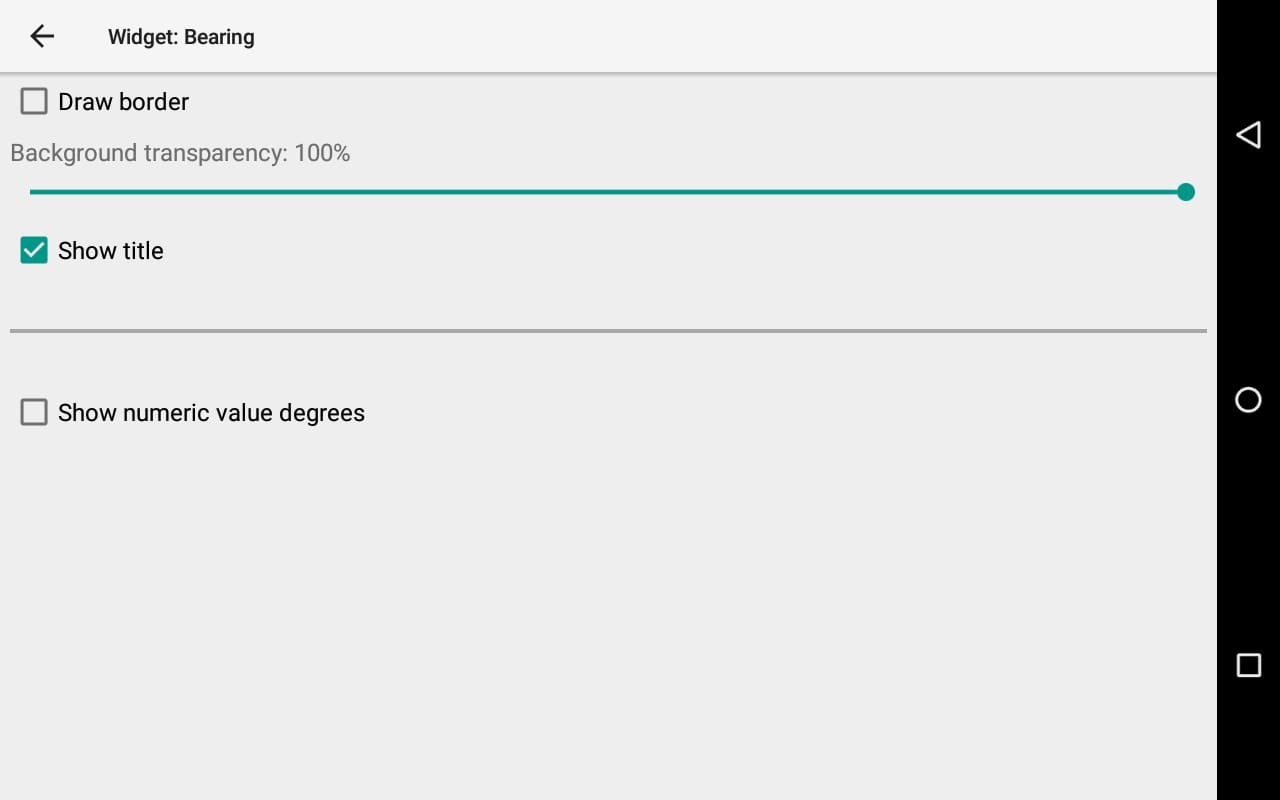
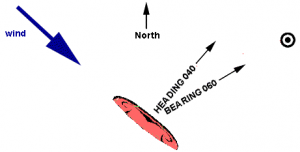
Bearing is the direction you are “really” flying/moving to, determined either  as cardinal direction letters or as numeric values (90°  = E).

“Bearing” could also called “Track” in some ways.

Bearing is the direction you are heading to if there is no wind. If there is some side wind, bearing is the direction where you are moving to.

GPS Altitude

Altitude determined by the GPS. No specific settings.

You of course need to get GPS signals to have the GPS altitude. GPS altitude is not influenced by atmospheric pressure and can also be understood as the altitude above mean sea level.

Units can be changed  (m <-> Ft) in Menu/Preferences/Display/Units/Altitude

Baro altitude

Barometric altitude is determined by the pressure sensor.

Altitude can be indicated in meter, feet or yards.

Some concepts related to baro altitude, pressure and ways to avoid collision between aircrafts should be understood.

QNH is the air pressure you get at your location, converted as if you were at sea level. If you set correctly your QNH, you should be able to get your exact altitude according to the pressure because there is a direct link between the altitude and the pressure drop once you climb.

So, depending on the way the altimeter has been set (QNH), you may read an altitude that is different from another aircraft while you are exactly at the same altitude. This would not happen if both aircrafts would have intentionaly set the QNH at the same pressure. This is called the Standard mode (STD) or QNE, setting the QNH at 1013.25 hPa.

In other words, the Standard mode means that you are considering that the atmospheric pressure at sea level is1013.25 hPa. This way, every aircraft has calibrated the same way the altitude and therefore this shall avoid collisions. See more info here: Wiki

You can select the pressure altitude type in the last drop down list.

If you select QNH, the baro altitude will take into account the QNH set in Menu/Preferences/Altimeter&QNH settings.

It can be set automatically based on information provided by internet for pilots using the Pro version (Metar or Weather stations) or based on GPS altitude on the ground before take-off.

Alternativelly, you can set the QNH manually.


AMSL

Shows barometric altitude according to the current QNH set in Menu/Preferences/Altimeter/QNH settings. AMSL = Altitude Above Mean Sea Level.

QNH can be set automatically through internet (Pro version) thanks to Metar or Weather station, … or through the GPS altitude. It can also be set manually.

AMSL is usually used to indicate altitude below the transition level ( typically 4000-4500 feet above sea level).

Flight levels are usually used to indicate altitude above the transition level.

AMSL gives the same information as the Baro Alt widget if it is set to QNH, but it’s more straightforward.


Flight Level

Shows Flight Level, if pressure sensor is available (calibrated @ 1013.25 hPa such as Standard baro altitude).

Strictly speaking a flight level is an indication of pressure. Flight levels are usually used to indicate altitude above the transition level ( typically 4000-4500 feet above sea level).

You can decide the number of decimals that will be displayed (0, 1 or 2)

You can find more details in the wiki.

AGL

Current GPS altitude above ground. In order to calculate the altitude above ground, you need to have installed the terrain information for the area above which you are flying. Read more details how to install elevation files in  Menu/Preferences/Maps/Terrain.

All terrain files are pre-installed on AIR³ according to the region where it is shipped. By default, you don’t need to install these files. However, if you fly in a different continent, then it may be necessary to install additional terrain files.

A tuto video shows you how to manage terrain and maps. Watch the video in the videos page!

Units can be changed  (m <-> Ft) in Menu/Preferences/Display/Units/Altitude

Vertical speed

Text version of vario.

Units can be changed  in Menu/Preferences/Display/Units/Vertical Speed

Set the average interval to average your sink or climb speed.

A lot of pilots use longer averaging interval as a second vario to indicate how effective the climb is (the averaging is set to the time of one or half turn in the thermal).


Vario Bar

Current lift/sink indication as colored column.

Set the average interval to average your sink or climb speed.

A lot of pilots use longer averaging interval as a second vario to indicate how effective the climb is (the averaging is set to the time of one or half turn in the thermal).


The bar is divided in two halves. The top half corresponds to a lift. The lower half corresponds to a sink. Each half is divided in 4 main parts corresponding to the units.

1, 2, 3, 4 m/s for lift starting from the middle up to the top. Once the upper half is fully filled with bars, if the lift keeps increasing, the bars will disappear accordingly from the middle to the top.


Set the average interval to smooth the data collected.


Glide Ratio

Current glide ratio.

Set the average interval to smooth the data collected.

When you go up, the glide ratio can’t be calculated and you can replace the info with the vario.

You can also remove the leading 1: to increase the readability.


3 Glide Ratio widgets.

The first row while sinking with or without leading 1:


The second row while going up with or without the vario in lift.


Location


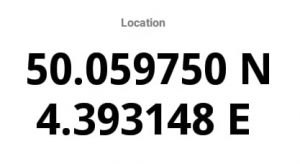
WGS-84 or UTM coordinates of the current location

WGS84 format                             UTM


Air time


Flying time since takeoff


Sunset

Time of sunset.

The sunset is the daily disappearance of the Sun below the horizon. The Sun is just below the horizon, so there is generally enough natural light to carry out most outdoor activities. Twilight is the time between day and night, starting at sunset when the Sun is below the horizon but its rays still light up the sky.

The drop down menu allows to display either the exact time of sunset, or the remaining time.

The Time of sunset widget is a great tool to comply with the legal restrictions  related to VFR rules and make sure you have landed on time.

Civil twilight

Time of Civil twilight.

The Sun is just below the horizon, so there is generally enough natural light to carry out most outdoor activities. Twilight is the time between day and night, starting at sunset when the Sun is below the horizon but its rays still light up the sky.

The drop down menu allows to display either the exact time of civil twilight, or the remaining time.

The Civil twilight widget is a great tool to comply with the legal restrictions related to VFR rules and make sure you have landed on time.


Vertical graph

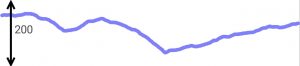
Shows course of altitude during a specified time period. In other words, this graph is the recent history of your altitude.

Units can be changed  in Menu/Preferences/Display/Units/Altitude.

The horizontal axis corresponds to the time period, from 5 seconds to 15 minutes. Reduce it to have a view on the very recent altitude change. Increase it if you want to have a more general view of your altitude change for a longer period.

The vertical axis corresponds to the altitude during the defined time period. You can set the steps from 10 m to 500 m. Once the altitude  difference between the highest and lowest altitude exceeds the defined step, the vertical axis will display n times these steps to display the entire graph for the defined time period.


Next section:

en_USEnglish