This page gives details on the widget that is in the “System” subsection. The wiget can be accessed by customizing the XCTrack Pro pages pre-installed on AIR³. Remember that your customisations will be lost if you reset XCTrack Pro interface with AIR³ Manager, if you change the profile (Kiss, Easy, Expert, Paramotor) or if you load a different configuration file ‘xcfg’.
Click on the + sign to read the details.
The status line is divided into 6 sections: GPS status, Media volume, External sensor status, Livetracking & Electronic Conspicuity status, Battery status, time.
![]()
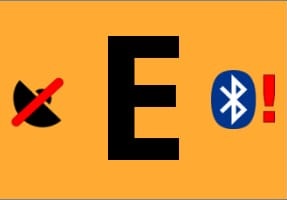
The first part of the status line shows the GPS status. See the different icons below that can be displayed depending on the GPS status, whether the flight is being recorded, or whether a tracklog is being played.
The second part is dedicated to the Media volume: read below the different options and the resulting possible info available.
AIR³ has its own internal GPS and barometer sensors. AIR³+ also contains an internal Fanet and Flarm module. It doesn’t require any external sensor. By default, you won’t see any external sensor logo unless you want to use another one. For example, you can use XC Guide as TCP sensor to let XC Guide provide XCTrack with various data such as commercial aircrafts ADS-B traffic. Read more details in the following page describing the specificities of XC Guide for AIR³.
If you want to do so, go to Menu/Preferences/Connection & Sensors/ and configure it as appropriate (Bluetooth sensor, USB sensor, UDP server or TCP client connection).
Depending on the statuts of such external connection, you may see a logo such as the following one indicating that you are trying to get GPS location through an external sensor via Bluetooth.
If you activate the Fanet and Flarm module with AIR³+, you will see the Fanet+ Logo.
![]()
As of version 0.9.6.2, you can set multiple external sensors. You can check that each sensor is correctly working by looking at the status line widget.
This is for example what you can see if you have set a TCP connection, activated the Fanet and flarm module and have set a Bluetooth connection.
![]()
In the configuration menu, you can set if you want the label “Live” to display next to the logo and set if you want to display the time.
Time in the status widget shows the local time only if there is no gps signal and it’s marked as being in error state: the background is orange. As soon as gps time is available, the GPS time is shown without the orange background as it is the case for the “Time” widget in the Flying subsection.
So, if time in status line widget has orange background, it is the local time. If there is no orange background, it’s gps time, adjusted to the local time zone.


2/ Media Volume Status
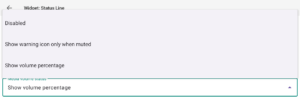
To see the current media volume, select “Show volume percentage.” The status line will then display the current volume level.

Select the second option if you only want to see a warning logo when the sound is muted.

If you do not want to display anything related to volume, select Disabled.
To learn more about media volume, go to Preferences > Sound & Alerts > Automatic Volume.
![]()
![]()
Removing the “Live” label:
![]()


Trackers
Once you are “live”, you can also see another symbol: ![]() followed by a number.
followed by a number.
This is happening when you are tracked by someone.
The number corresponds to the count of people who are tracking you in other xctrack apps plus the number of people who clicked on your flight on the web.
4/ External sensors and Fanet/Flarm module
Once you have activated the Fanet and Flarm module of AIR³ 7.3+, you can also see the Fanet+ logo.

Check more details about the internal Fanet/Flarm module as explained in the Preferences page of the XCTrack Pro Manual.
Depending on the external sensor actvivated, you will see the logo of the external sensor activated.
![]()
If you have connected a Bluetooth (BT) device that provides battery information, you will see a blue battery icon with the remaining percentage.


If the brightness is set by XCTrack, the ! suffix is added.

If the brightness is set by the system, there is no ! suffix.

Next section