AIR³ Manager can be used for different purposes, including the update of XCTrack interface with the latest improvements.
Check here how to reset the XCTrack interface via AIR³ Manager.
Here are more details on how the XCTrack interface was designed based on the chosen profile.
Click on the profile for which you want to get more details.

KISS
One page interface with only the needed info for first flights.
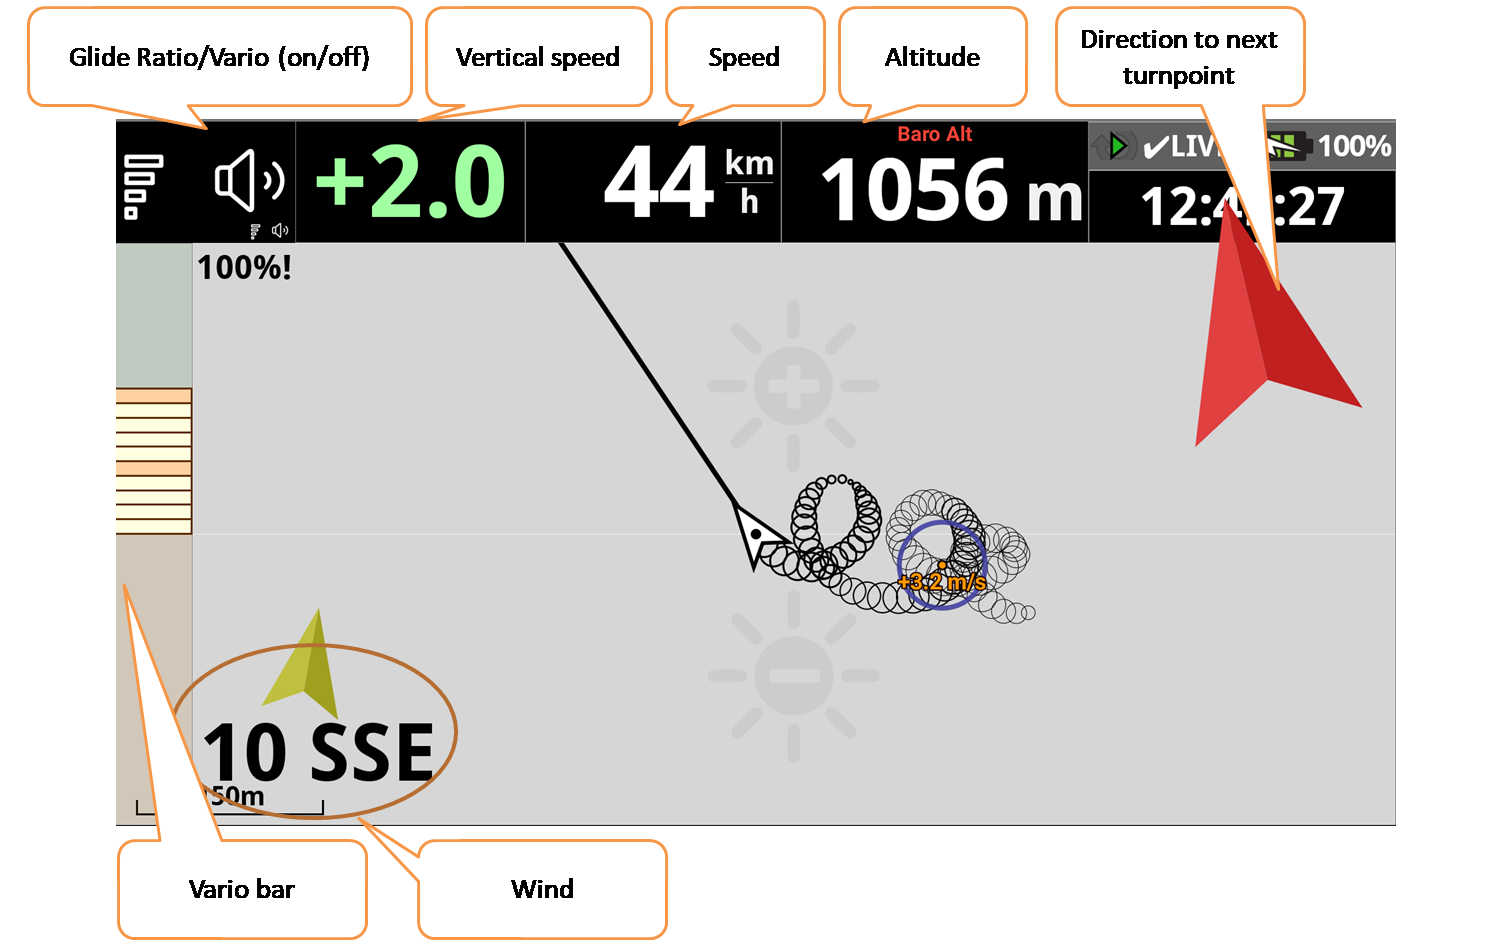
Altitude is based on pressure. It doesn’t require to be calibrated if you have an internet connection (it will get the QNH from the closest weather station).
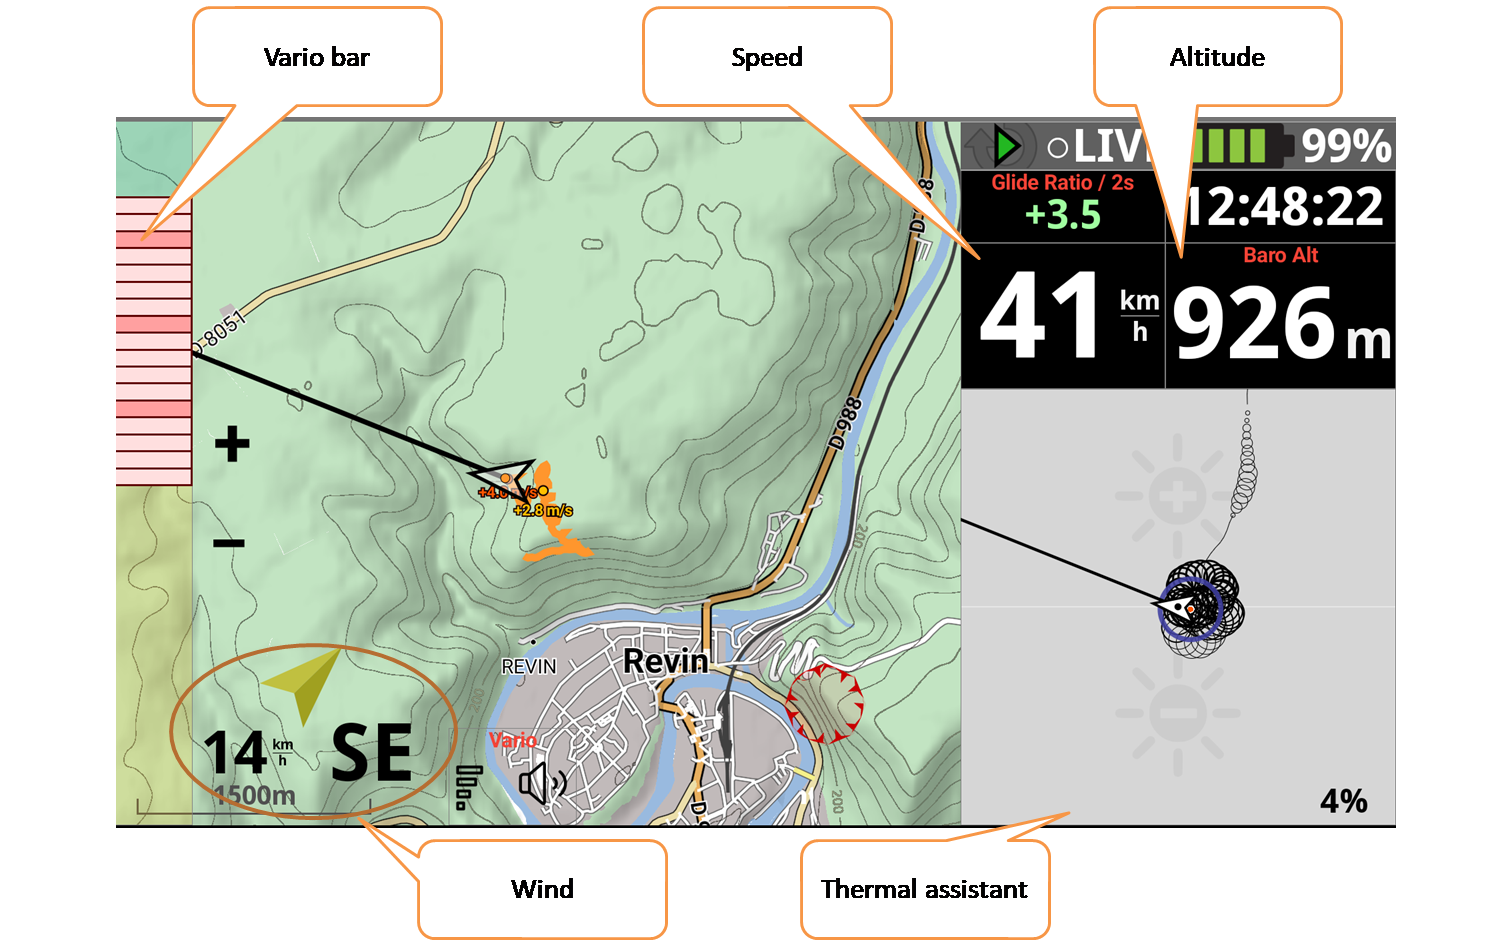
The thermal assistant is a very useful widget to clearly see where the thermal is. It moves with the wind automatically.
Wind is calculated after you have flown each direction (360°).
The green arrow corresponds to the wind direction relative to you. Example, with the arrow going up, it means tailwind.
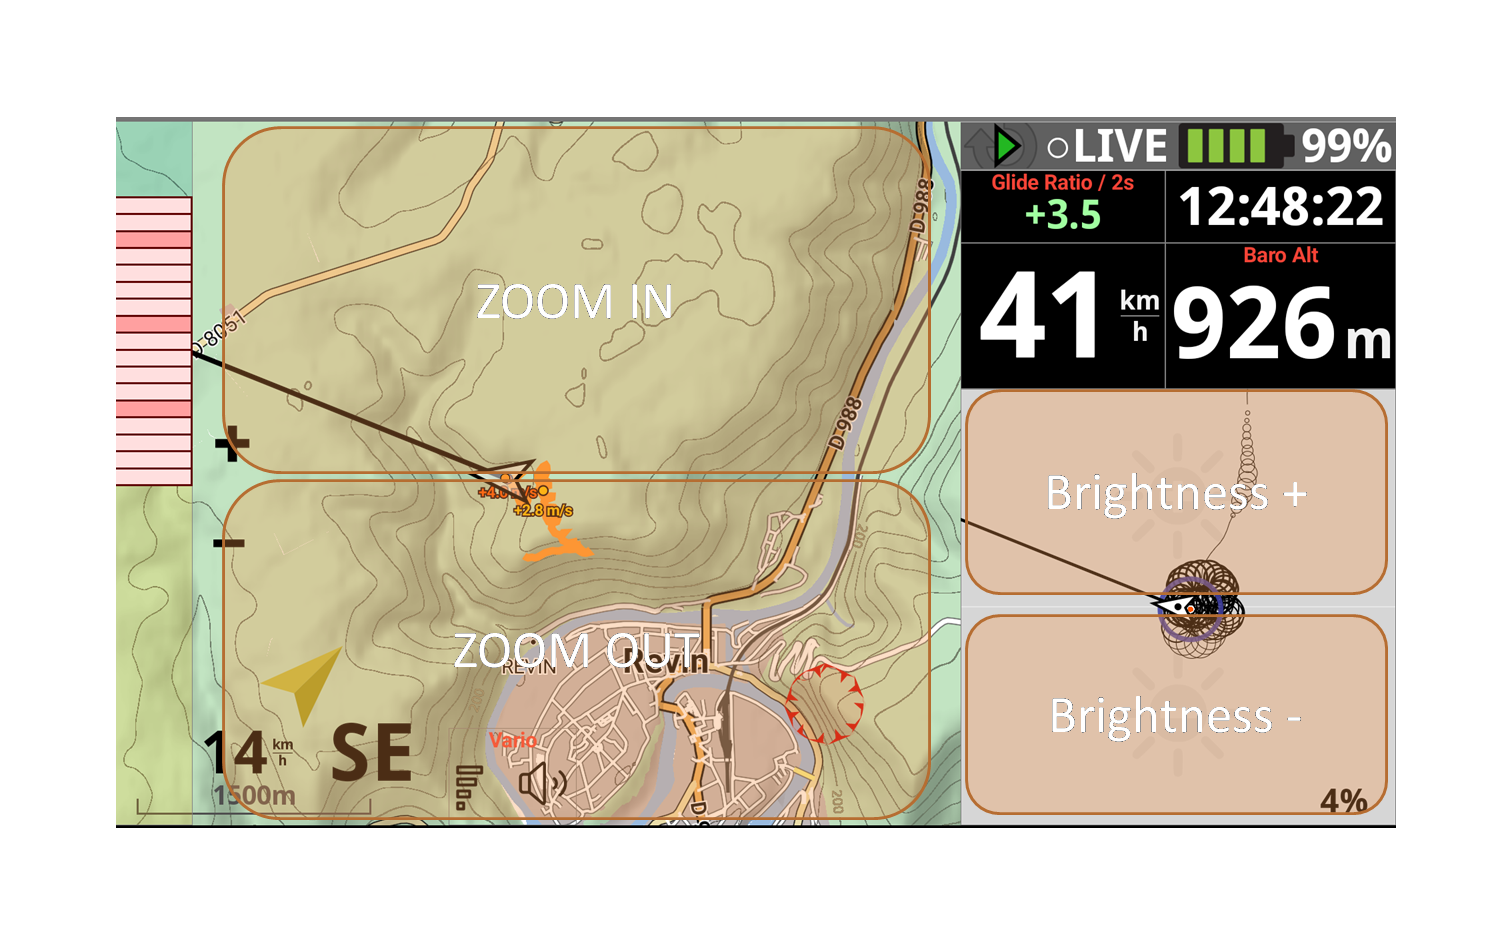
Clicking on the top half of the map (like clicking the “+” button) will zoom in; lower half, zoom out (equivalent to clicking the “-” button).
Clicking on the top half of the thermal assistant will increase screen brightness (similar to clicking the F1 button); lower half, brightness down (equivalent to clicking the F2 button).
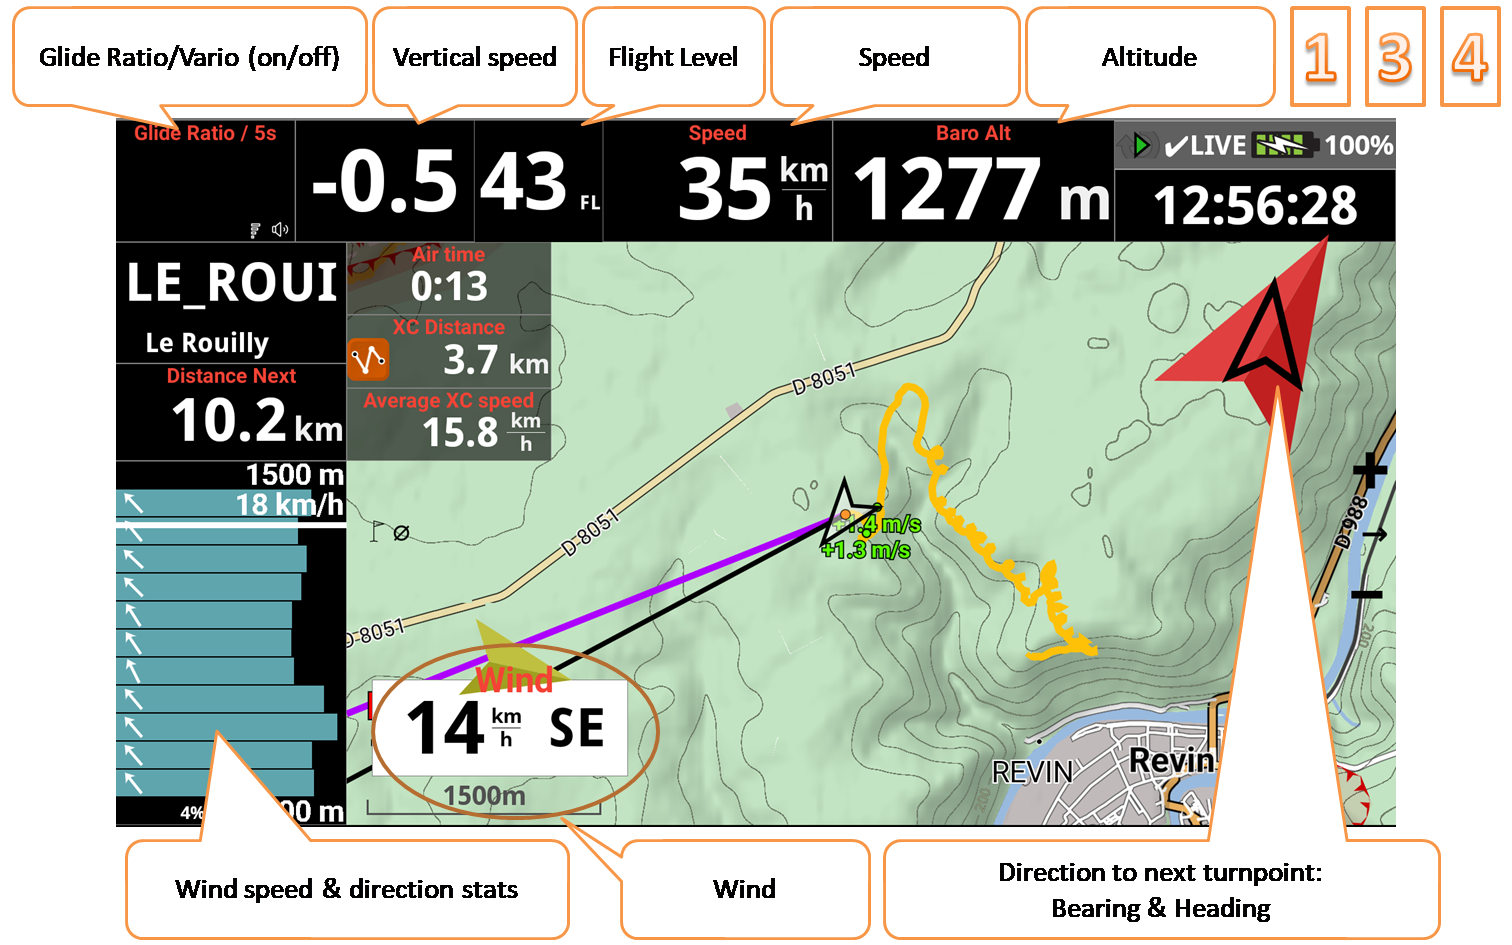
EASY
Two-page interface with only the information needed when progressing to the first navigations.
Altitude is based on pressure. It doesn’t require to be calibrated if you have an internet connection (it will get the QNH from the closest weather station).
Wind is calculated after you have flown each direction (360°).
The green arrow corresponds to the wind direction relative to you. Example, with the arrow going up, it means tailwind.
The glide ratio will only be displayed when descending. When going up, it switches to the Vario button. Simply click on this area to activate or deactivate the vario.
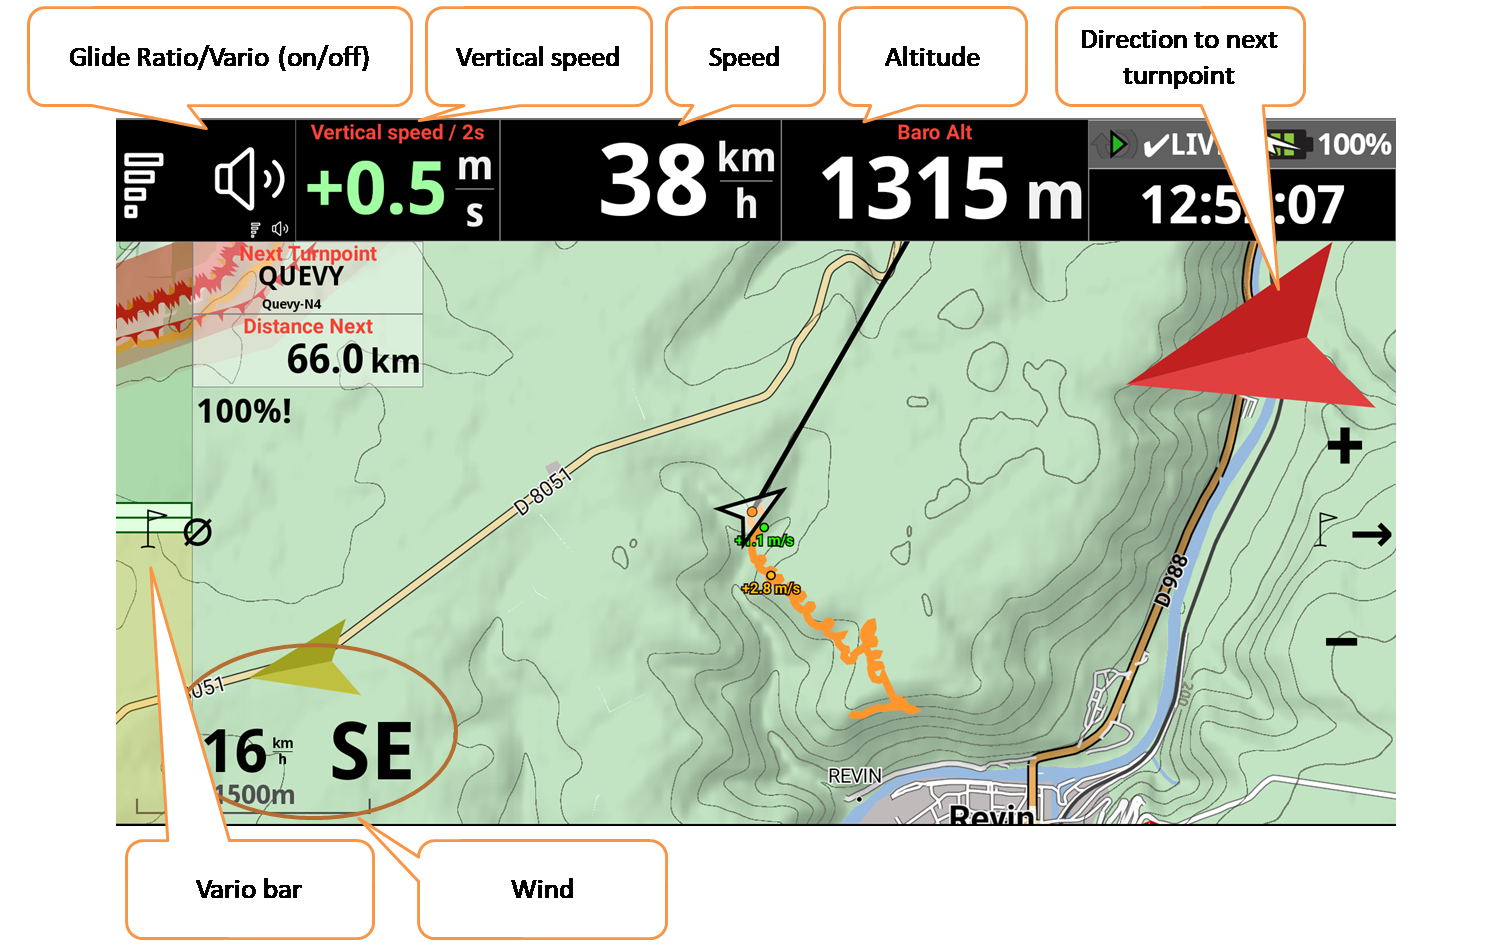
Clicking on the top half of the map (like clicking the “+” button) will zoom in; lower half, zoom out (equivalent to clicking the “-” button).
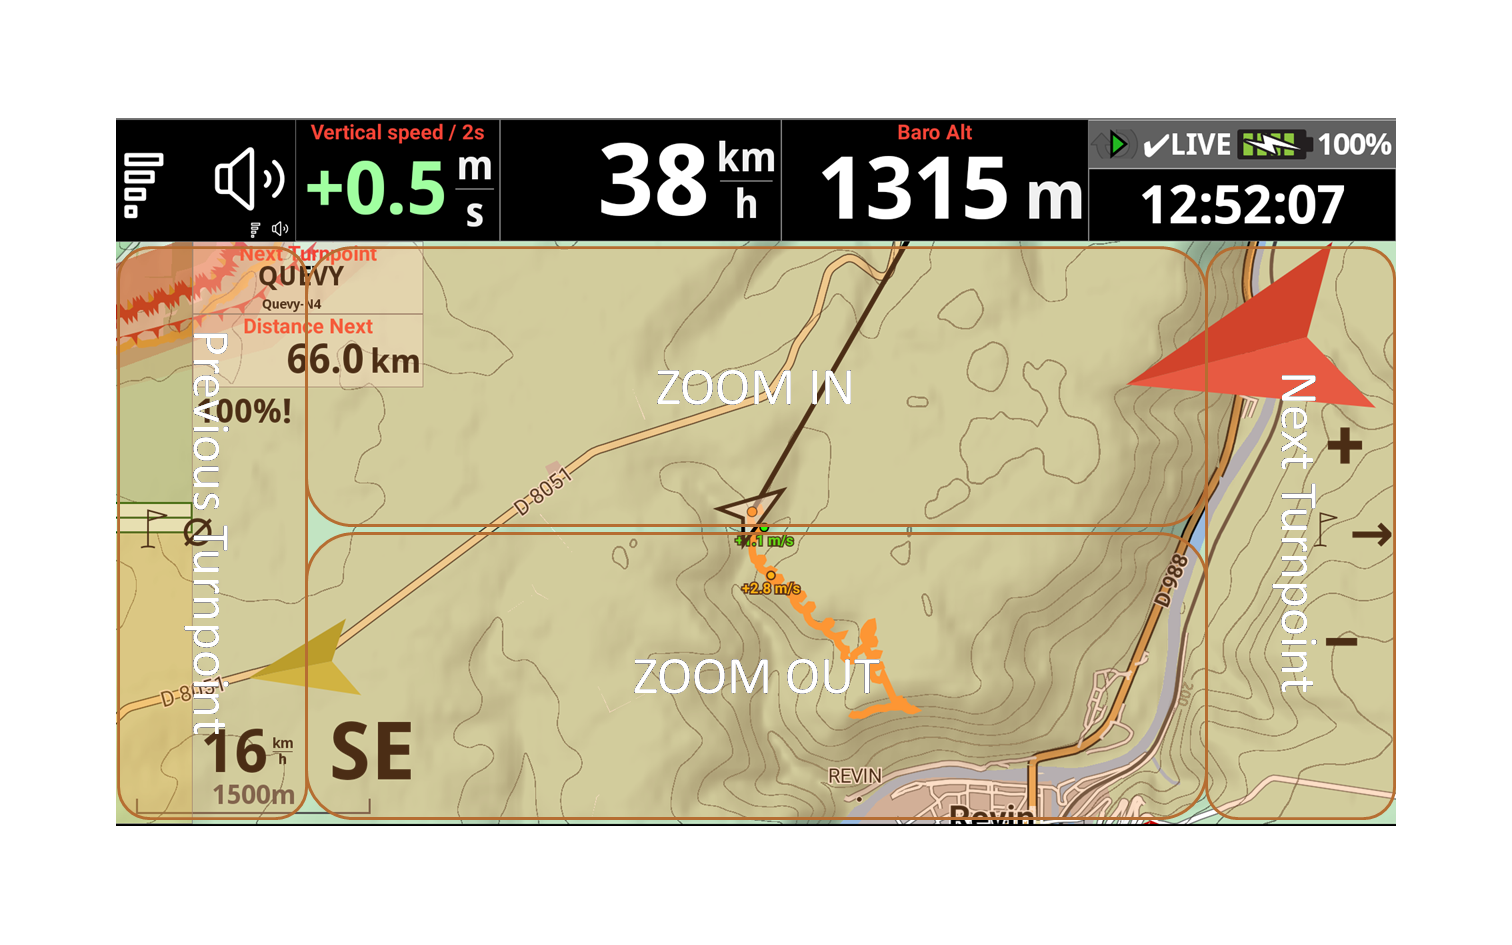
A long click on the left end of the map (like the long click on the F1 button) moves the navigation back to the previous turnpoint; the right end, towards the next turnpoint (equivalent to making a long click on the F2 button).
The thermal assistant is a very useful widget to clearly see where the thermal is. It moves with the wind automatically.
Clicking on the top half of the thermal assistant will increase screen brightness (similar to clicking the F1 button); lower half, brightness down (equivalent to clicking the F2 button).
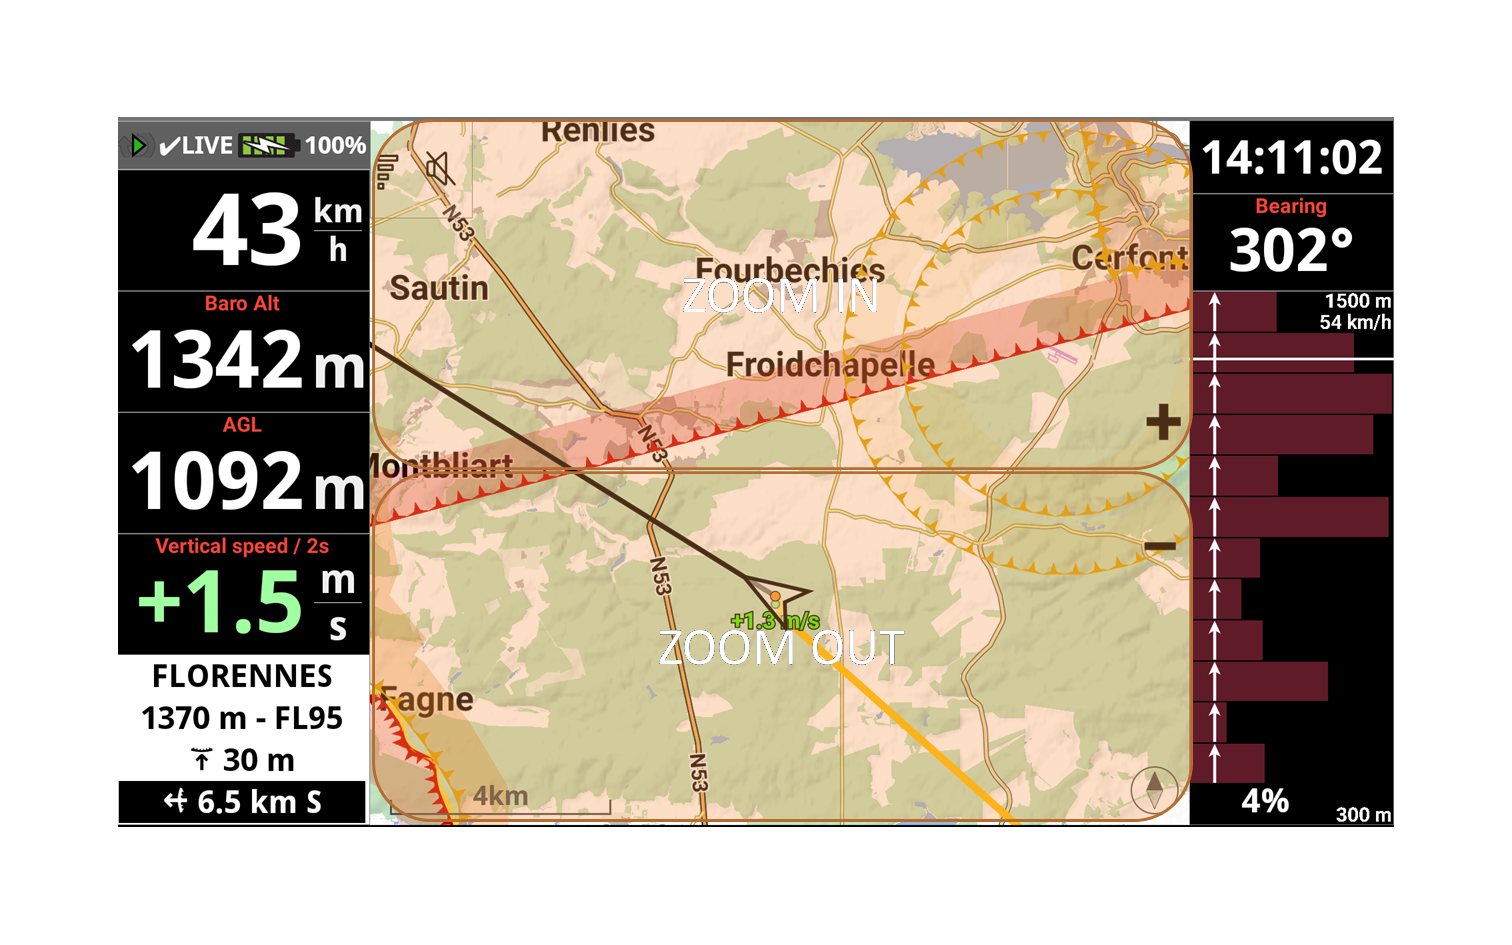
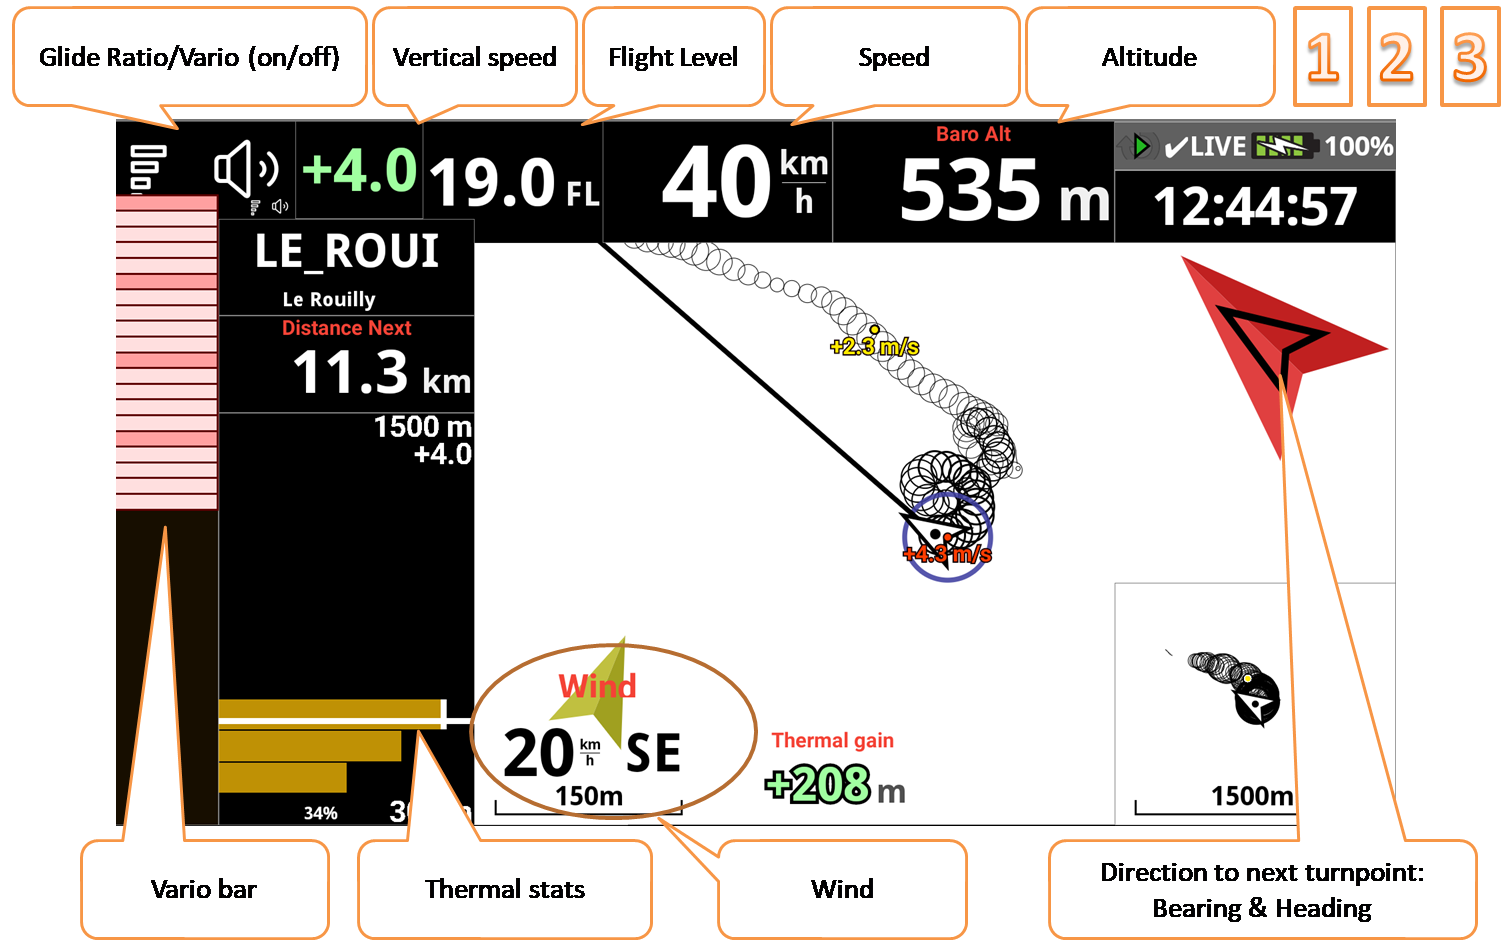
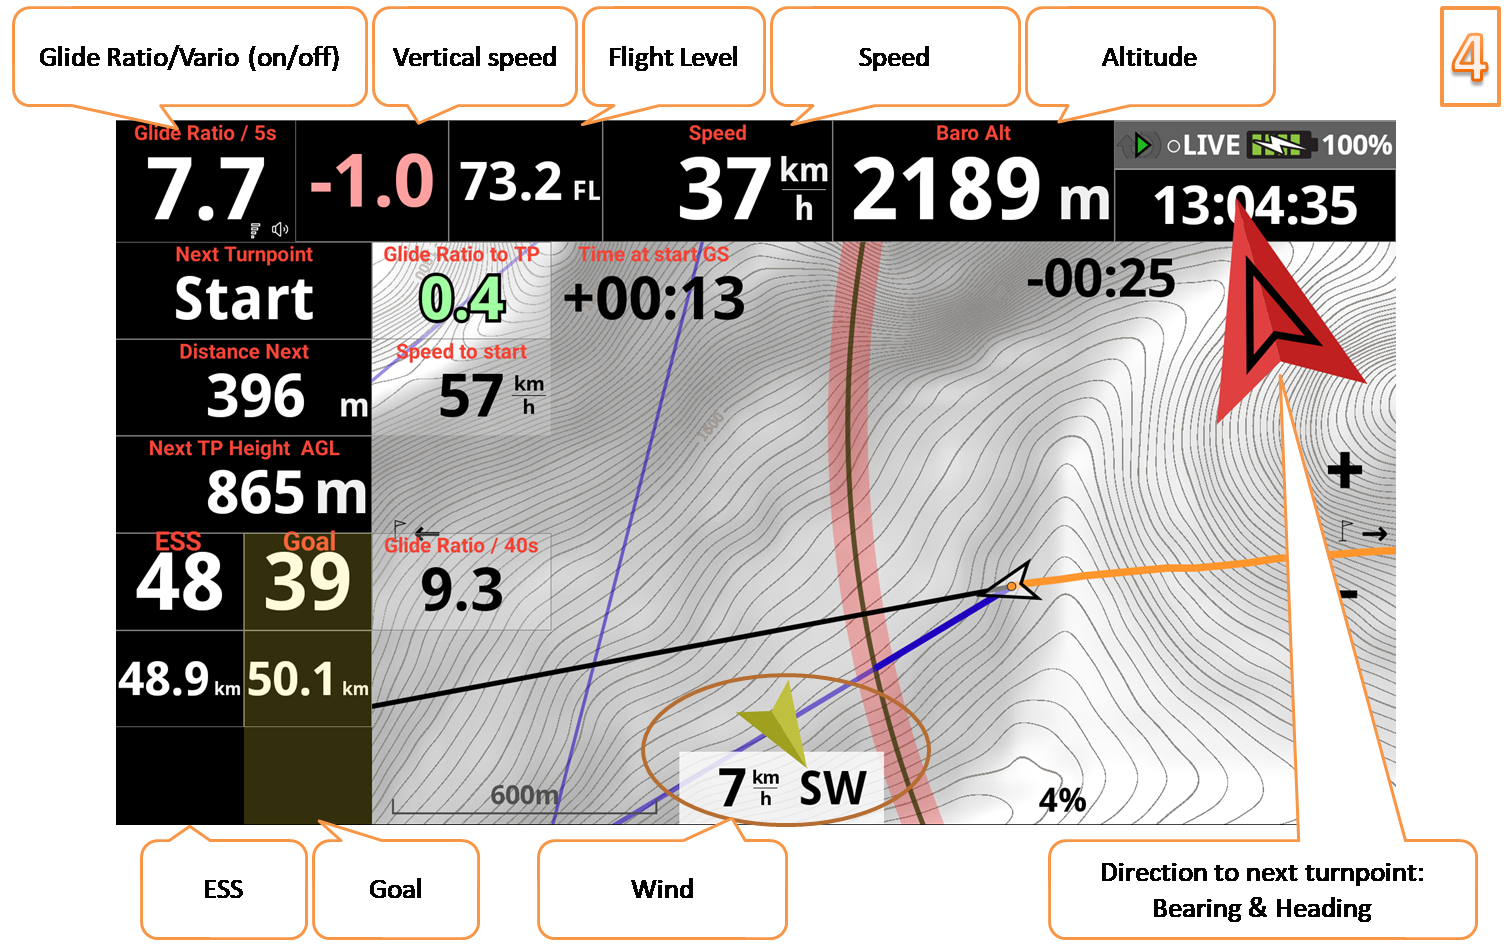
EXPERT
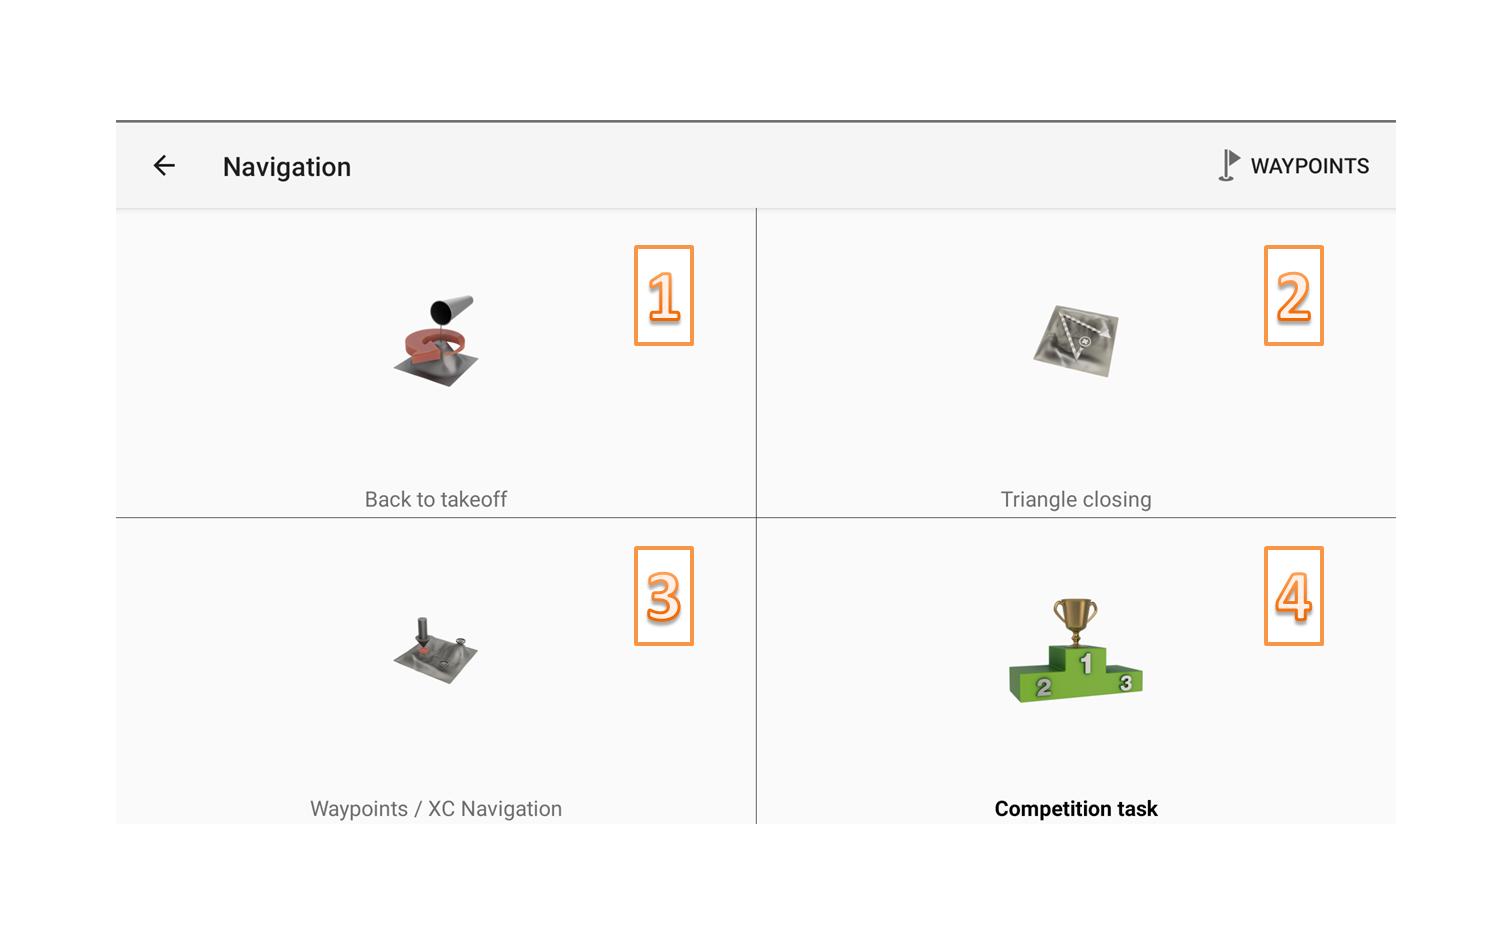
For competition, XC, triangle, …
The expert pages are displayed according to the chosen navigation.
Altitude is based on pressure. It doesn’t require to be calibrated if you have an internet connection (it will get the QNH from the closest weather station).
Wind is calculated after you have flown each direction (360°).
The green arrow corresponds to the wind direction relative to you. Example, with the arrow going up, it means tailwind.
The glide ratio will only be displayed when descending. When going up, it switches to the Vario button. Simply click on this area to activate or deactivate the vario.
The red and black arrows correspond to the direction to the next turnpoint (bearing or heading).
By choosing Triangle as navigation type, you will get the same page, but with triangle options on the map.

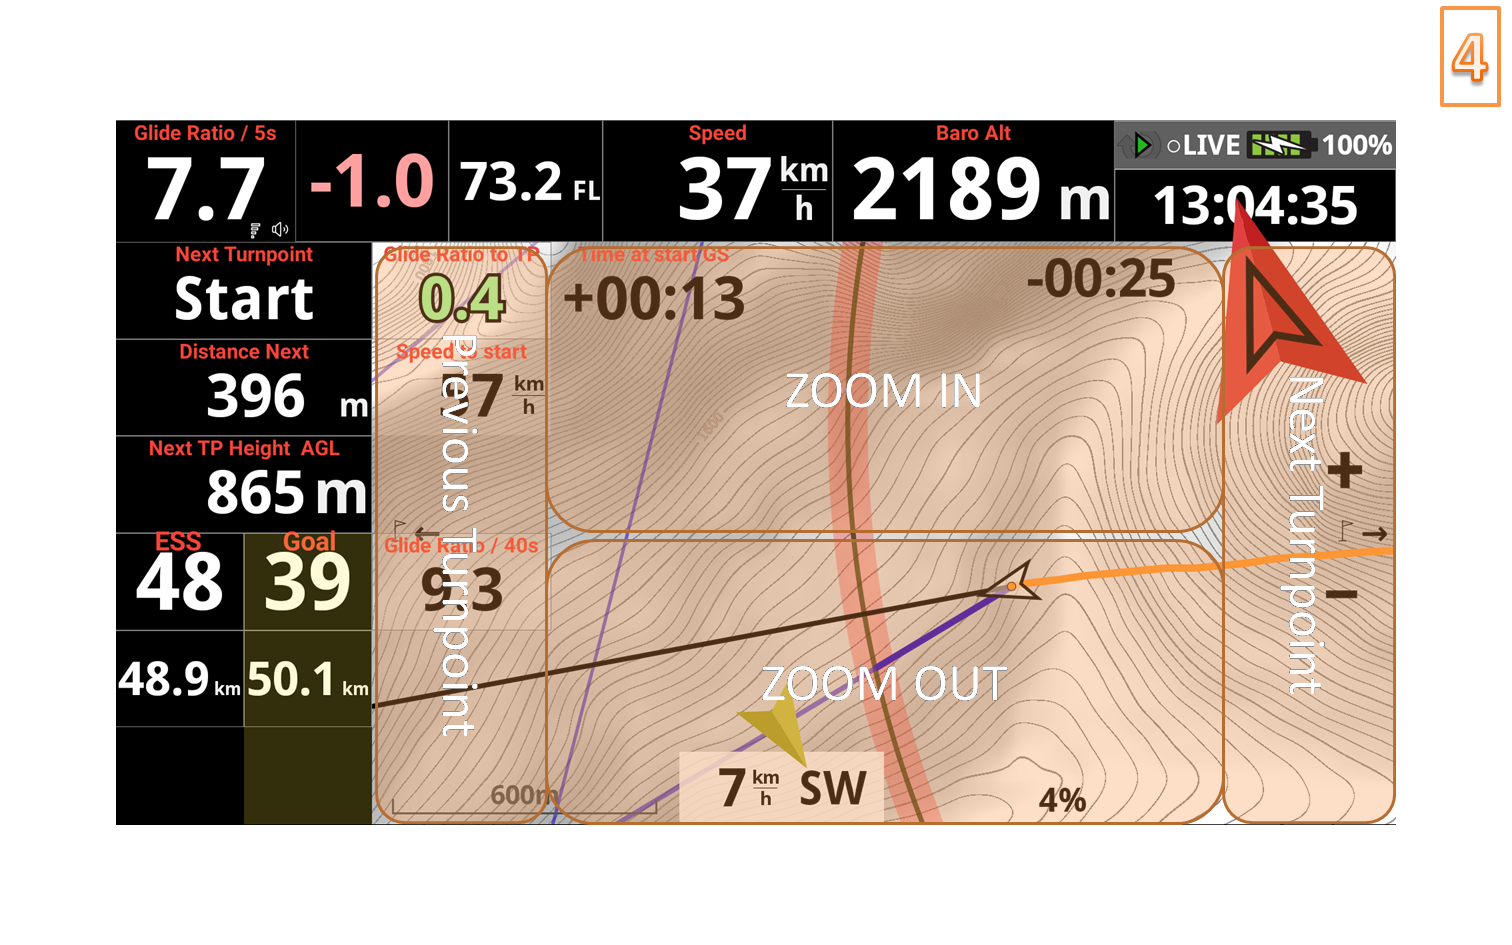
Clicking on the top half of the map (like clicking the “+” button) will zoom in; lower half, zoom out (equivalent to clicking the “-” button).
A long click on the left end of the map (like the long click on the F1 button) moves the navigation back to the previous turnpoint; the right end, towards the next turnpoint (equivalent to making a long click on the F2 button).
Clicking on the top half of the thermal assistant will increase screen brightness (similar to clicking the F1 button); lower half, brightness down (equivalent to clicking the F2 button).
The small widget on the bottom right is just the same thermal assistant with a different scale.
If you choose the Competition navigation type, additional competition-related widgets will be displayed depending on the task situation.
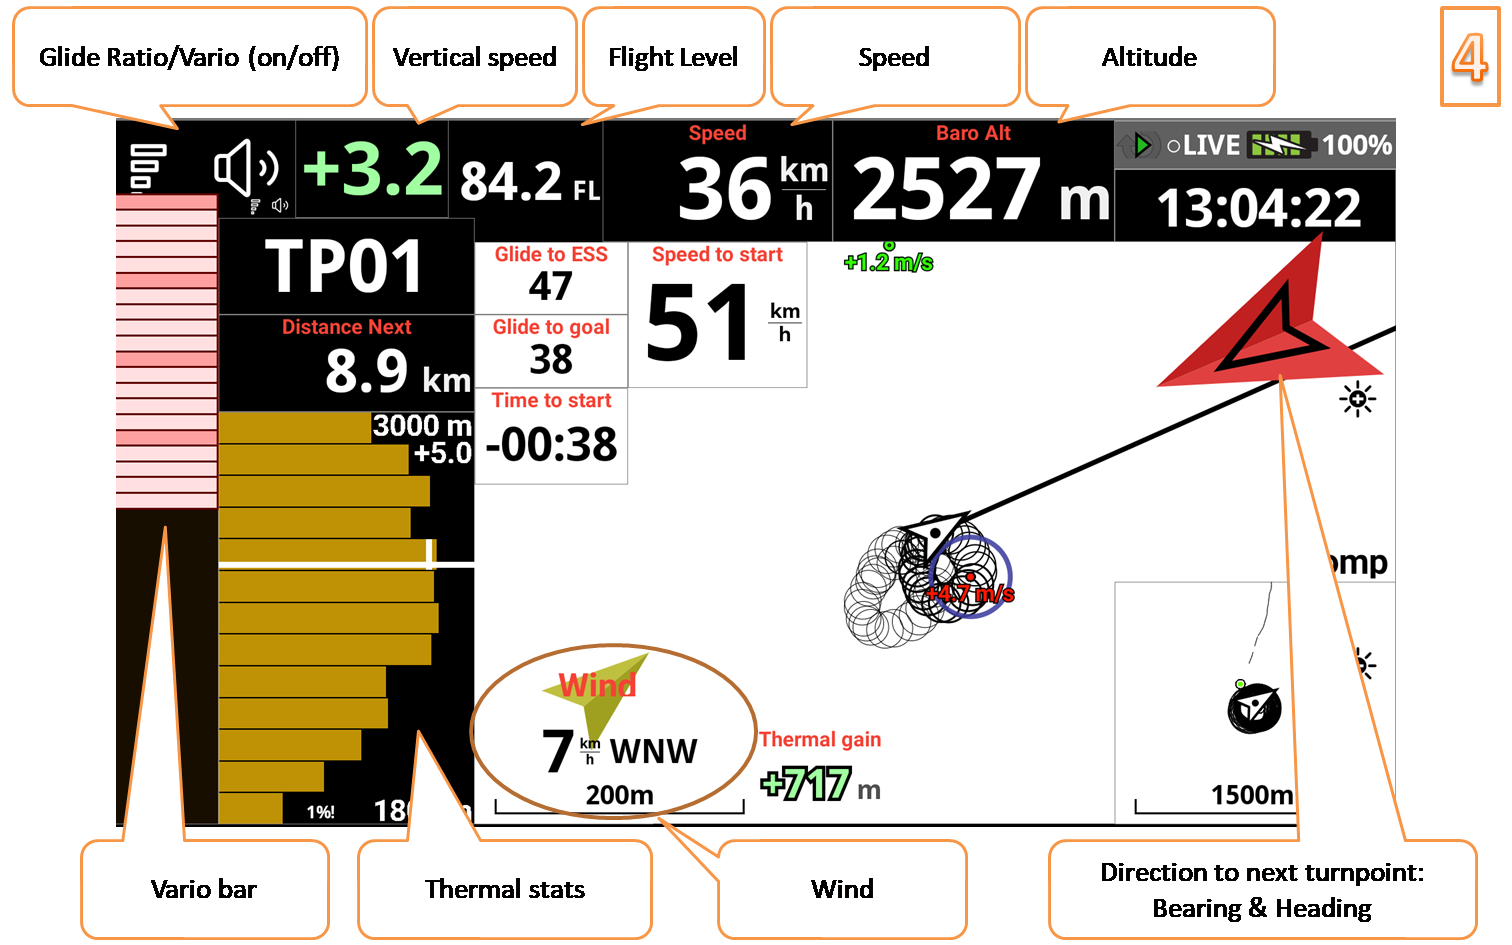
The specific competition page contains widgets that are directly related to the situation during the task.
Before the start, some start-related widgets will display so you can make sure you start at the ideal time and position. Keep an eye on the Speed to start widget which gives you some very interesting information.
Once you get close to the ESS, you’ll get other specific widgets giving you the ability to decide when to do the final glide.
Clicking on the top half of the map (like clicking the “+” button) will zoom in; lower half, zoom out (equivalent to clicking the “-” button).
A long click on the left end of the map (like the long click on the F1 button) moves the navigation back to the previous turnpoint; the right end, towards the next turnpoint (equivalent to making a long click on the F2 button).
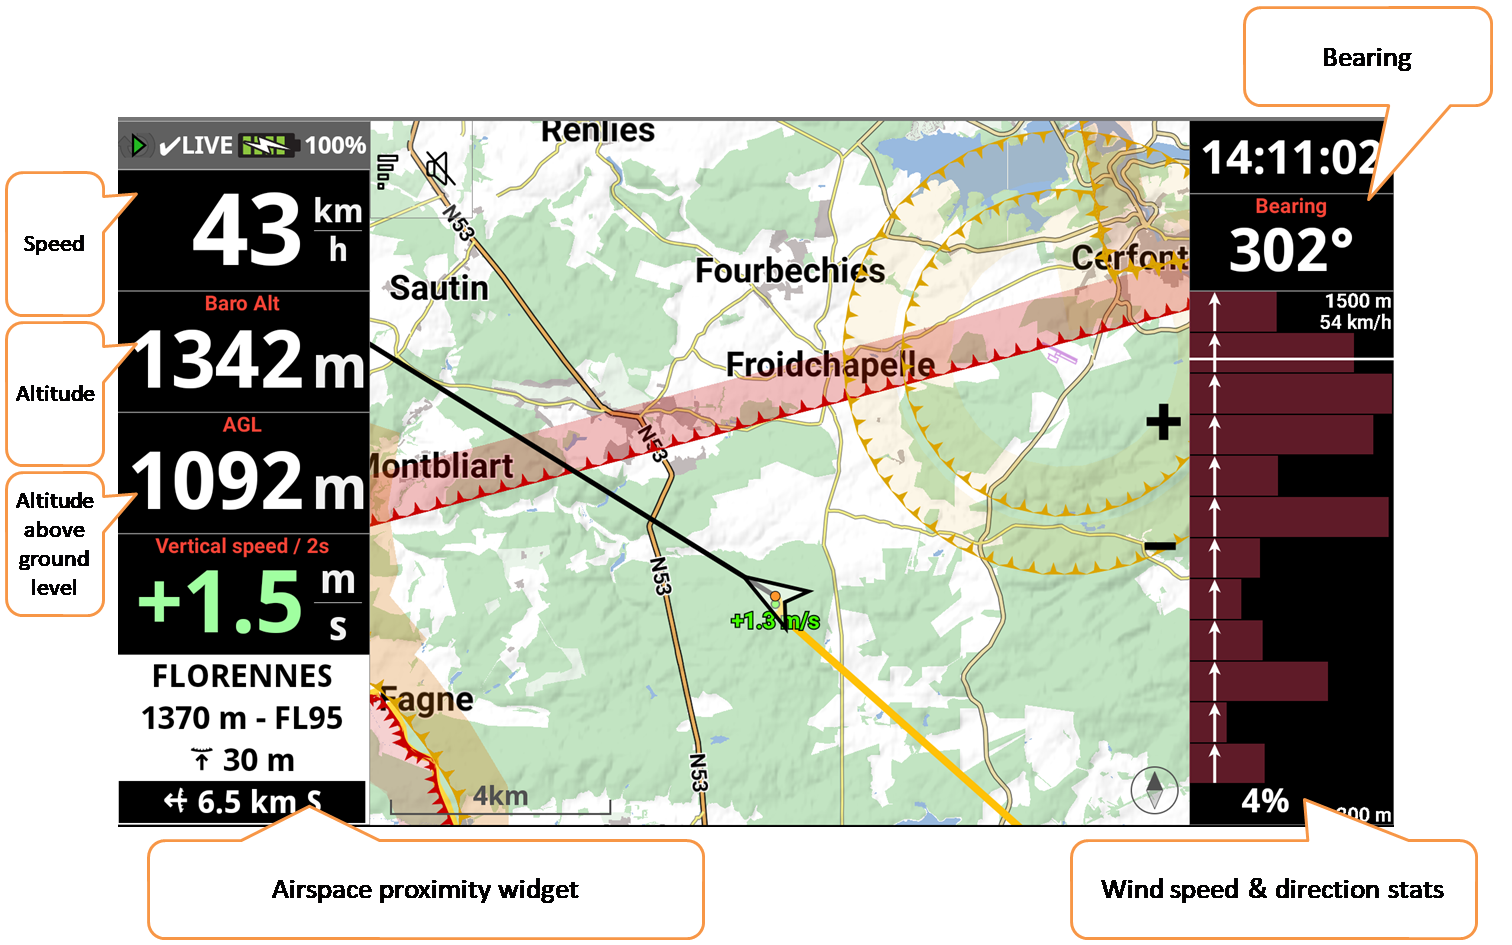
Airspace and vertical view page.
The map gives you a 2D view of the airspaces around you.
The vertical view gives you a third-dimensional view of the airspaces around you.
The proximity widget gives you specific information about the nearest airspace zones.
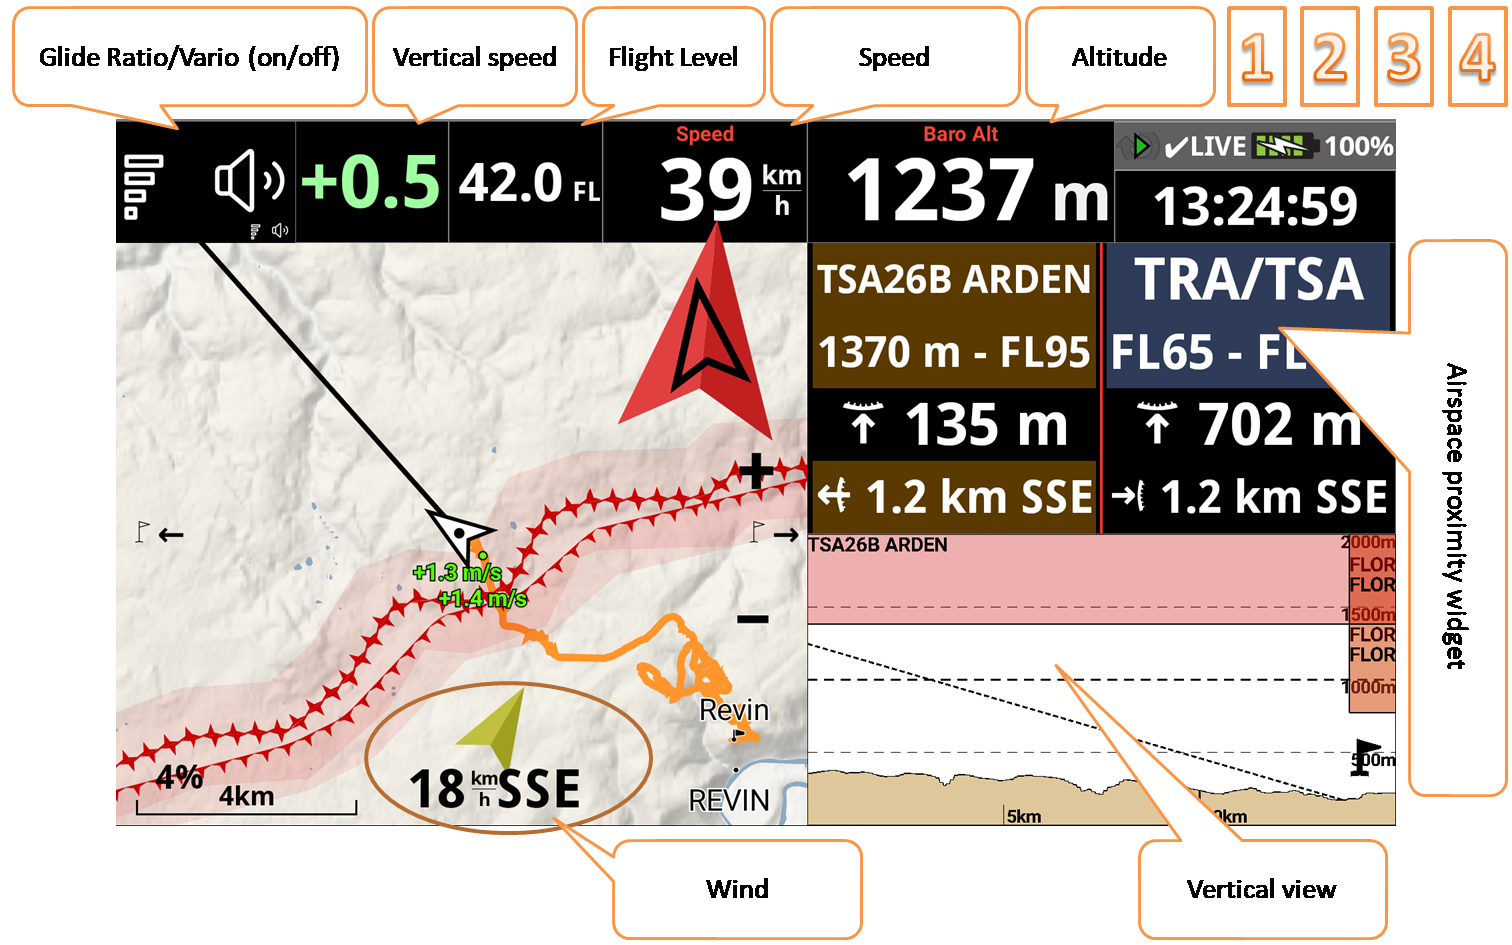
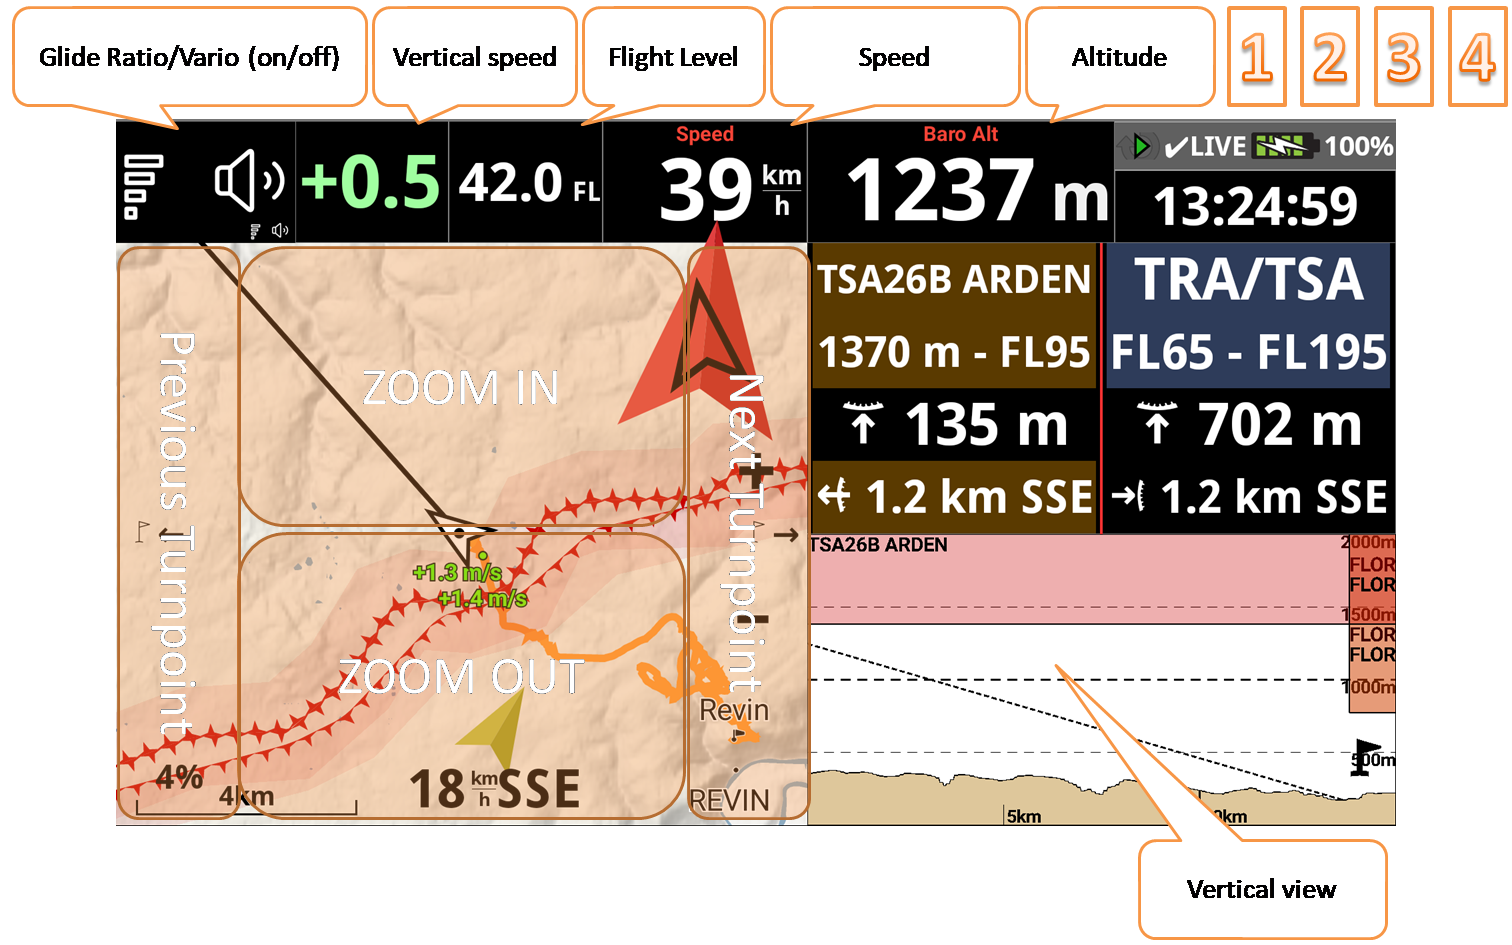
Clicking on the top half of the map (like clicking the “+” button) will zoom in; lower half, zoom out (equivalent to clicking the “-” button).
A long click on the left end of the map (like the long click on the F1 button) moves the navigation back to the previous turnpoint; the right end, towards the next turnpoint (equivalent to making a long click on the F2 button).
At the top, you can see the wind speed (average and gust) and direction of the 5 nearest weather stations. (Internet connection required).
When you receive a Livetracking message, this top section will hide the weather stations and display the messages.
To call a person in your address book, you must first configure the button (Menu/Customize) to associate it with the contact you want to call while flying. If you click and hold the button, XCTrack starts the call with the speaker.
On the right side you can see the task summary.
A long click on the camera button will launch the camera application.
A short click on the Brightness + or – widget will increase or decrease the screen brightness (similar to clicking the F1 or F2 key).

PARAMOTOR
Travel direction is always on top.
Altitude is based on pressure. It doesn’t require to be calibrated if you have an internet connection (it will get the QNH from the closest weather station).
Wind is calculated after you have flown each direction (360°) (with no power).
The green arrow corresponds to the wind direction relative to you. Example, with the arrow going up, it means tailwind.
Clicking on the top half of the map (like clicking the “+” button) will zoom in; lower half, zoom out (equivalent to clicking the “-” button).
A long click on the left end of the map (like the long click on the F1 button) moves the navigation back to the previous turnpoint; the right end, towards the next turnpoint (equivalent to making a long click on the F2 button).
Airspace and vertical view page.
The map gives you a 2D view of the airspaces around you.
The vertical view gives you a third-dimensional view of the airspaces around you.
The proximity widget gives you specific information about the nearest airspace zones.
Clicking on the top half of the map (like clicking the “+” button) will zoom in; lower half, zoom out (equivalent to clicking the “-” button).
A long click on the left end of the map (like the long click on the F1 button) moves the navigation back to the previous turnpoint; the right end, towards the next turnpoint (equivalent to making a long click on the F2 button).
BALLOON
Travel direction is always on top.
Altitude is based on pressure. It doesn’t require to be calibrated if you have an internet connection (it will get the QNH from the closest weather station).
Clicking on the top half of the map (like clicking the “+” button) will zoom in; lower half, zoom out (equivalent to clicking the “-” button).
.