This page describes several subsections of the Preferences menu of XCTrack. Check the other sections to learn more about the different features of XCTrack.

Videos have been produced to explain the different features of XCTrack Pro. Check the videos tuto page to learn quickly how to use XCTrack Pro.
Click on the + sign to read the details.
AIR³ is provided with an accurate GPS and powerful pressure sensor.
We recommend to always use the internal very performing pressure sensor of the AIR³. Watch and listen to the videos comparing AIR³ vario and other flight instruments.
However, you still have the opportunity to connect an external sensor.
WARNING: FAI CIVL compliance
Note that if you use an external sensor for GPS and/or pressure data, you are not following FAI CIVL rules and your IGC file will not be FAI compliant.
Once you have connected an external sensor (GPS and/or pressure), you can choose which sensor has a higher priority (see below).
If you use an external sensor with a higher priority than the internal sensor, your IGC file will not be FAI compliant.
If you have both an internal sensor and a lower priority external sensor enabled, your IGC should be FAI compliant. However, if your internal sensor has a temporary problem (no GPS reception) for more than 30 seconds, XCTrack will try to use the secondary (external) sensor. In this case your IGC file will not be FAI compliant. If it is important for you to have a valid FAI-compliant IGC file, it is recommended that you enable only internal sensors for GPS and pressure data, and check that your settings meet FAI CIVL requirements. Note that you must obtain a GPS position (good satellite reception) to validate your use of internal GPS.
Read more about the use of several sensors and their priority below.
Read also more details about the GPS/Baro source settings in the Action buttons subsection of the XCTrack Pro Widgets manual


Connection
Internal Sensors
First, select which data will be provided to XCTrack as internal sensors. Click on the 3 dots to the right, then click Properties to open the Internal Sensors selection page.
Disable the sensors you do not want to use as internal sensors.
Compass Usage: Please see below for special notes on using the internal compass versus the heading calculated by XCTrack based on bearing and wind. If you are using the internal compass, don’t forget to calibrate it by making big 8.
To use the internal Fanet/Flarm module of the AIR³+ version, enable “Fanet/Flarm data”. Note that the internal Fanet/Flarm module should only be activated by either XCTrack OR XC Guide, not by both applications. More details about the activation of the Fanet/Flarm module with XC Guide here.
Should you need to calibrate the internal pressure sensor, click on “Baro Calibration”.
To know more about GPS TIME FIX, read below this specific feature.


External sensors
If you want to use an external sensor, first click “ADD” and then select the type of sensor you want to connect.


If you select a Bluetooth sensor and Bluetooth is not enabled on your device, XCTrack will ask you to be allowed to enable Bluetooth.
XCTrack will then list the different devices that have been paired and the available Bluetooth sources. If you haven’t paired the device yet with the AIR³, pair it before selecting it.


Once the new sensor is selected, click on the 3 dots and select “Properties” to select what data is available from this new sensor. Keep what you need activated with this sensor.
If you have multiple sensors connected for the same function, you can sort the priorities. Be aware of FAI CIVL compliance as mentioned above.


Color dot indicates connection status: red disconnected, green connected.
Within the list of available data for a specific sensor, you can identify if XCTrack receives data when the name is bold. If the name is bold and green, this means that XCTrack also uses the data from this sensor.
With this following example, XCTrack is connected to the sensor (Green dot), receives data from GPS (bold) but doesn’t use it (not green), receives and uses the data from Baro and Fanet/Flarm (bold and green).
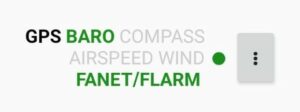


XCTrack can parse both Flarm ($PFLAA) and Fanet ($FNNGB) strings.
Read more details about the way to use XC Guide as TCP external sensor in the XC Guide specificities for AIR³ page, providing XCTrack with different information that can be displayed on XCTrack map.
Don’t forget to enable “Fanet/Flarm data” as available data in the TCP client properties so that XCTrack understands the information provided by XC Guide.
Once you have activated an external sensor, check the Status line to make sure it is working properly.

FANET/FLARM
AIR³+ includes a FANET/FLARM module allowing XCTrack to transmit and receive data to FANET and FLARM devices.
Once the module is enabled, XCTrack communicates witht the module in order to display the validity of the Flarm licence and the Flarm/Fanet id. Check how to freely upgrade the FLARM licence through XC Guide in the XC Guide specific AIR³ features page.
Once you have activated the FANET/FLARM module, check the Status line to make sure it is working properly.
![]()

GPS
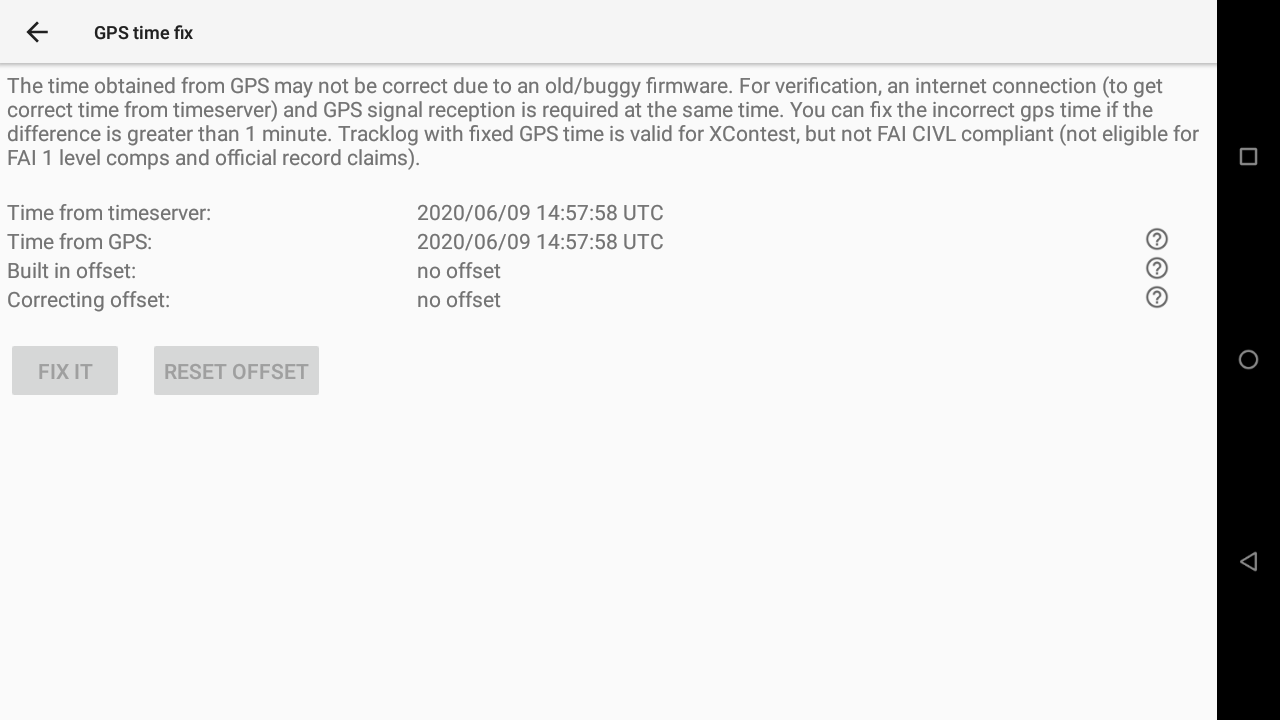
GPS time fix feature is available to solve the GPS week number roll over bug.
Just click on the button to use it.

Make sure you get a GPS signal and an internet connection.

The time obtained from GPS may not be correct due to an old/buggy firmware. For verification, an internet connection (to get correct time from timeserver) and GPS signal reception is required at the same time. You can fix the incorrect gps time if the difference is greater than 1 minute. Tracklog with fixed GPS time is valid for XContest, but not FAI CIVL compliant (not eligible for FAI 1 level comps and official record claims).
Wind and Airspeed
By default, XCTrack computes the wind (speed and direction) during thermalling. From wind and ground speed XCTrack estimates the airspeed.
External devices can provide these values to XCTrack. When Airspeed and/or “Wind speed and direction” is/are enabled, XCTrack will used these data instead of the computed ones. XCTrack will just grab the values provided by the external instrument.
Some external devices report wind direction in opposite manner. You can reverse the wind direction by selecting “Rotate wind direction by 180 degrees”.

Compass
By default, XCTrack uses the Bearing (track) direction thanks to the GPS, the wind speed and direction, to compute the Heading direction.
By enabling “Compass” in the internal sensors or in an external sensor, XCTrack will use the information coming from such sensor to display the Heading, instead of that computed Heading.
Note that the Compass usually provides heading information with some small delay, while the Heading calculated from wind and ground speed is almost instantaneous. Therefore, you may see some delay while themalling. Prefer the computed Heading unless you have a good reason to not do so.
Both widgets “Digital Compass” and “Compass and Wind” in the navigation page of the XCTrack Pro widgets manual are influenced by this setting.
For each widget displaying a map, such as the Thermal Assistant widget in the Air page, the XC map widget of the Xcontest page and the Task Map widget of the Competition page of the XCTrack Pro widgets manual, the pilot arrow corresponds to the Heading, while the solid line in front corresponds o the Bearing. For each of these widgets, you can increase the size of the Pilot arrow in order to clearly identify the difference between the Bearing and the Heading. By enabling “Use internal compass”, you will use the internal compass for Heading instead of the computed Heading based on the wind.

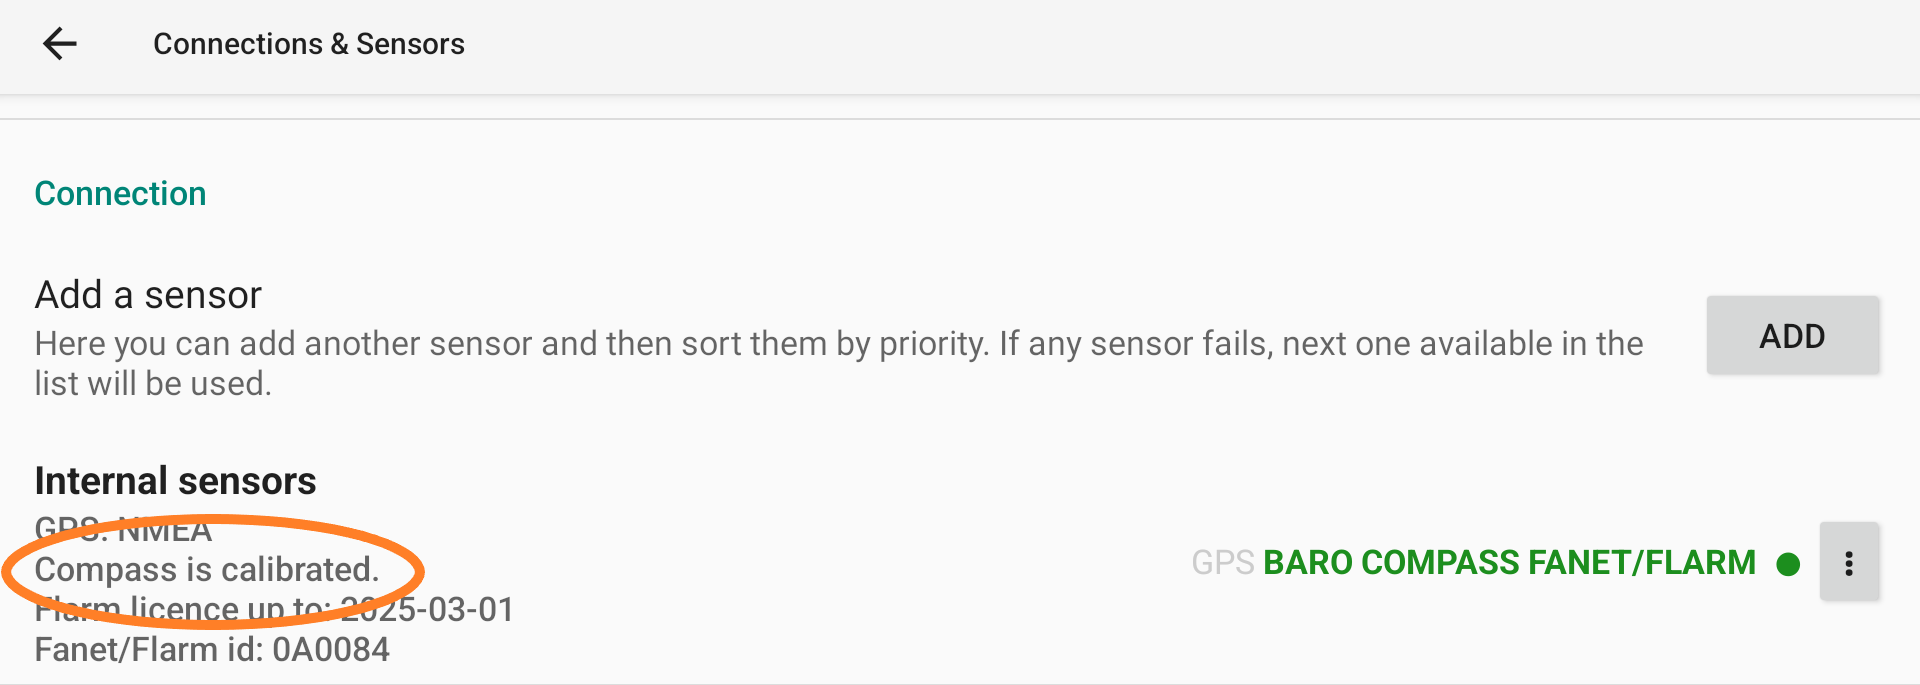
To use the internal compass, you need to calibrate it.
If it is not calibrated, XCTrack will warn you and will indicate the percentage of calibration. You can calibrate the internal compass by making 8-like figures to improve calibration.
Once calibrated, XCTrack indicates “Compass is calibrated”
Atmospheric pressure sensor
If you have connected an external device with a pressure sensor, you can choose if you want to use the internal or the external barometer.
Read above the consequence on FAI CIVL compliance above if you are using an external sensor.
If you have activated the external barometer and there is no baro data available, XCTrack will warn you with the following sound unless you have deactivated this option in Menu/Preferences/Sound/Acoustic vario.

Baro Calibration (pressure sensor)
Choose Baro Calibration to calibrate the baro sensor.
Pressure displays the direct info provided by the sensor in Pa. Just below the pressure, the frequency of pressure information received by XCTrack per second.
Altitude is the direct conversion of the standard pressure into altitude. The second value is the mean value and variant computed from raw values for the last 20 seconds.
The Smoothing slider allows you to apply a low pass filter on the data to avoid taking into account data coming from the sensor that are not coherent. The value corresponds to the weight of the low pass filter (by lowering the number, you limit the possible wrong values, but you also limit the vario sensitivity in case of big lift).
Lift is the resulting altitude difference per second computed after smoothing.

Acoustic vario
Directly enter the Acoustic vario menu (see also Menu/Preferences/Sound/Acoustic vario explained in the Sound section above).

This feature in previous versions was located in Menu/Preferences/Testing & Debug/Configuration. It only allowed the user to export the whole configuration and import the same. Often, users were importing the whole configuration to get a different page layout, but didn’t realize that the whole configuration was imported. This generated a lot of issues such as external sensor settings, specific sound settings, etc.
With this new feature, it is now possible to export only the pages and decide what to do when importing it. Unless the configuration comes from the same device, it is highly recommended to only export and import the pages. Not the rest of the configuration.
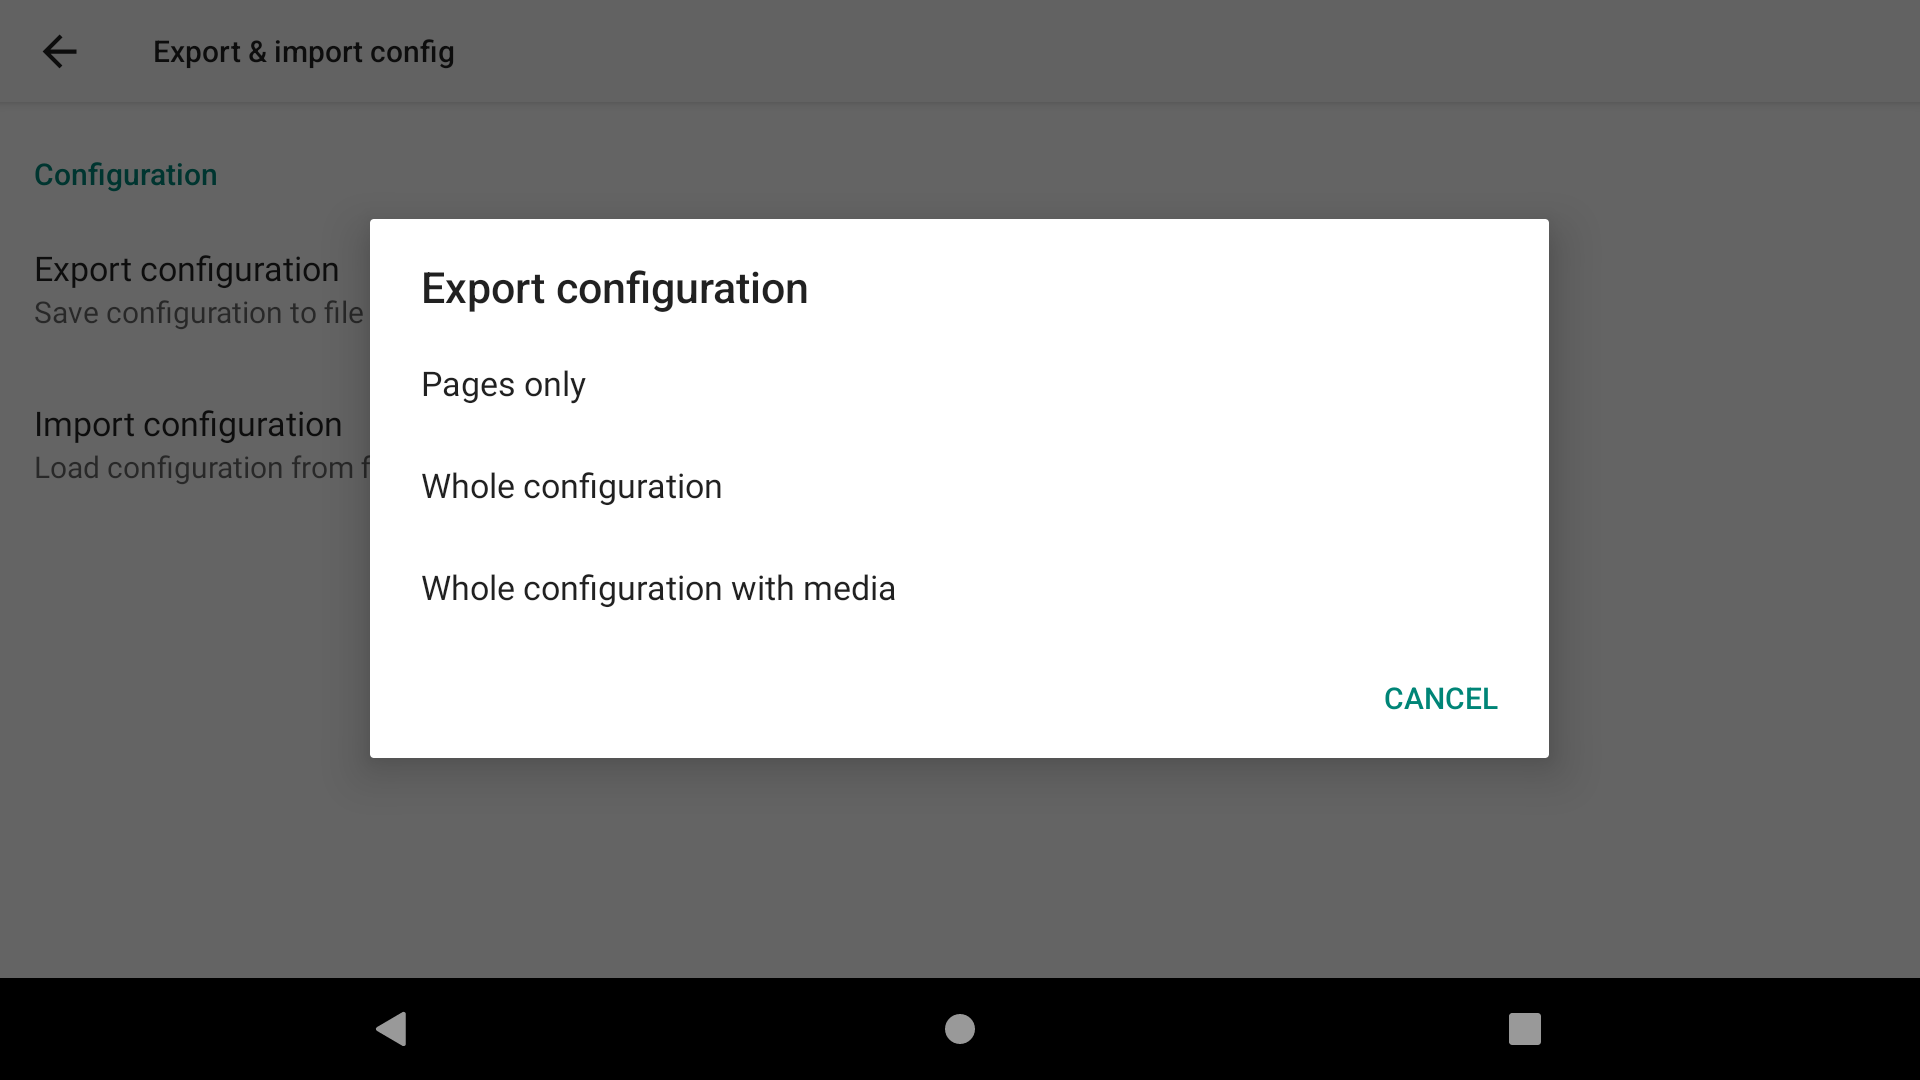
When you enter the menu, you can choose to export your configuration or import a configuration.
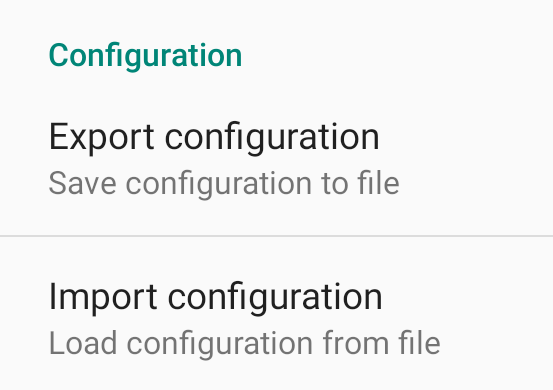
Export configuration
Choose if you want to only export the pages, the whole configuration or the whole configuration with media (sound files).
In all cases, the file exported will be located in the Config subfolder of XCTrack.

If you have selected to only export the pages, the file name exported will contain “pages”. Once exported, you can click on the “share” button to directly send your files to the desired person. You can for example send it with Whatsapp, Gmail, Messenger or any other application that you would have installed.

If you have selected to export the whole configuration, the file name exported will contain “backup”. Once exported, you can click on the “share” button to directly send your files to the desired person. You can for example send it with Whatsapp, Gmail, Messenger or any other application that you would have installed.
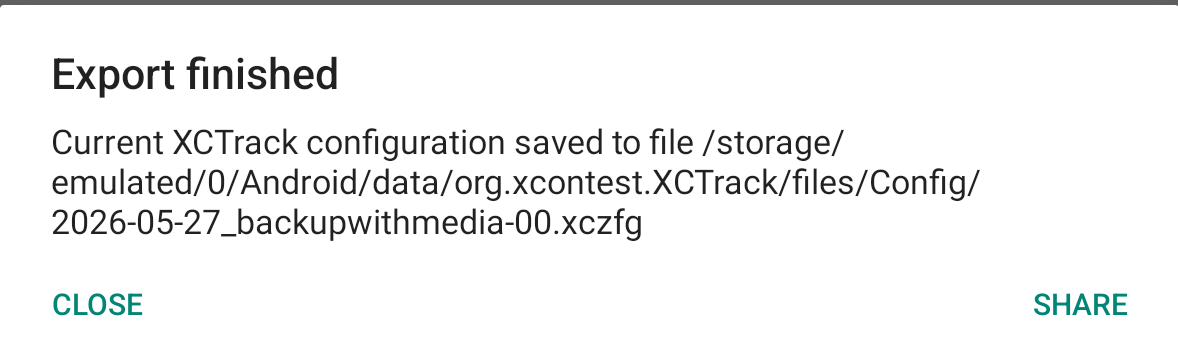
If you have selected to export the whole configuration with media, the file name exported will contain “backupwithmedia” and the extension will be xczfg as it is a compressed file. Once exported, you can click on the “share” button to directly send your files to the desired person. You can for example send it with Whatsapp, Gmail, Messenger or any other application that you would have installed.
Import configuration

If you click on Import configuration, XCTrack will check if there is a configuration file in the Config subfolder of XCTrack.
Select the file you want to import. If your configuration file is not located in the Config subfolder of XCTrack, click on “Other” and select the file where it is located.

If you have selected a configuration file with Pages only, the first option is disabled. You can choose to replace the pages with the ones that are included in the configuration file, or to add these pages.

If you have selected a configuration file with the whole configuration, you have 3 options. You can choose to replace all, pages and every settings of XCTrack. This will overwrite everything. The second option is to replace the pages only with the ones that are included in the configuration file. The third option is to add the pages to the ones you currently have.

By replacing all, all custom configuration will be reset.

If you select to replace pages only, your pages will be replaced. Other configuration won’t be changed.

If you select to add pages, nothing will be overwritten.
Most of the features indicated in this section are self explained.
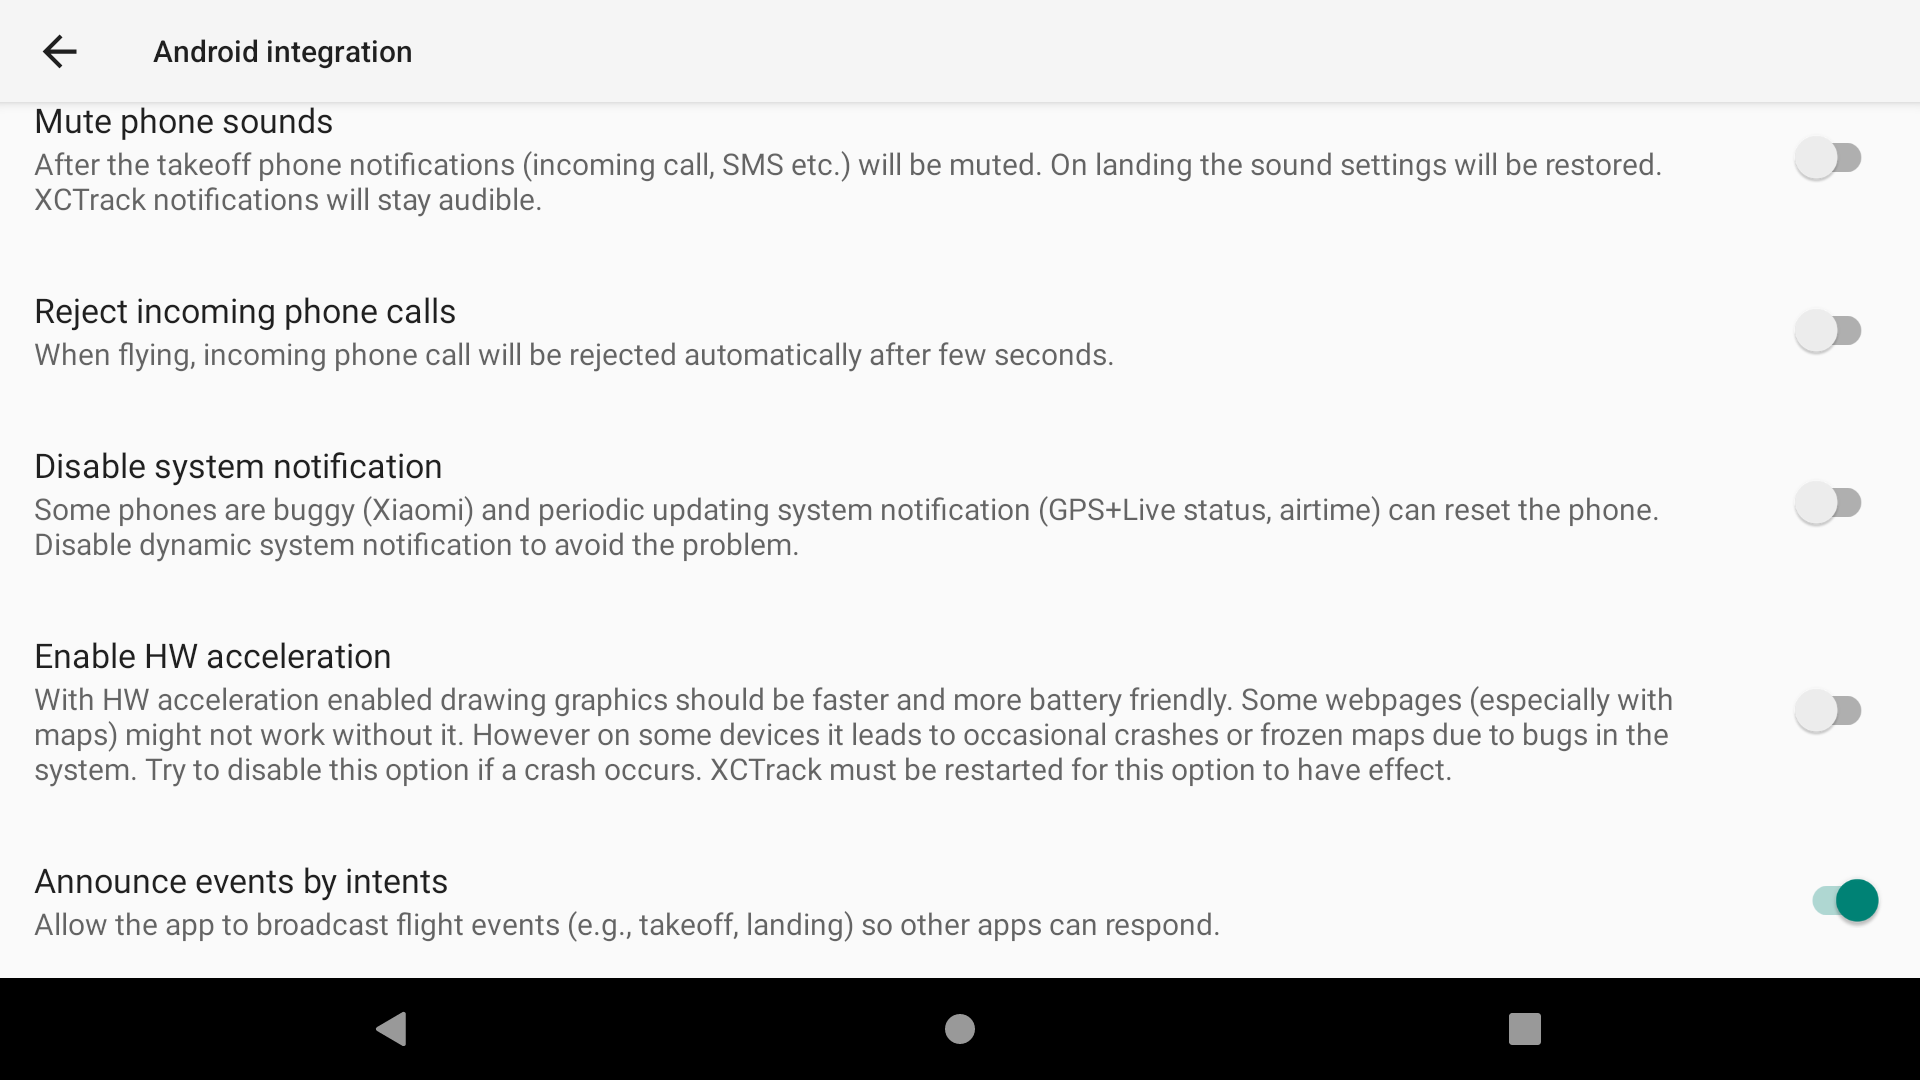
Enable HW acceleration
With HW acceleration enabled drawing graphics should be faster and more battery friendly.
Some webpages (especially with maps) might not work without it. However on some devices it leads to occasional crashes or frozen maps.
Try to disable this option if a crash occurs. XCTrack must be restarted for this option to have effect.
Announce events by intents
Allow the app to broadcast flight events (e.g. takeoff, landing). The AIR³ XCT Addon heavily relies on events sent by XCTrack. Make sure this option is enabled so that AIR³ XCT Addon can properly respond to these intents.
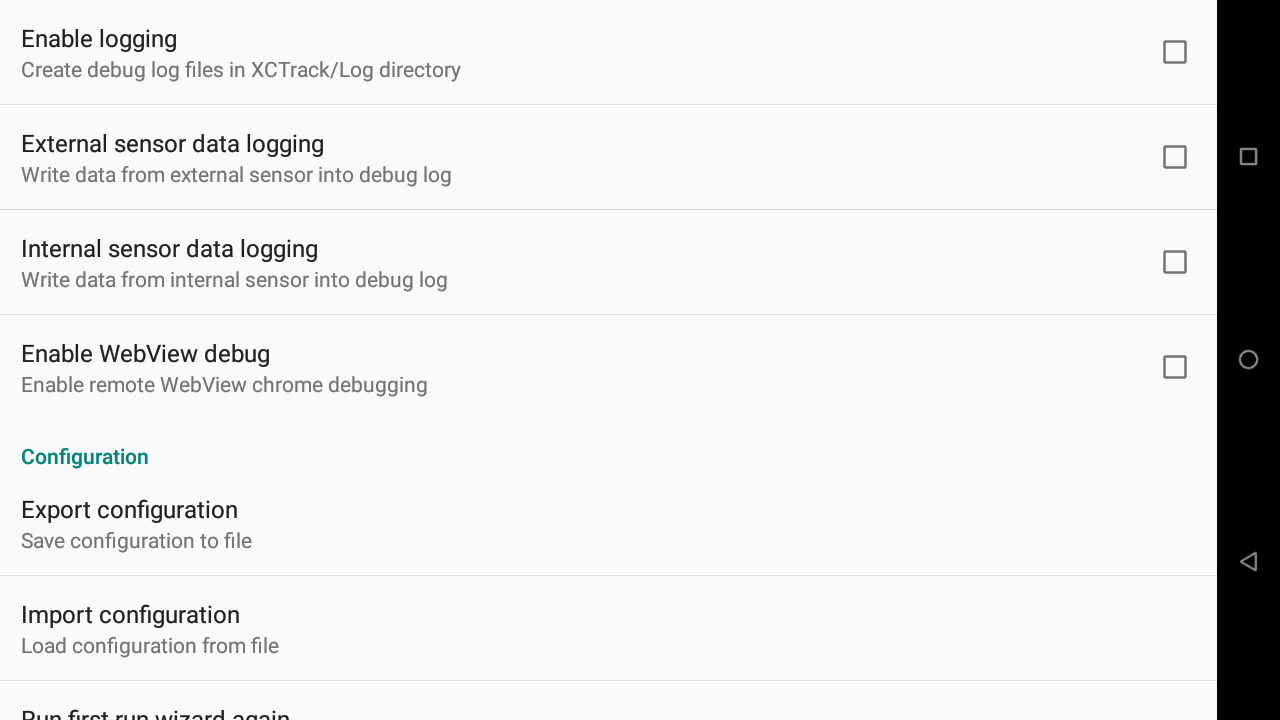
The testing and debug section is mainly used for advanced users. Most of the features are self explained.
Configuration
As of XCTrack 0.9.8.7, the export and import configuration features are located in Menu/Preferences/Export & Import config.
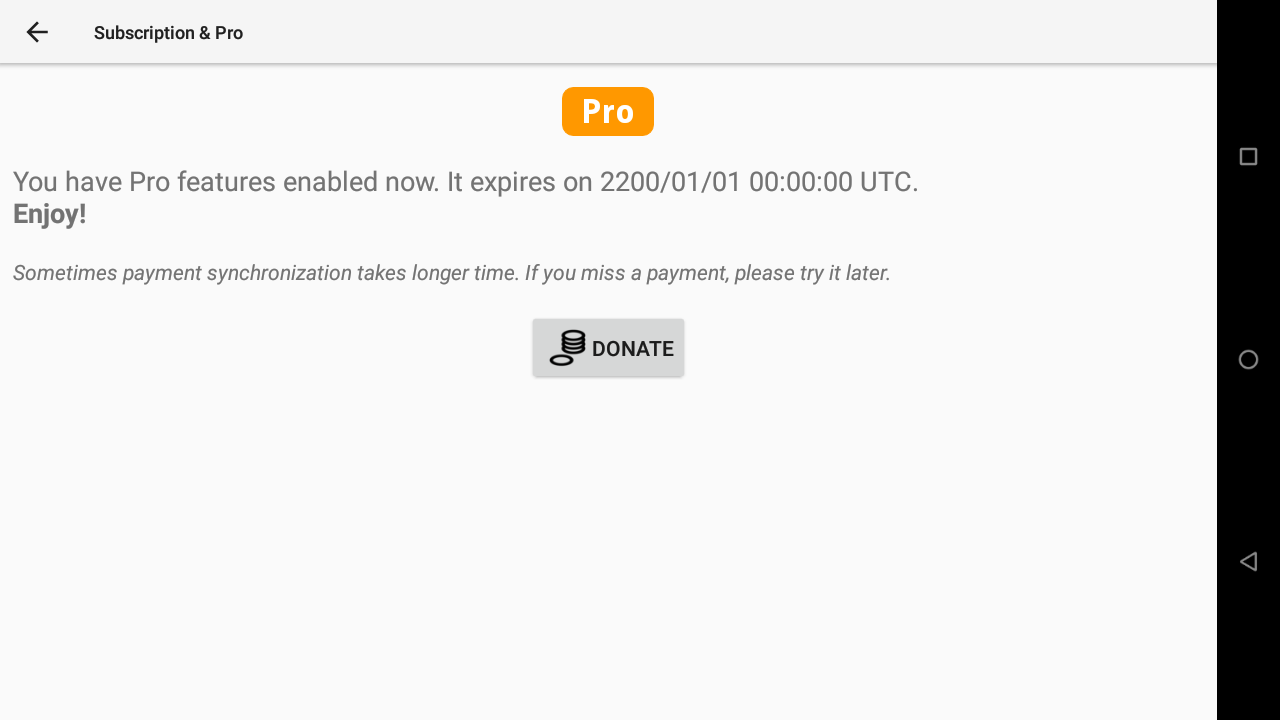
AIR³ is provided with a perpetual licence of XCTrack Pro. The licence is linked to the instrument and not the pilot.
If you like XCTrack, consider supporting further development with a small amount of money. Click on “Donate” and follow the steps.
Note that if you want to subscribe to get the Pro version on a different device, the subscription will be linked to the pilot. Make sure your credentials are correctly entered in the Pilot section (see above).
XCTrack Pro contains many features that are not available in XCTrack (standard). There will be more and more additional features available to the Pro version in the coming releases. These new features will be available to the pilots that have subsribed to the Pro version through the upgrades.
If you are using XCTrack with another instrument and would like to get the Pro version, you can get the Pro version by subscribing. Check your Pilot’s credentials in the Pilot section detailed above (Menu/Preferences/Pilot).

Each euro will give you access to 1 month of XCTrack Pro.

Next section