fbpx
December 15, 2021

XC Guide specificities for AIR³ & XCTrack

XC Guide is probably AIR³’s best “additional app” for AIR³. You can either use it as a stand-alone application, using it as a flight computer, or use it alongside XCTrack, in the background, to extend the functionalities of any AIR³ or to communicate with AIR³ FANET/Flarm module included in AIR³ 7.3+.

You can find more details about the use of XC Guide on XC Guide website.

You can find hereunder more details about the use of XC Guide with AIR³. Check particularly the section for AIR³ 7.3+ hereunder. XC Guide communicates directly with the internal FANET & FLARM module of AIR³ 7.3+ and provides many features related to this module.


Use XC Guide with any AIR³ (or any XCTrack)

You can get OGN and other livetracking pilots directly on XCTrack map (Input) and/or be tracked in different livetracking platforms through XC Guide, including OGN (Output).

Input

Read more details about XC Guide that can be used to get OGN and other livetracking pilots directly on XCTrack map through this FAQ: https://www.fly-air3.com/en/ufaqs/see-flarm-devices-and-others-around-you/. This is valid for OGN, but also for Livetrack24, Skylines, Flymaster, Airwhere, XC Globe, ADS-B traffic, Fanet, Flarm, SPOT & Garmin inReach and other Livetracking platforms integrated after the writing of this guide.

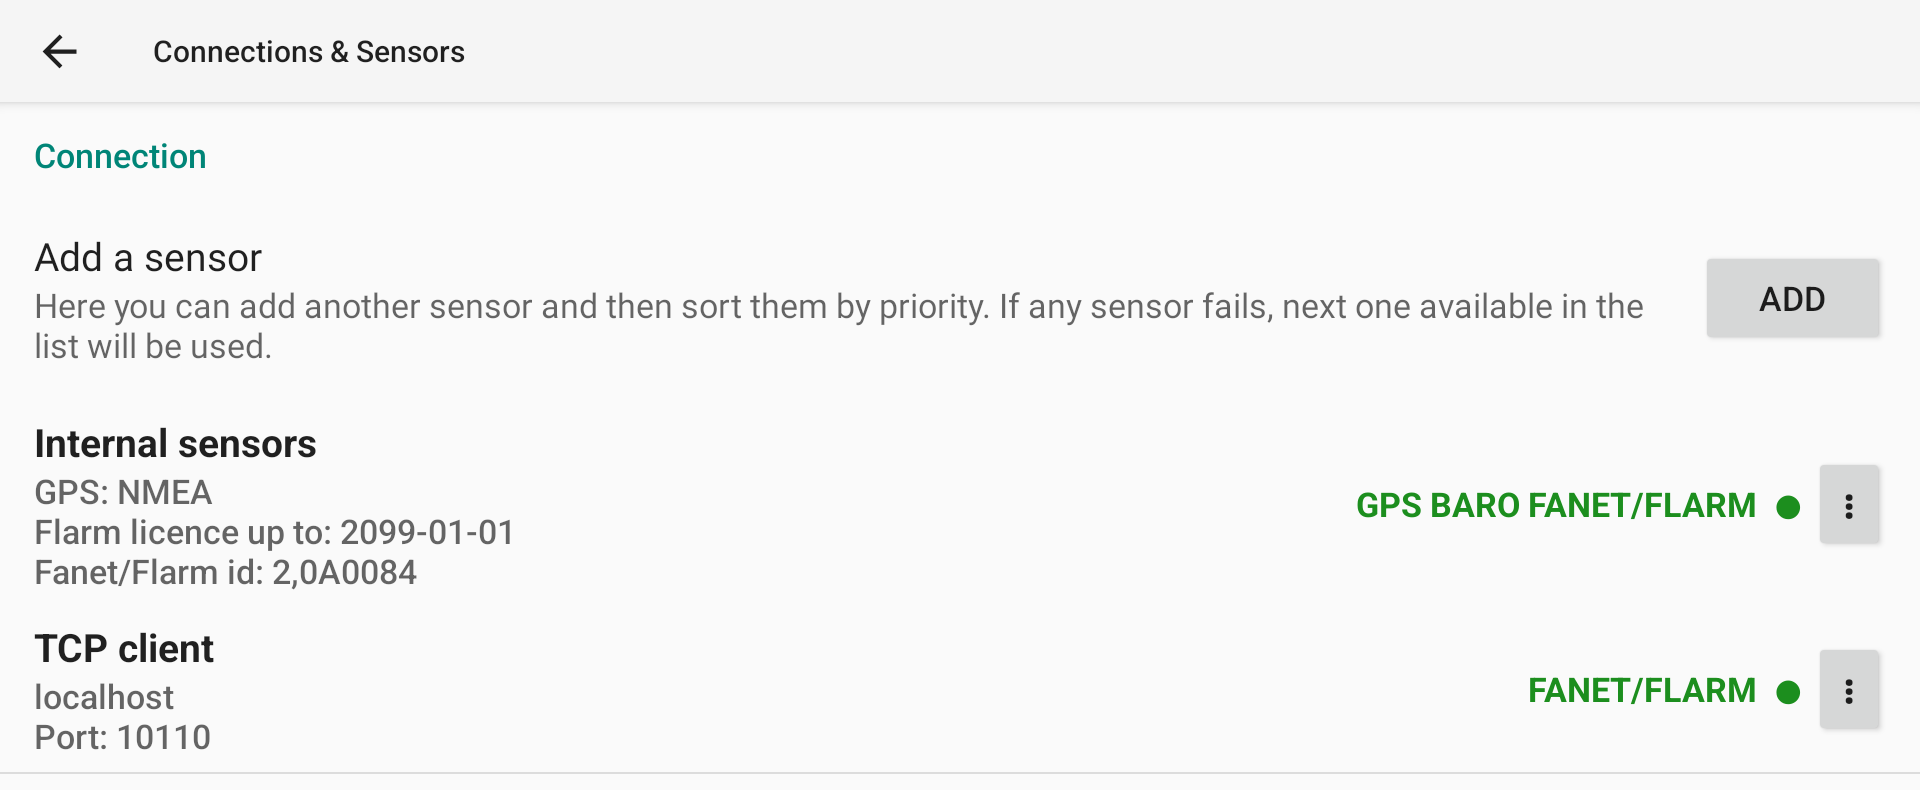
To let XC Guide and XCTrack communicate with each other, you have to set XC Guide as a localhost server for XCTrack and configure XCTrack to get input information from an external TCP sensor. XCTrack will display aircrafts provided by XC Guide directly on the map.


To use this configuration, set XC Guide the following way:

  • Settings/System: enable “Start on bootup” and enable “Start minimised”. This is not mandatory for the system to work but having XC Guide started on bootup will avoid that you forget to start it and “Start minimised” will avoid that you need to hide the window if you mainly use XCTrack.

  • Settings/System/Localhost server: enable “Localhost server” and make sure to use “Flarm protocol to XCTrack” and “Flarm emulation port” set on 10110.

  • We also recommend to enable Settings/Google map/Map detail/ Airtime saver mode in order to avoid downloading maps while it is not necessary. Otherwise, you will spend data for no reason.

In XCTrack,

  • go to menu/Preferences/Connections & Sensors/Connection/External sensors and enable “Network connection (TCP client)”
  • Check that the Network port is set to 10110

In AIR³ Manager,

  • Menu/Settings: enable “Delay XCTrack launch on boost” (Version 2.05 or higher).

Once you will restart the unit, XC Guide will be launched automatically and be hidden, XCTrack will be launched automatically once XC Guide has been initialised correctly and will get data provided by XC Guide.

Don’t forget to configure in XC Guide the Livetracking pilots you want to track. Check these in Settings/Live tracking/


Commercial aircrafts could also be detected by XC Guide and transferred to XCTrack as localhost server, in order to see them on XCTrack maps.

Here is the traffic one could see with Flightradar24:

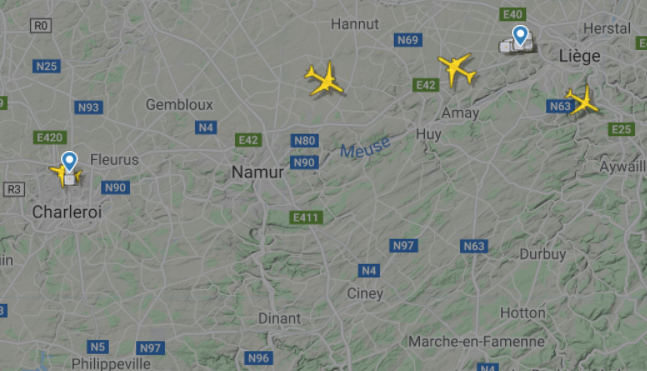
Set the Opensky ADS B filter in the Livetracking menu of XC Guide. Once XC Guide has a GPS fix, it will display the aircrafts around and/or transfer them to XCTrack.


Output

Read more details about XC Guide which can be used to be seen on OGN through this FAQ: https://www.fly-air3.com/en/ufaqs/be-seen-on-the-open-glider-network/ . This is valid for OGN, but also for Livetrack24, Skylines, Airwhere and XC Globe. Enter your dedicated credentials and XC Guide will take care of sending the info to the desired platform.


XC Guide for AIR³ 7.3+

XC Guide has been customized to communicate with FANET/Flarm Module of AIR³ 7.3+.

IMPORTANT: the FANET/Flarm module should only be activated either by XCTrack or XC Guide, not both. If you activate the FANET/Flarm module within XC Guide, make sure it is not activated by XCTrack.


To directly access AIR³ related settings, click on “AIR³” logo in the information window.


You can also go to the XC Guide settings and select “Connected devices”.


Select Fanet & Flarm settings. You can enable or disable the AIR³ FANET Module and select the type of module: AIR³ 7.3+ V1 uses “Fanet + module (vers 1) and AIR³ 7.3+ V2 uses the Flarm Horizon & Fanet module.

AIR³ 7.3+ produced in december 2022 and later are V2. Previous versions of AIR³ 7.3+ are V1.

Once activated, AIR³ sends Fanet and Flarm data for other aircrafts around, receives Fanet data for V1 and receives Fanet and Flarm data for V2.


XC Guide allows to take advantage of all Fanet features.


Click on the pilot to get a contextual menu


Send preset or custom messages, SOS or retrieve requests.

USE XC Guide to update the FLARM licence expiration date

WARNING!: Use XC Guide V 523 or up!

Before going further, make sure to have the latest version of XC Guide.

Check here to know how to upgrade apps.

There is a difference between using the Flarm module while flying and the process of upgrading the Flarm license. You can use the Flarm module with either XCTrack OR XC Guide. However, it should be used by ONLY one application at a time, not both. If you are using the Flarm module with XCTrack while flying, it means that you have disabled the module in XC Guide. In this case, to upgrade the Flarm module license, you must first deactivate the module in XCTrack and then activate it in XC Guide. See above on this page how to activate the module within XC Guide.

To upgrade the FLARM licence, click on the FLARM LOGO in the info window and follow the steps. (Note: a new FLARM licence file with updated expiration date is available 1-2 months before expiration date).

Warning 1: make sure the module is not activated by both XCTrack and XC Guide. To quit properly XCTrack, you need to quit XCTrack from the XCTrack menu.

Warning 2: XC Guide must be started manually, not hidden (XC Guide Settings/system/Start on boot up and Start Minimized must not be enabled).

Warning 3: Make sure to have activated the right module. Version 1 corresponds to AIR³ 7.3+ sold from 12/2021 up to 11/2022. Version 2 (Flarm Horizon & Fanet) corresponds to AIR³ 7.3+ sold from 12/2022.

Warning 4: If the module has been activated by both XCTrack and XC Guide, it may be “stucked”. The only way to solve this is to restart the unit.

Warning 5: If you encounter any difficulties during the process, close the application and restart the unit. This may help to solve the problem. Re-read all previous warnings carefully and make sure you follow all steps correctly.

If you have downloaded the FLARM licence file, you can select a local file that you have previously copied in Android/data/indysoft.xc_guide/files/Feeds. Otherwise, use “Download firmware” to directly get the licence file (internet required).

Once XC Guide has loaded the licence file, you can start the update process.

Watch the video in the quick tuto videos’ page, showing how to upgrade the Flarm licence through XC Guide.

If you still do not succeed to upgrade the Flarm licence after following the previous advices,
1) enable logging within XC Guide (go to settings/system and enable diagnostic mode – restart XC Guide)
2) send us your IMEI, a video and the log file created while making the video showing the issue (through whatsapp or telegram).


XC Guide for any AIR³ 7.3

By default, it sets F1 short press button to screen britghtness change (toggle from darker to system setting, like an on/off switch), F2 short press to App layout change, F1 long press to Map zoom in and F2 long press to Map zoom out.

If you want to modify these settings, open settings and go to “Connected devices” menu. Then click on the iTag & AIR³ F1 F2 actions.

Click on the action you want to modify.

Select the desired option.

During your flight, use one of the 4 customized actions.


en_USEnglish