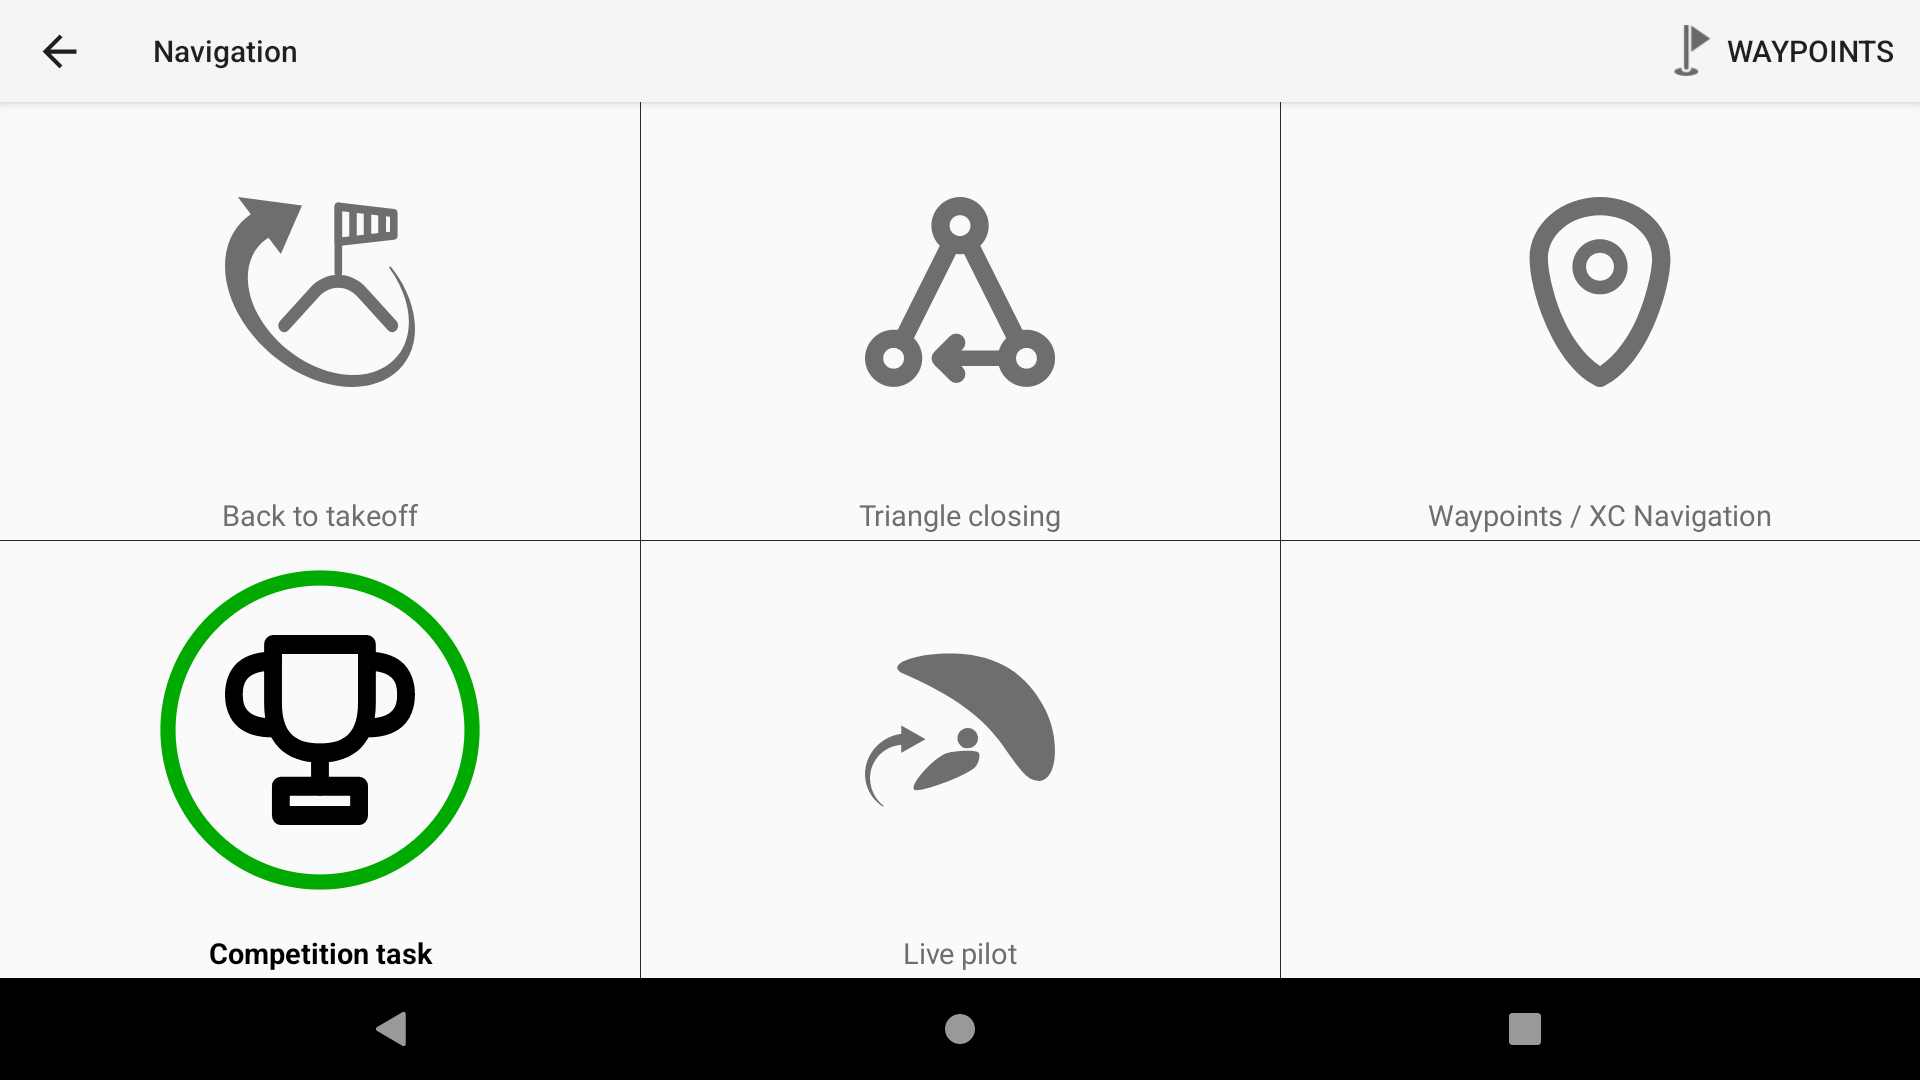
This page describes additional Navigation menu of XCTrack. Check the other sections to lean more about the different features of XCTrack.
Videos have been produced to explain the different features of XCTrack Pro. Check the videos tuto page to learn quickly how to use XCTrack Pro.

Click on the + sign to read the details.
Competition navigation mode can be used for competition, to navigate through different waypoints (route) or just to go to a waypoint with a given circle around it.
For competition, read more details about the different widgets available for competition in the competition subsection of the XCTrack Pro widgets manual.
A video tuto for competition has also been produced. Watch it in the video’s page.
More details can also be found about compliance for FAI category 1 competitions in the FAQ
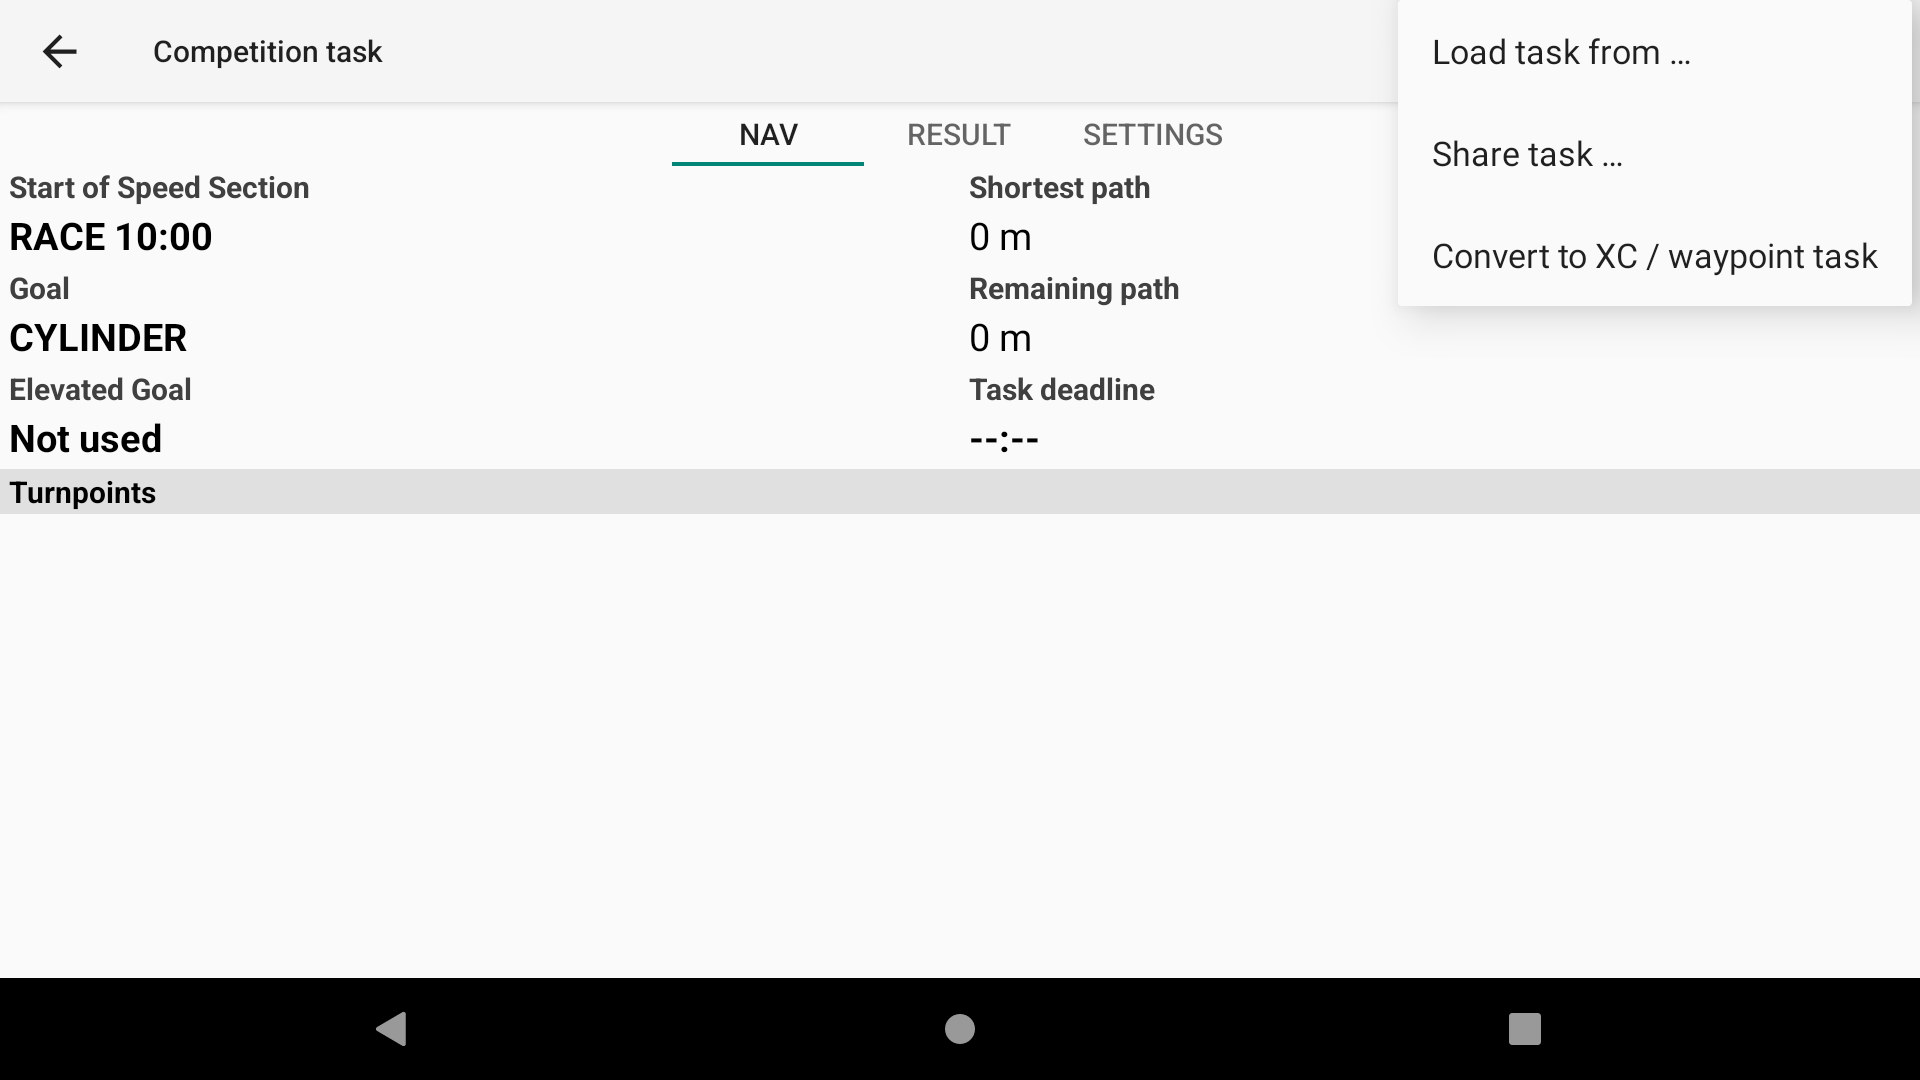
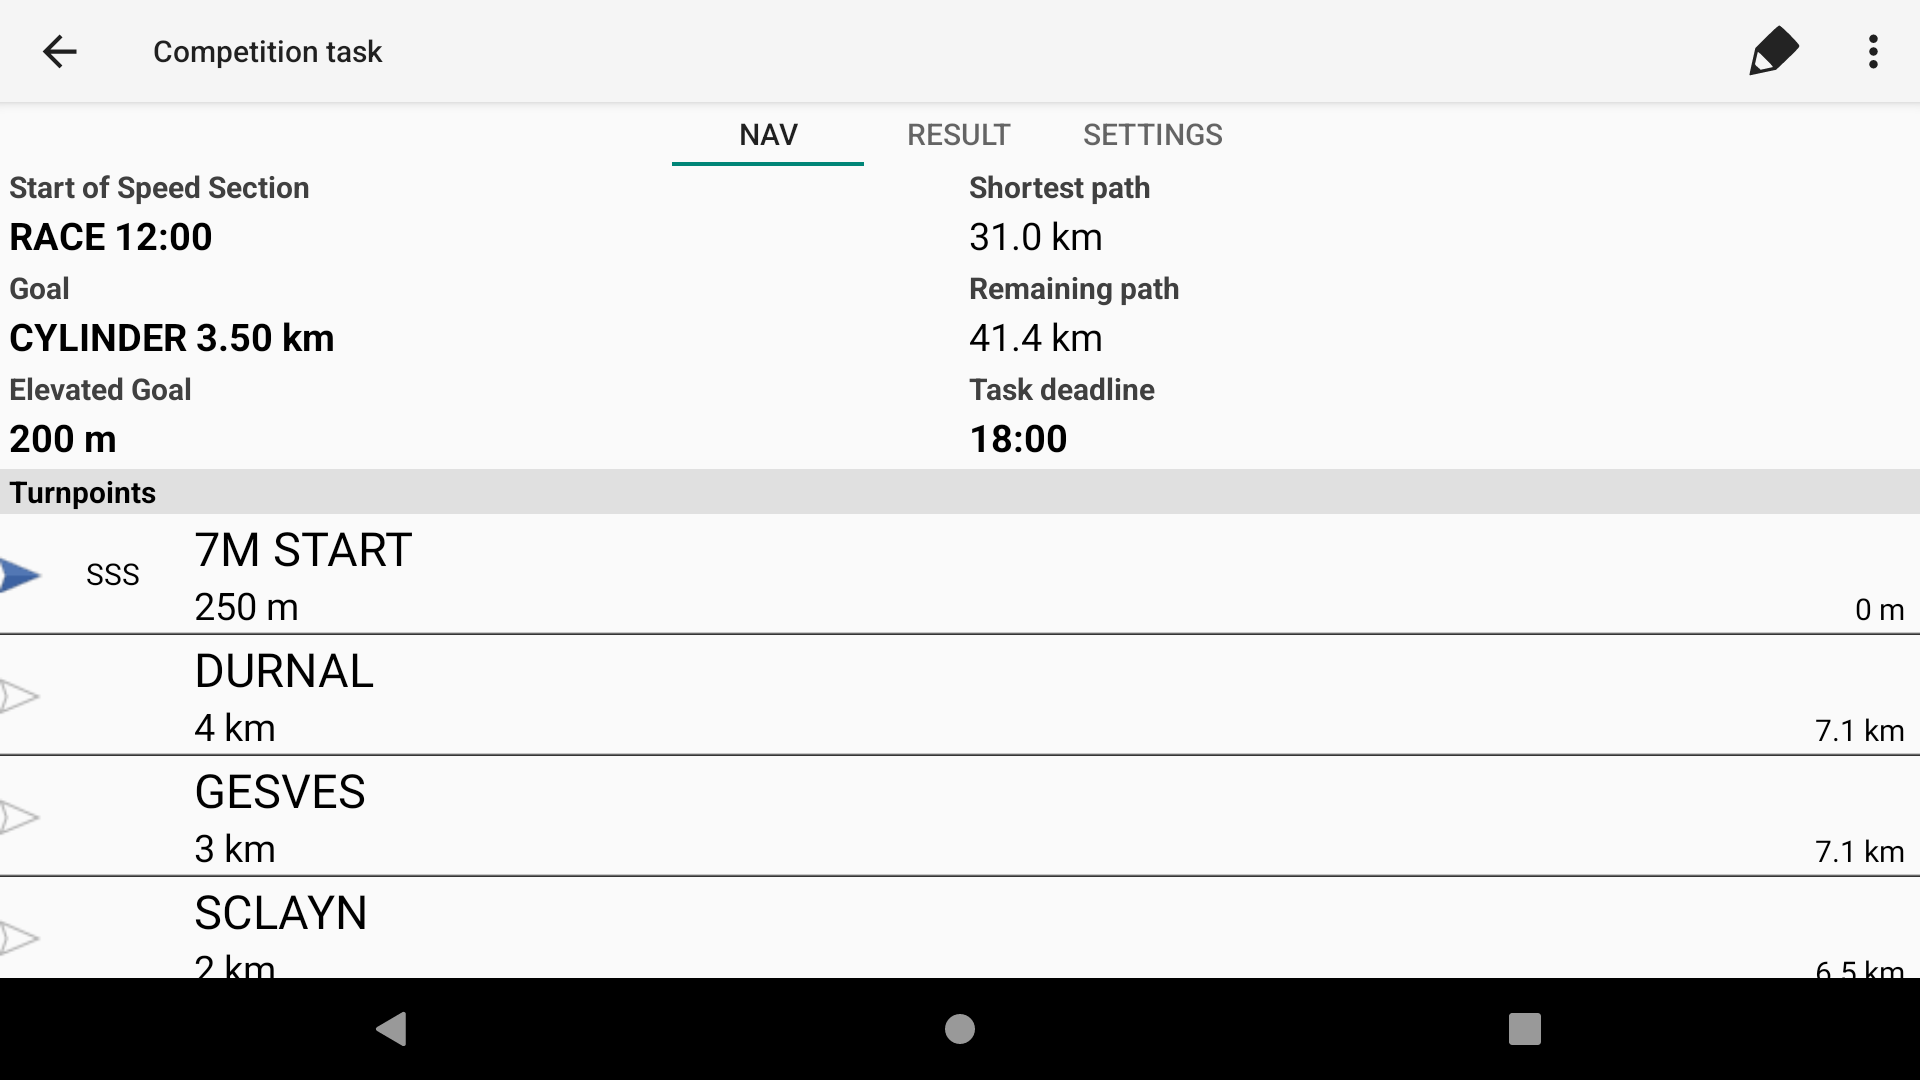
If you have set a task previously, you will land on the ‘Nav’ tab with the task details.
Click on the pencil in the top right corner to edit the task, or click on the three dots to access the menu features.
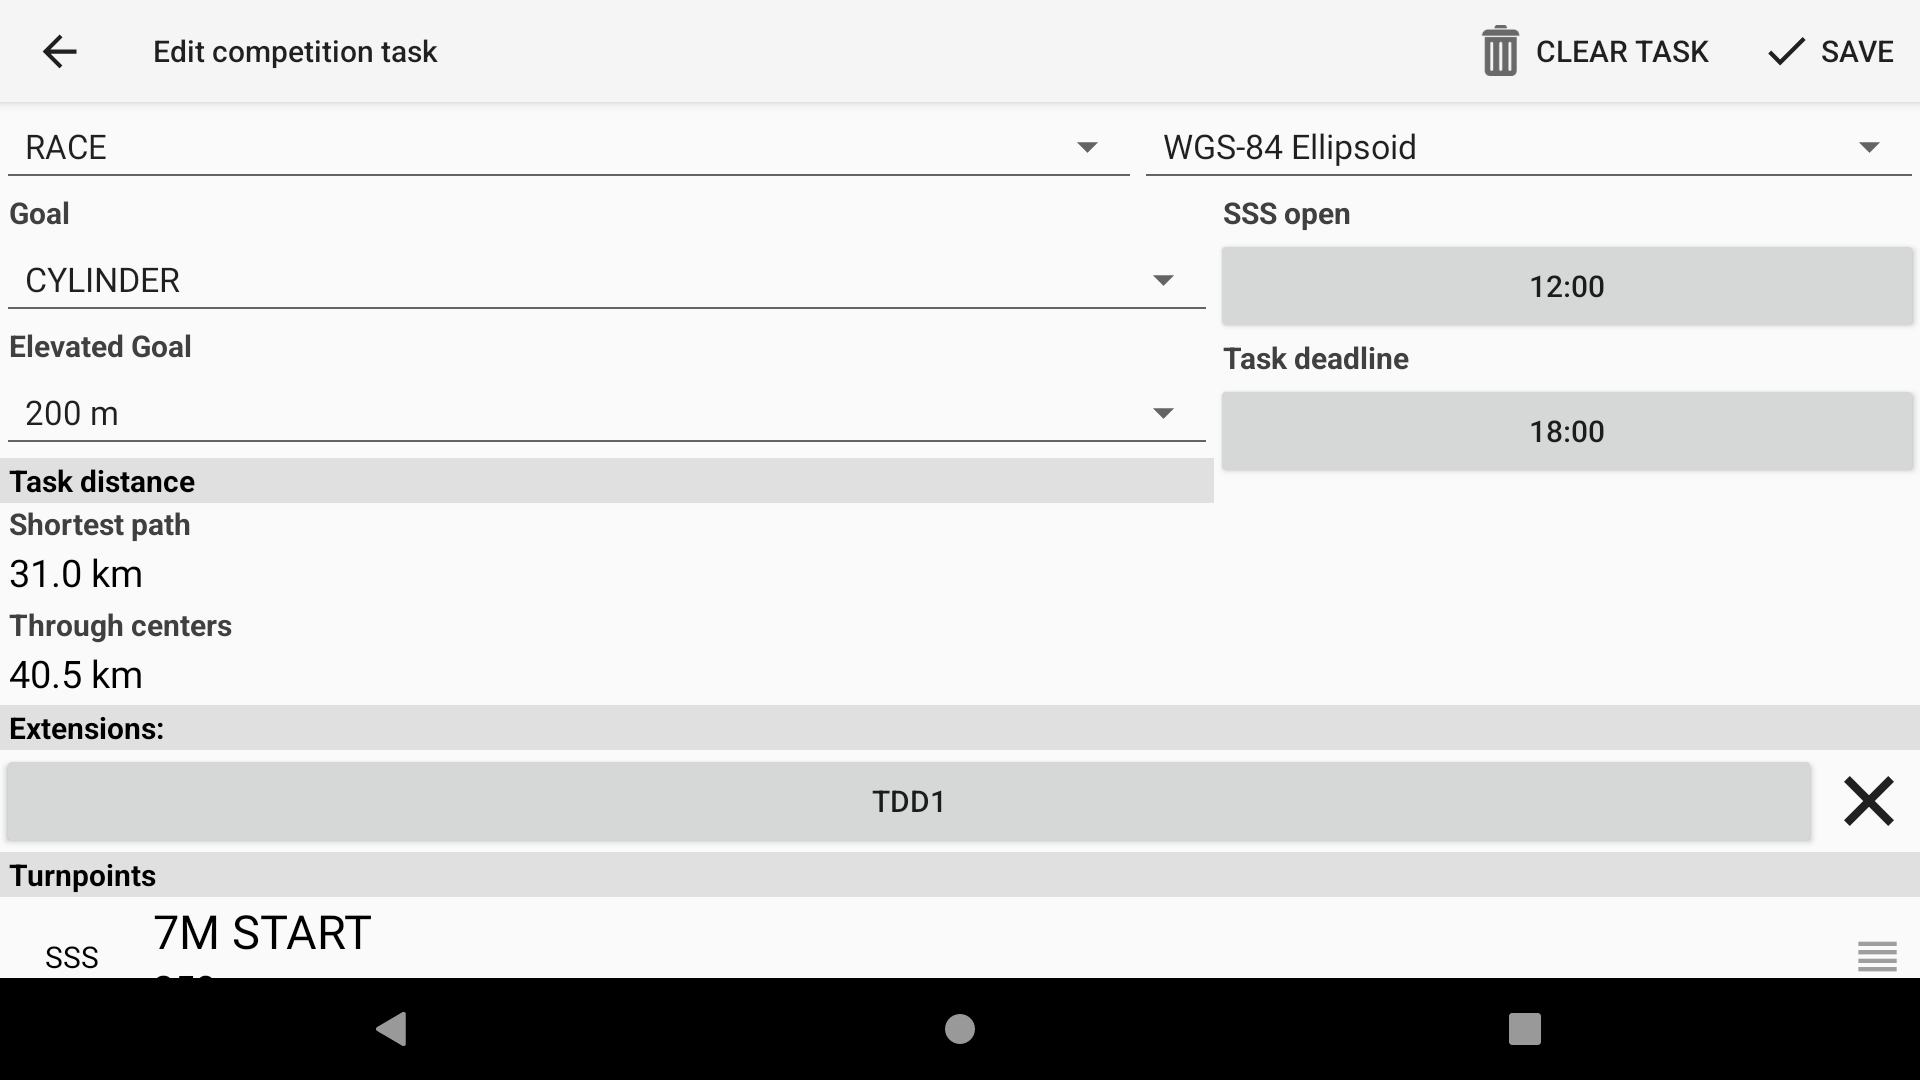
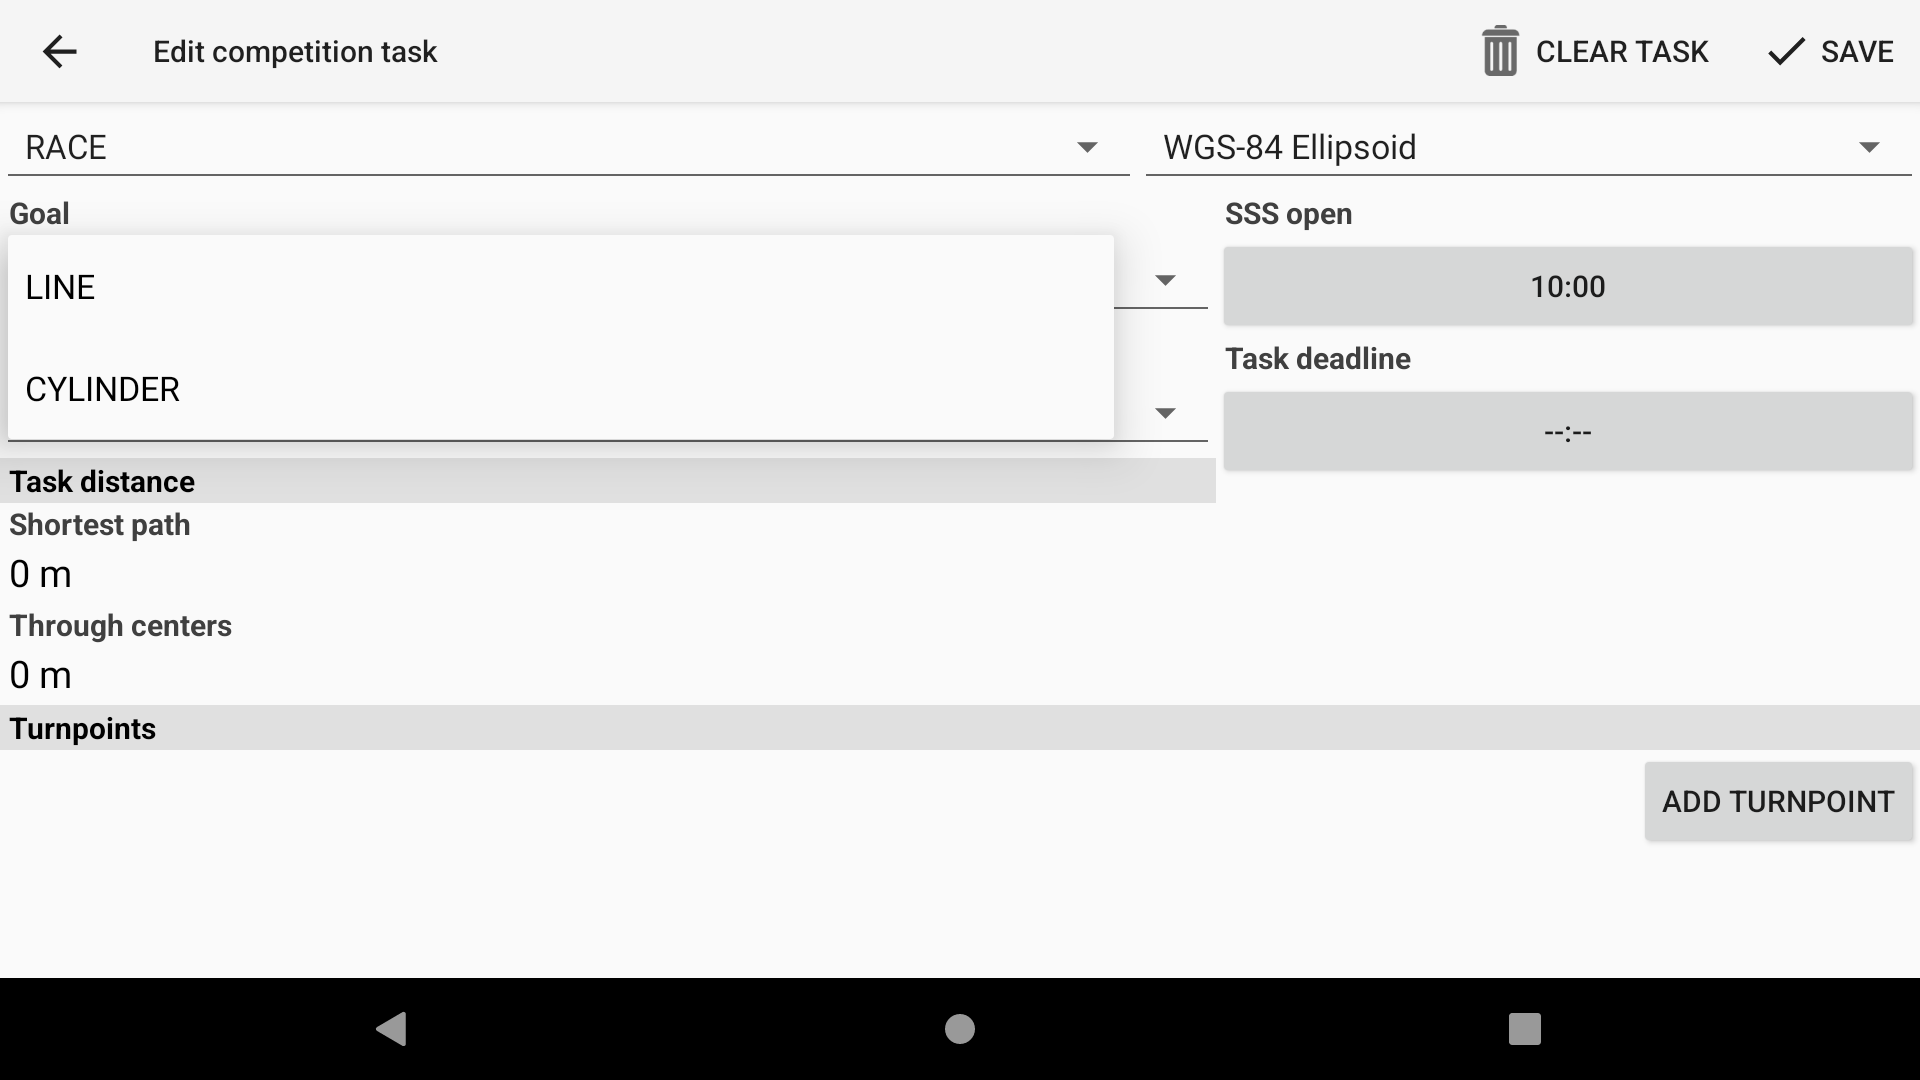
Once you click EDIT, you can enter all the task properties as seen on the task board.
At any time, you can click ‘Clear task’ to revert to the default settings and remove the different waypoints.
Once you have set the task, click on the Save button.
Manually setting up the task
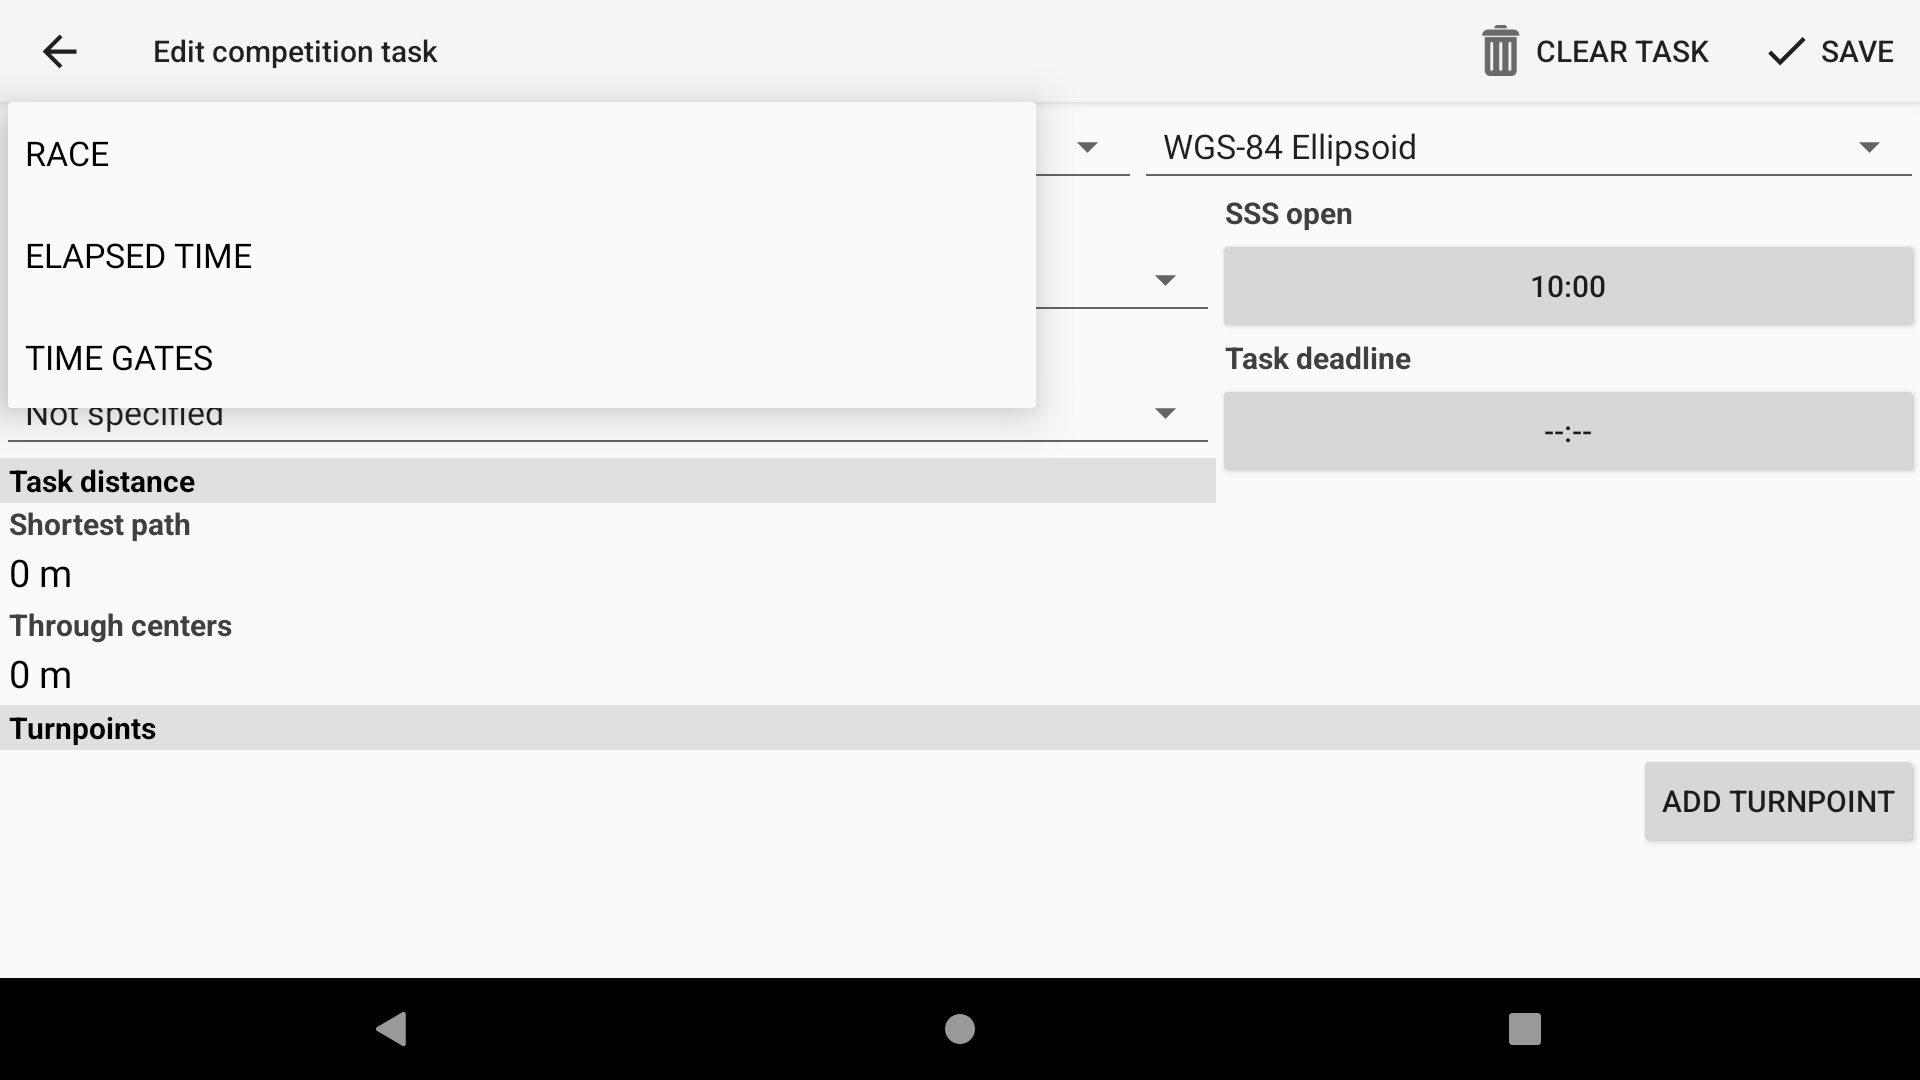
Determine the type of race.
Determine the type of goal.
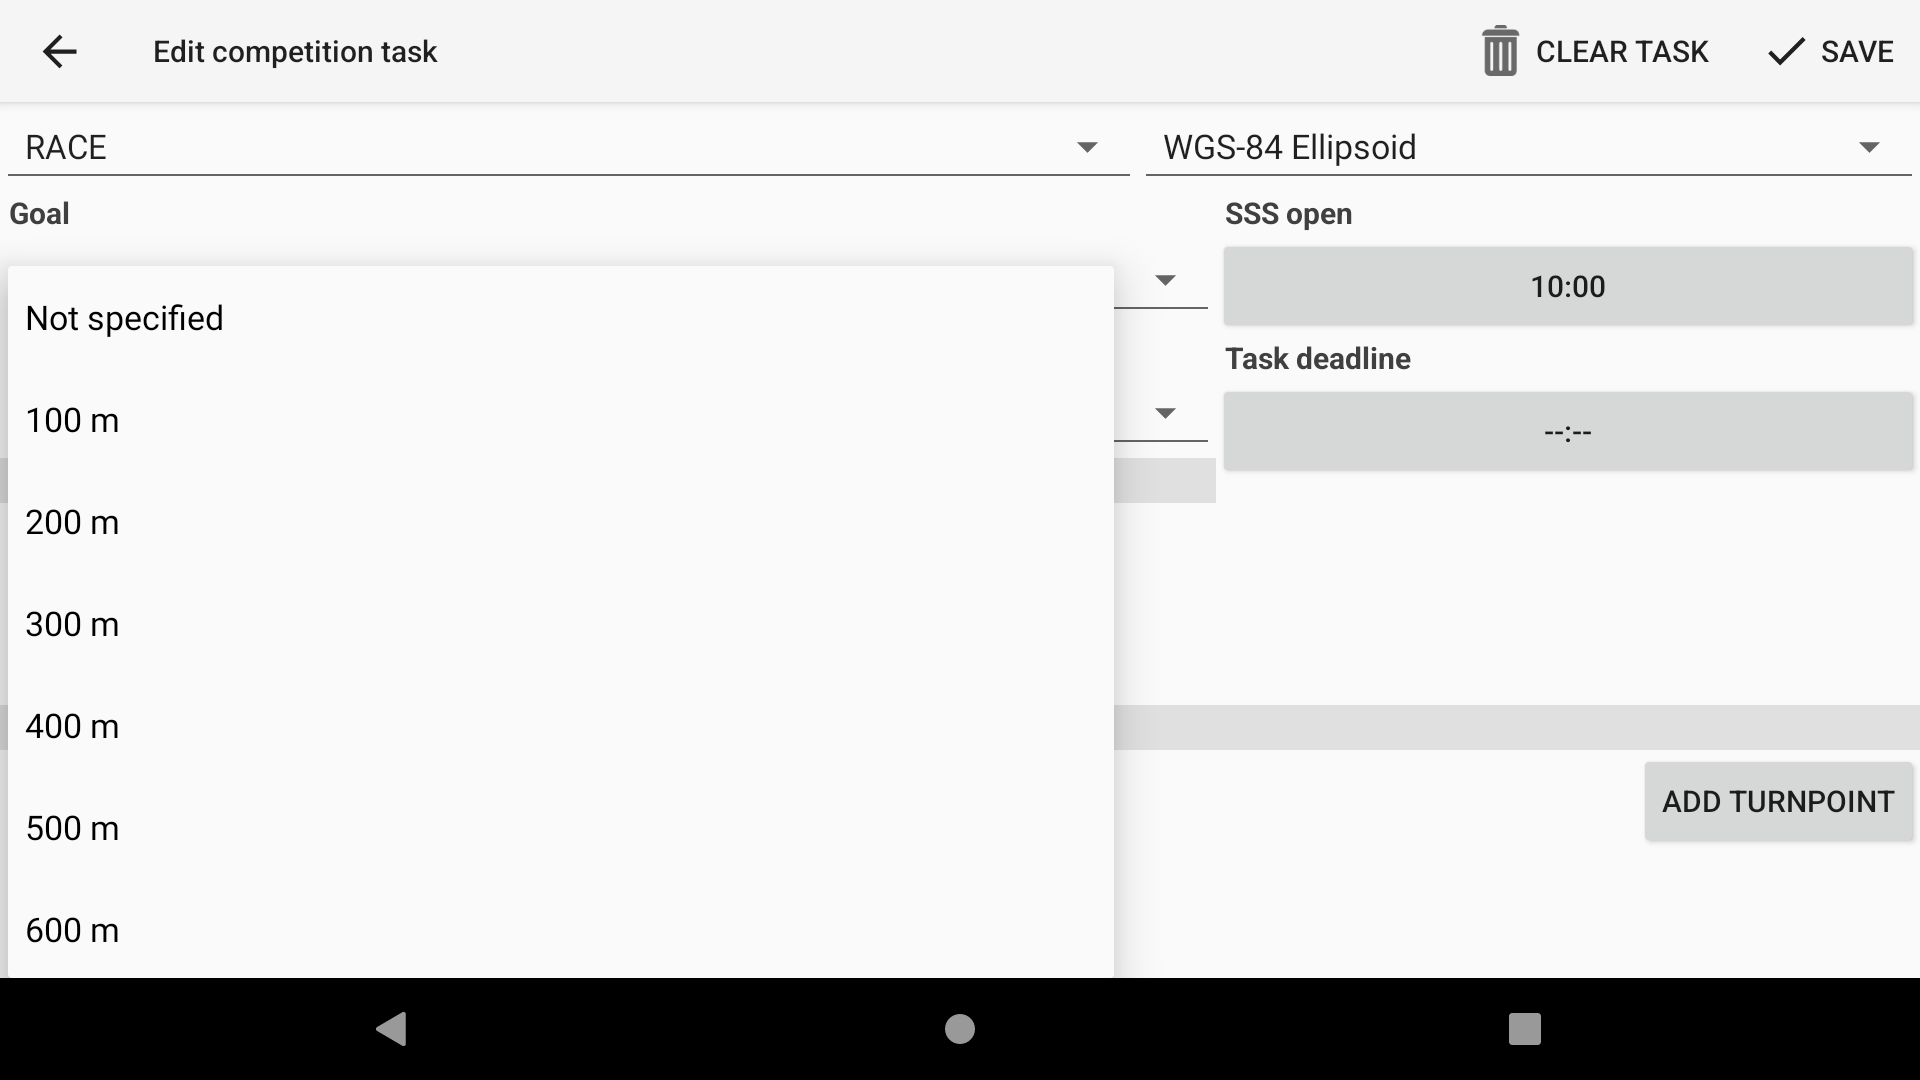
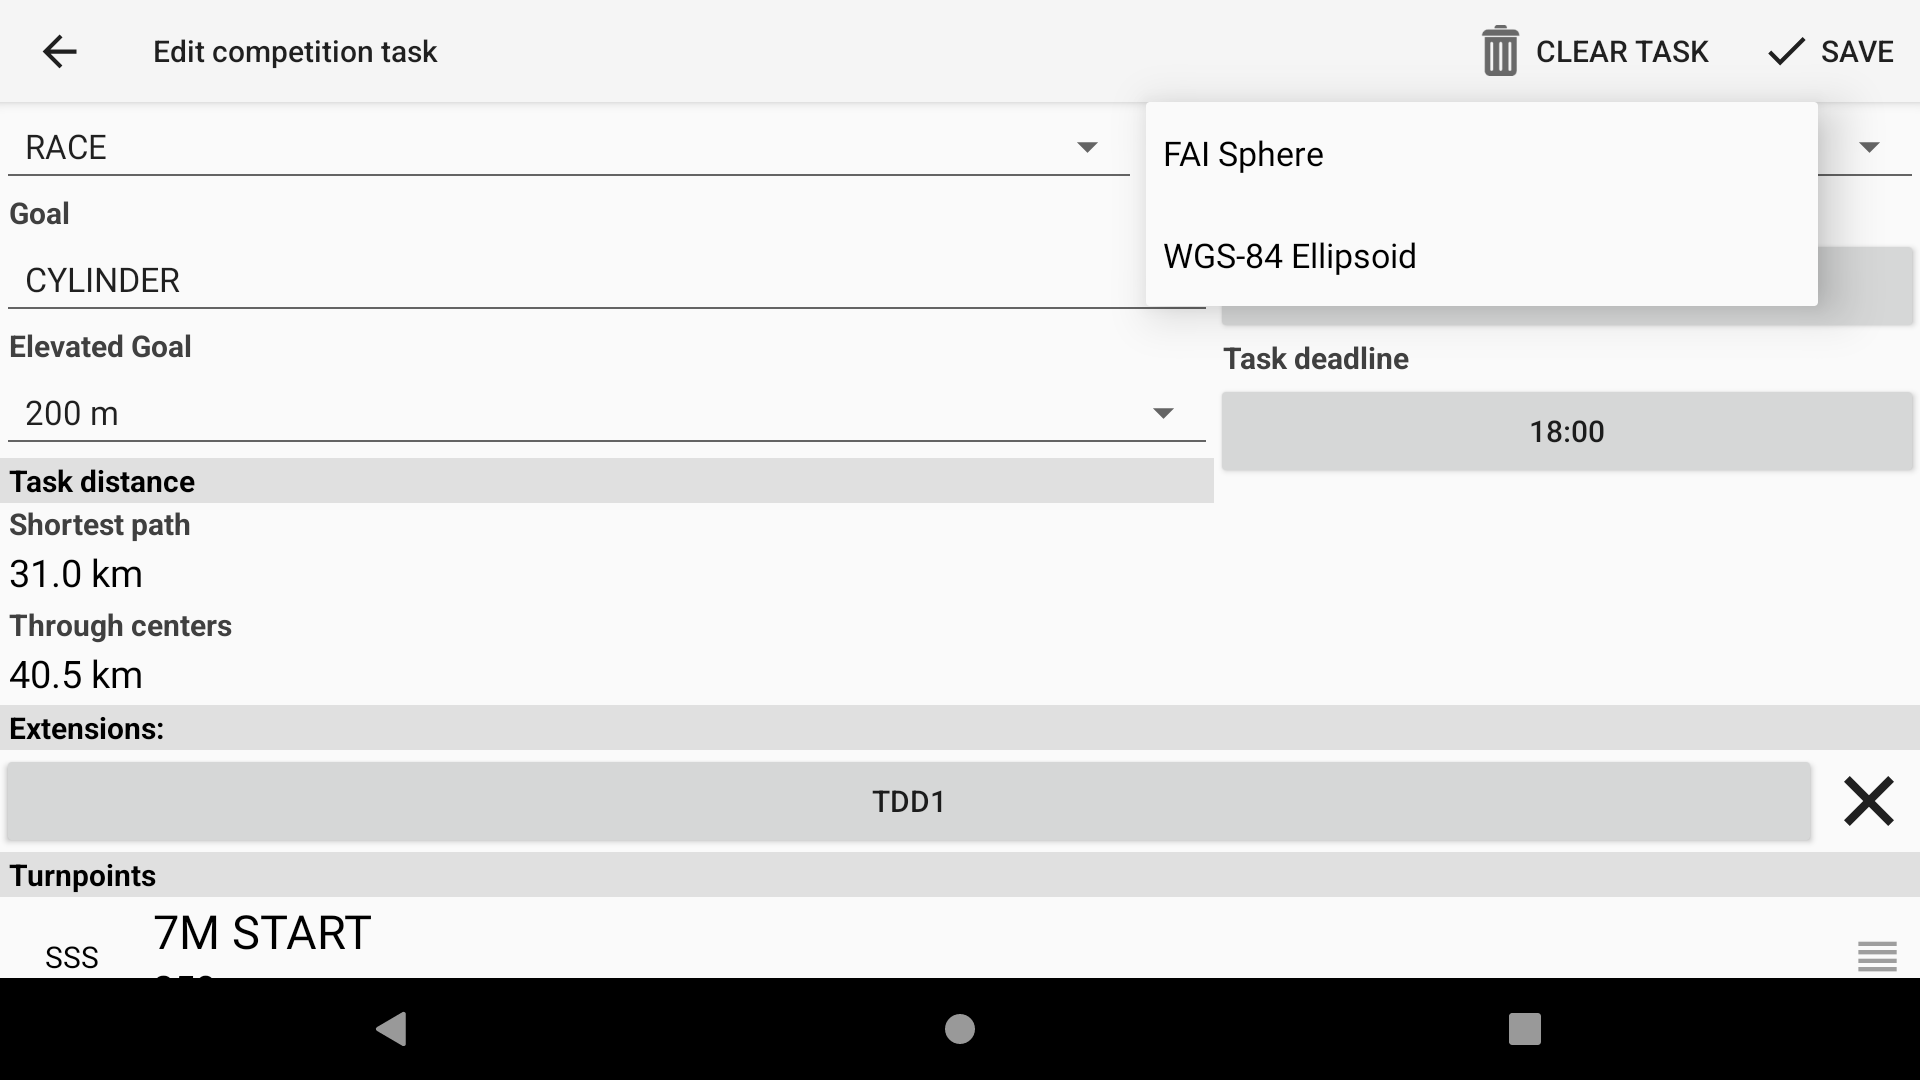
Set the elevated goal.
If the ESS and the goal are the same waypoint (coordinates and cylinder radius), the ESS widgets (Alt Over ESS and Glide to ESS) will respect the elevated goal. Otherwise, they will not.
If an elevated goal is set, XCTrack will not allow you to mark a waypoint as an ESS. The last waypoint will be labeled as both the ESS and the goal.
The altitude indicated in this field is relative to the waypoint height indicated in the waypoint file, not the ground elevation indicated in terrain files.
Measuring distance
XCTrack supports both FAI Sphere and WGS-84 ellipsoid for computing distances. Choose it in the drop down menu. Most competitions nowadays seem to require WGS-84 model. The two formulas give slightly different results. Depending on your Earth location you can expect the difference of about ~0.5%, with FAI sphere formula giving bigger distance in usual competition venues. This is important to have in mind nowadays with large cylinders becoming popular in PG comps in recent years. On 50km cylinder radius the difference between FAI sphere formula and WGS-84 formula can be about 200-300m, which can very easily result in making the cylinder in XCTrack yet missing it in the view of the scoring software (!).
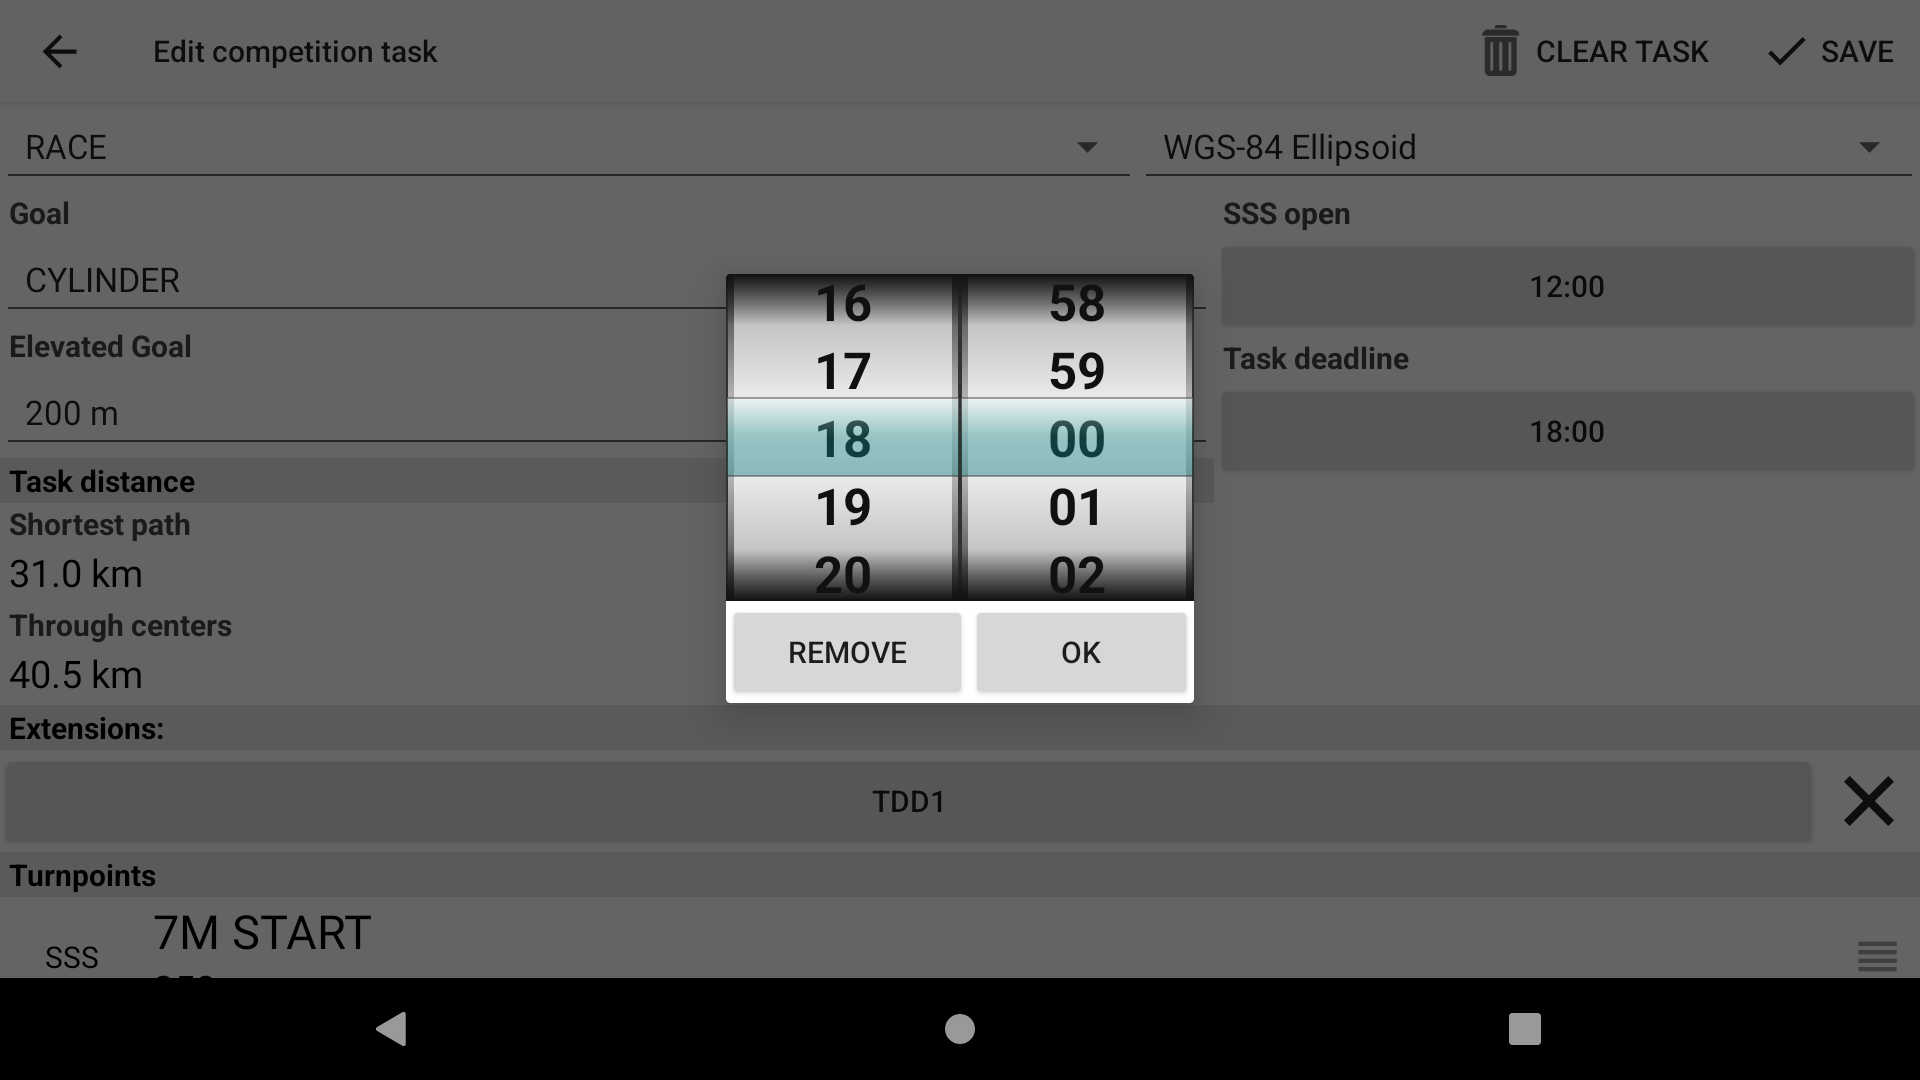
Set the time of the start and the task deadline.
Adding Waypoints to a competition task
There are different ways to add Waypoints to a Competition task. The most common way during competition is to add Waypoints, one by one, once the Waypoints file is activated (see above how to activate a Waypoints file).
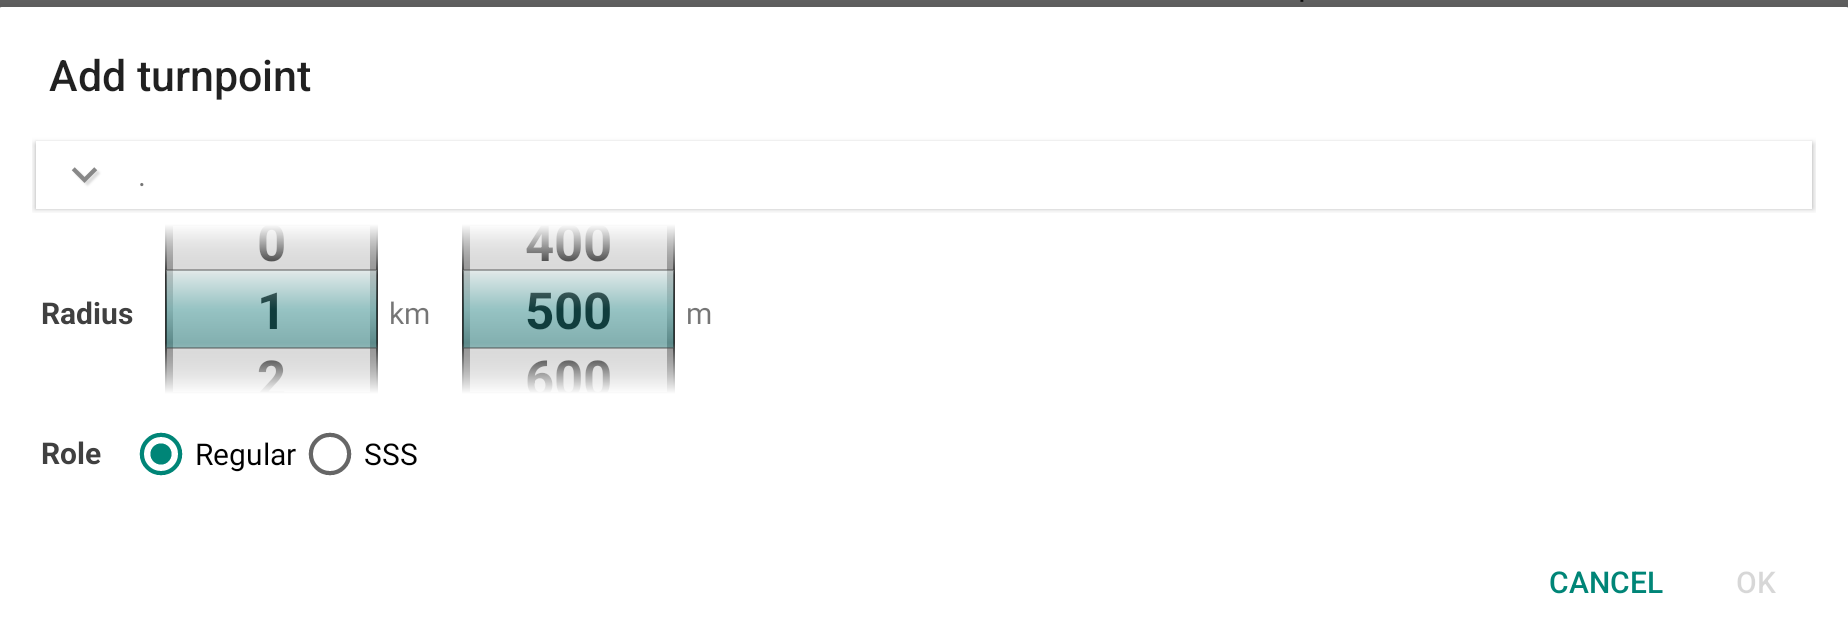
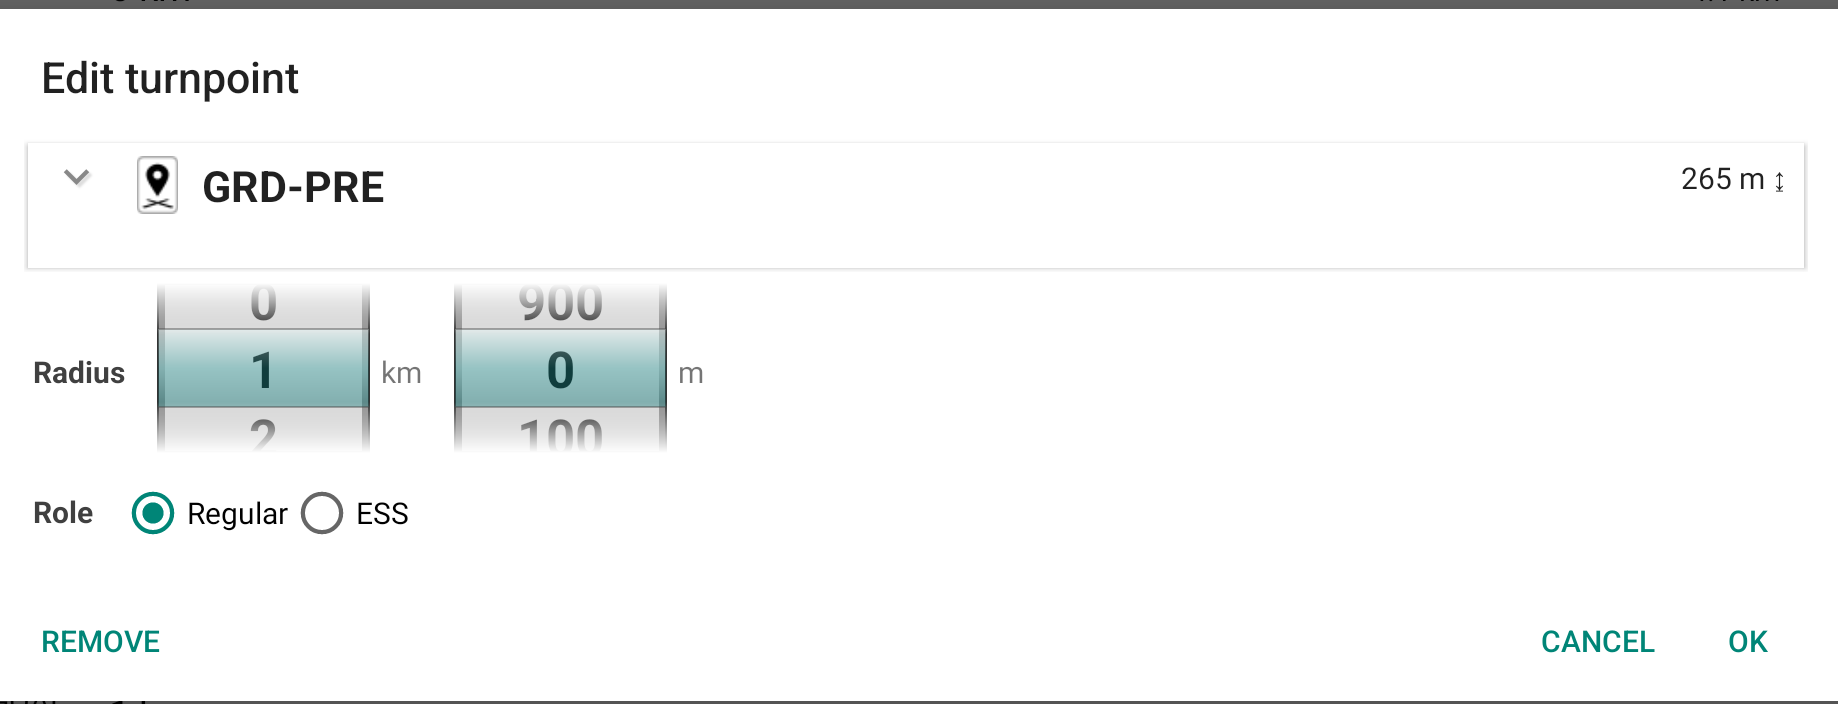
Click ‘Add turnpoint’ to enter the Waypoints screen. Select each turnpoint and radius. When you select the first turnpoint, you can choose whether it is a regular turnpoint or the start. Once the first turnpoint has been selected, a third option will also become available: ESS.
Please note that if there is any inconsistency when you save the task, the role may change. The first turnpoint is considered as start by default, and the last one is considered as goal. However, you may decide that the second waypoint is the start, in which case the first waypoint would be considered as take-off. The last turnpoint can be considered both as ESS and goal. Alternatively, you could decide that the last waypoint is the goal and the previous one is the ESS.
Enter takeoff, or not?
It does not matter if you enter the takeoff as a waypoint or start your turnpoints list with the first turnpoint (usually SSS). First turnpoint if automatically marked as TAKEOFF.
If you start your turnpoints list with the first turnpoint, make sure to mark this waypoint as SSS (otherwise taken by default as takeoff). Takeoff is never a target of navigation, but is used to correctly compute the task distance (see Measuring Distance above). You can specify the radius for the TAKEOFF turnpoint, but this radius is never used and even not displayed in the turnpoint list, unless you unmark the TAKEOFF flag (by converting it to SSS, pressing on the SSS button).
SSS, ESS
SSS stands for Start of Speed Section. This is usually called start cylinder in Paragliding competitions, but XCTrack uses the SSS term just because it is easy to remember and short. ESS stands for End of Speed Section and is generally used in competition tasks. ESS is the cylinder (unless it is identical with goal line), where the task clock stops.
EXIT type turnpoints?
XCTrack does not distinguish between ENTER and EXIT cylinders – you have to cross the cylinder boundary in order to make the turnpoint. This works very well for all the tasks ever seen in paragliding scene. For common enter turnpoints XCTrack navigates you inside the cylinder in order to make the turnpoint, for (rare) exit turnpoints the XCTrack navigates you the shortest way outside.
Save battery?
Do not worry about quiting XCTrack if you wait on the takeoff too long. Once you leave the task edit screen in XCTrack, the task is saved and you can safely quit XCTrack or turn off the device right away. The task will be loaded and ready to fly once you start XCTrack again.
Distance check
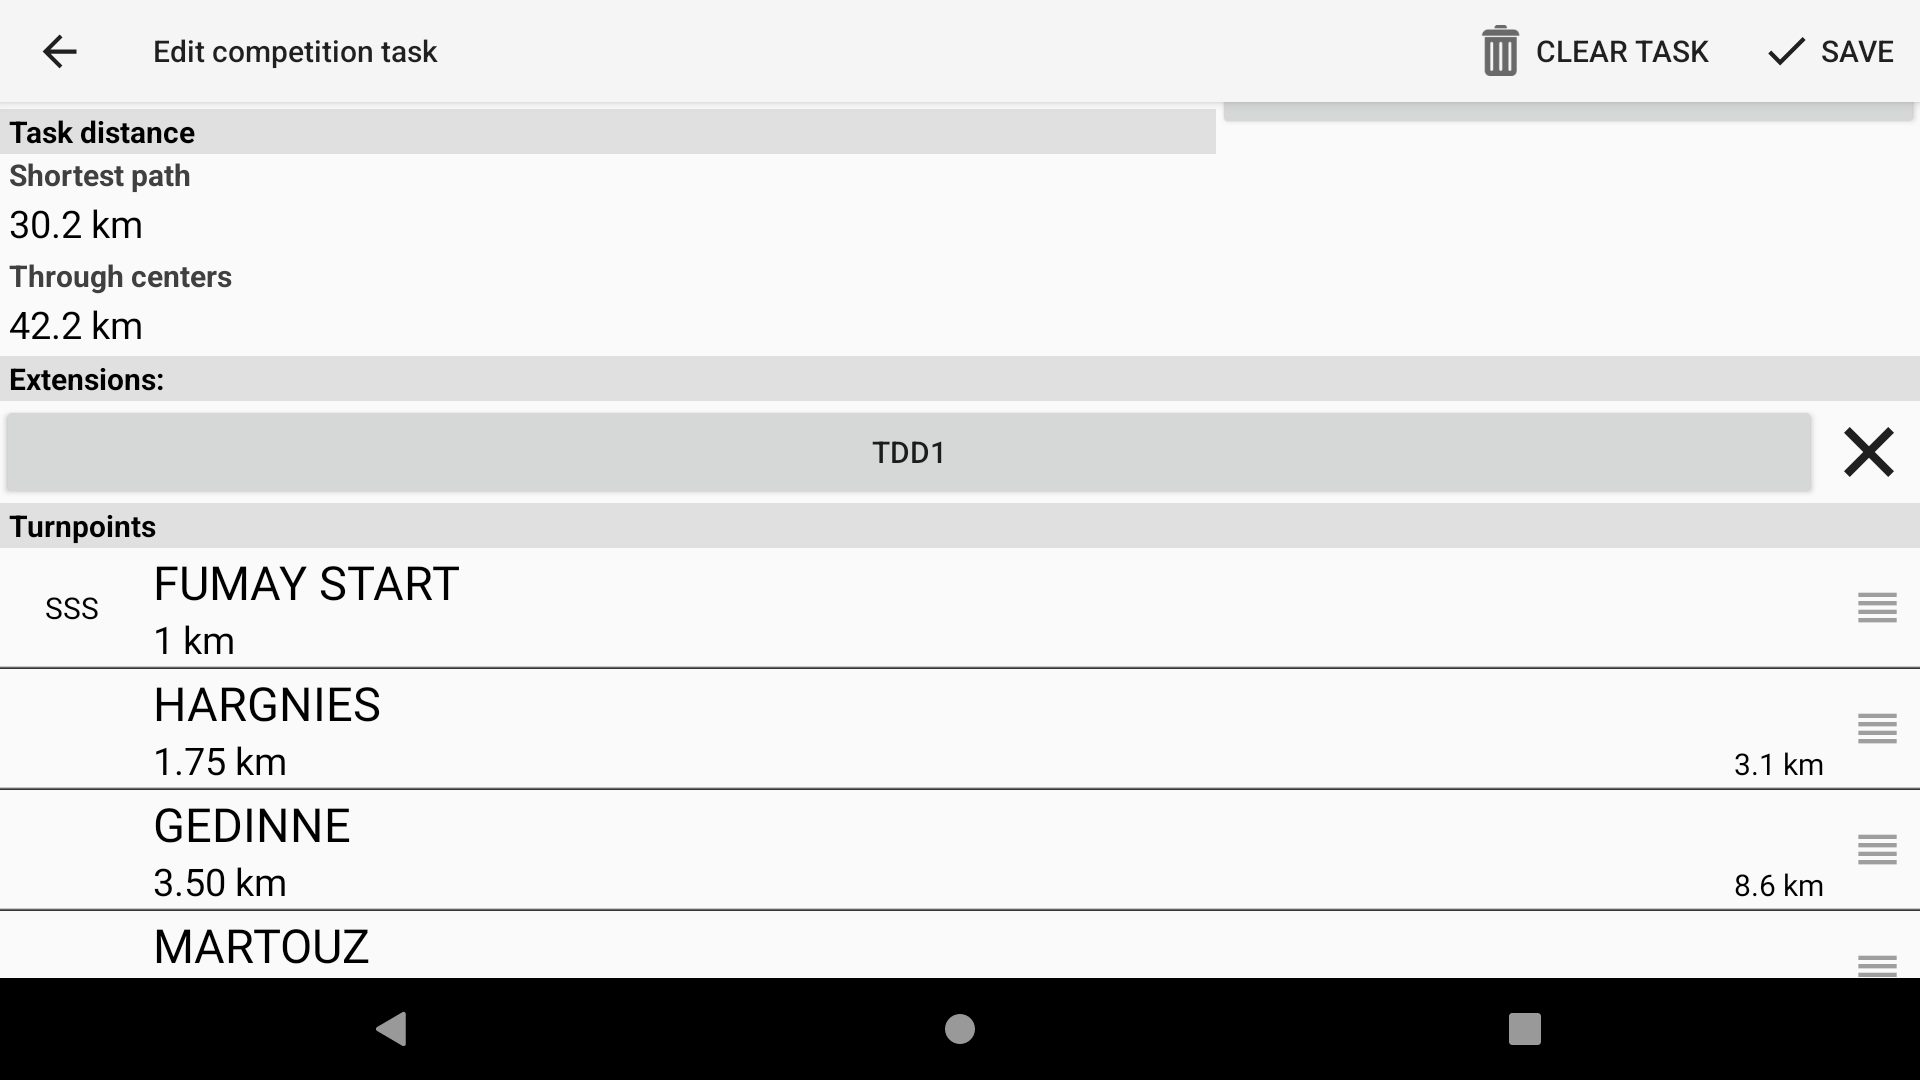
After putting in the task, check the distances at the bottom of the EDIT screen with the task board. The min distance is the shortest distance calculated from the takeoff all the way up to the goal line (or to the boundary of the goal cylinder if goal cylinder is used). If the TAKEOFF turnpoint is not specified then the distance is computed from your current location. The distance through centers is the task distance not counting in the turnpoint cylinders, useful as reference value for checking with simple instruments.
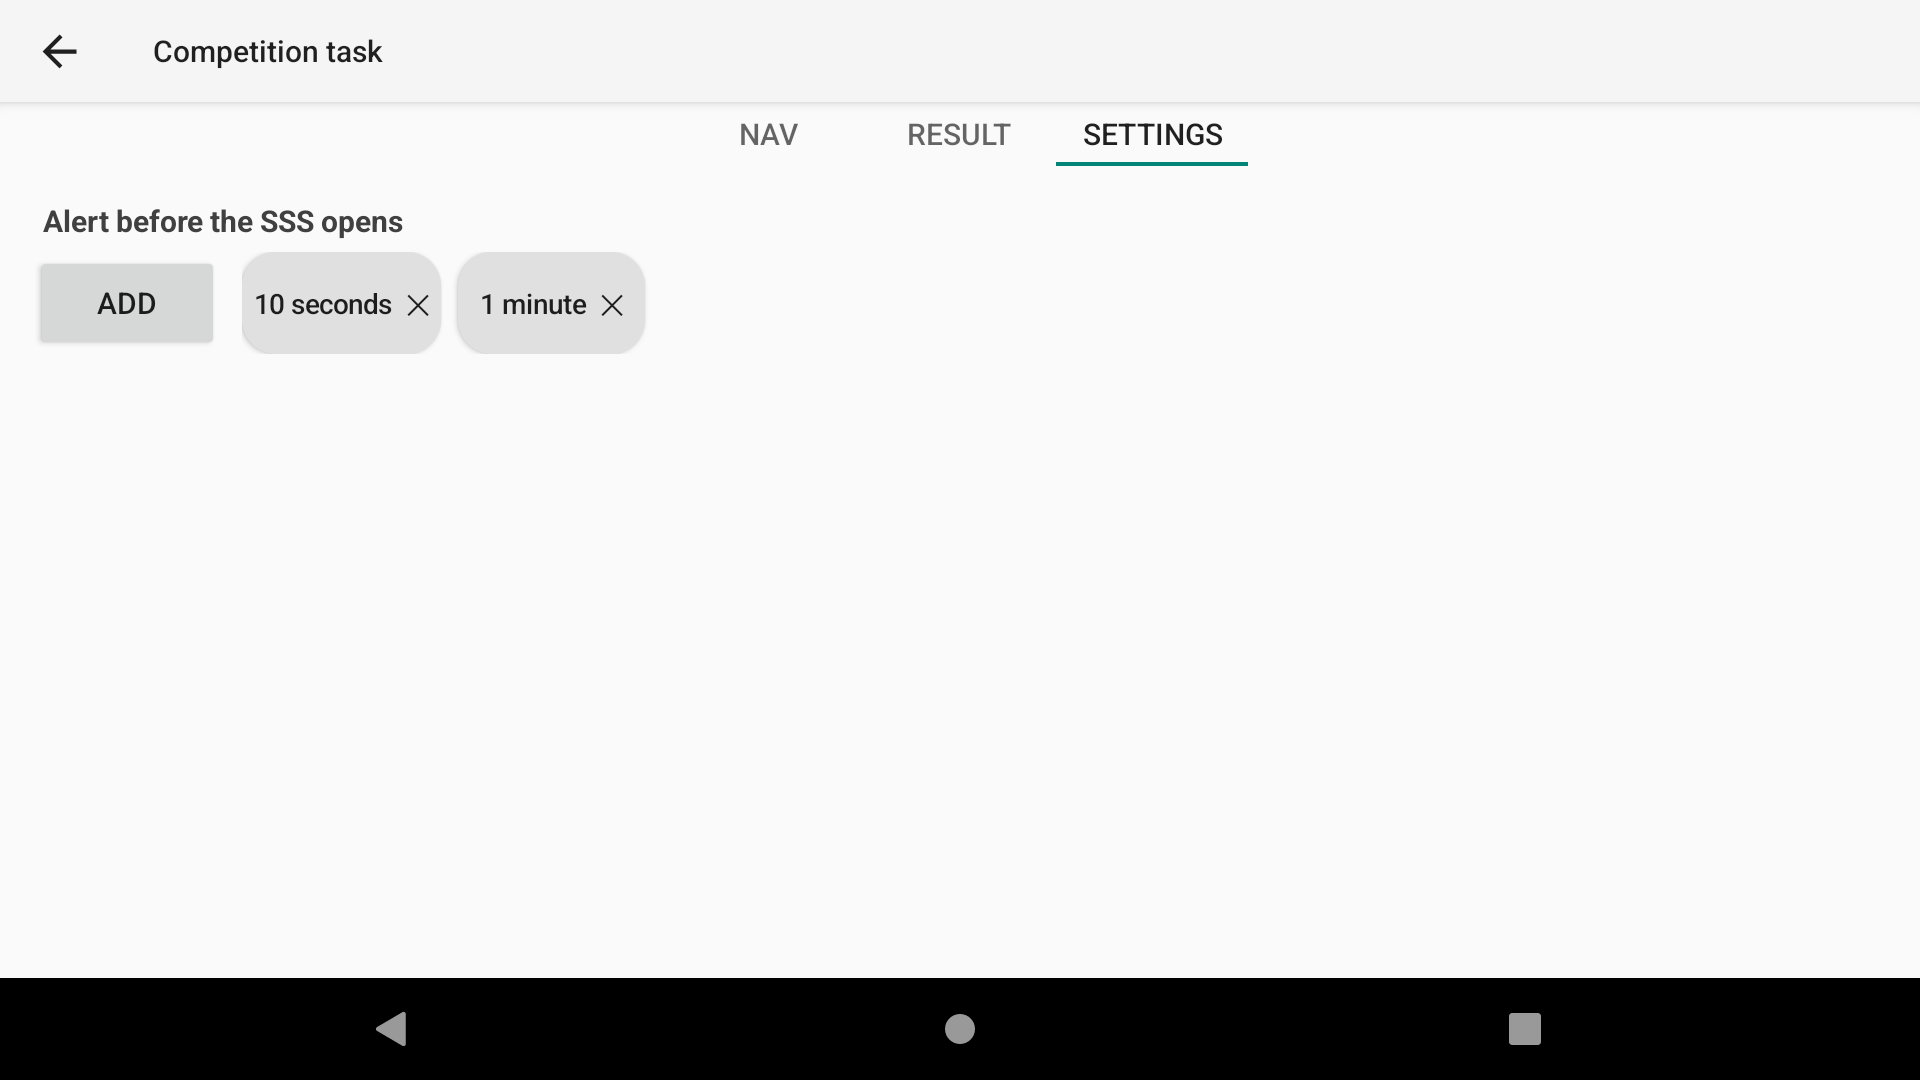
Settings: Create alerts at the right time
You can set up different alerts that will be displayed and sounded at the configured time before the start.
Once you have done this, go to Menu > Preferences > Sound & Alerts and scroll down to the Competition subsection. Find ‘Speed section will open soon’. You can then select the type of notification you want: sound, alert or both.
If you want to configure the sound, click on it. To see how to configure this section, check more details in Menu > Preferences > Sound & Alerts.
You can choose to have a sound only, a spoken message only, or both.
NAV: Select your turnpoint
Once you have finished setting everything up, you can return to your default flight page.
The system expects you to start first. However, if you want to go directly to a specific turnpoint for a specific reason, go back to ‘Menu’ > ‘Navigation’ > ‘Competition task’. In the NAV tab, click on the turnpoint you want to reach next and confirm.
Alternatively, you can use the ‘Navigation buttons’ widget in the ‘Action buttons’ or a physical button that you have associated with ‘Back to previous waypoint in task’ or ‘Skip to next waypoint in task’ in ‘Menu’ > ‘Preferences’ > ‘Key bindings’.
With the AIR³ default configuration, long-click on the extreme right or left of the map to go to the next or previous turnpoint, or long-click F1 or F2.
Alternative solutions for creating a Competition task
There are many alternative solutions to create a Competition task.
- Convert a Waypoints/XC Navigation task to Competition task (check more details in the Waypoints/XC Navigation task mode above)
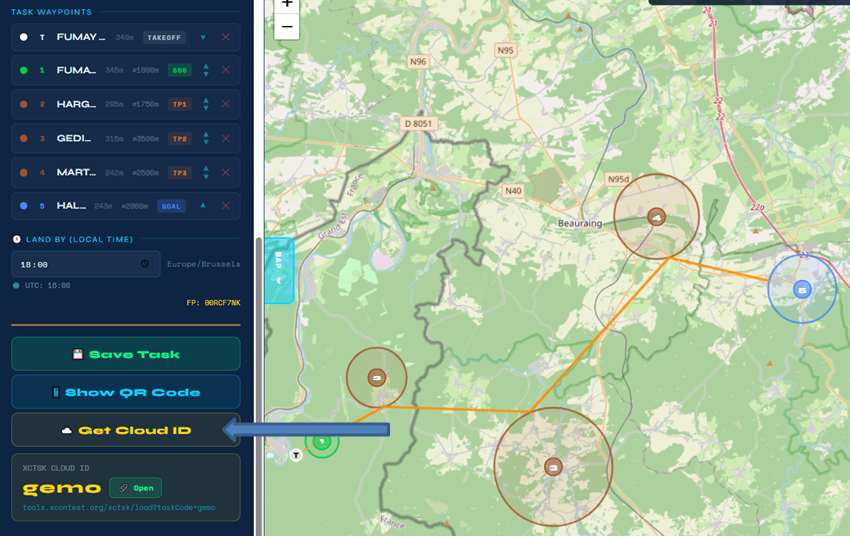
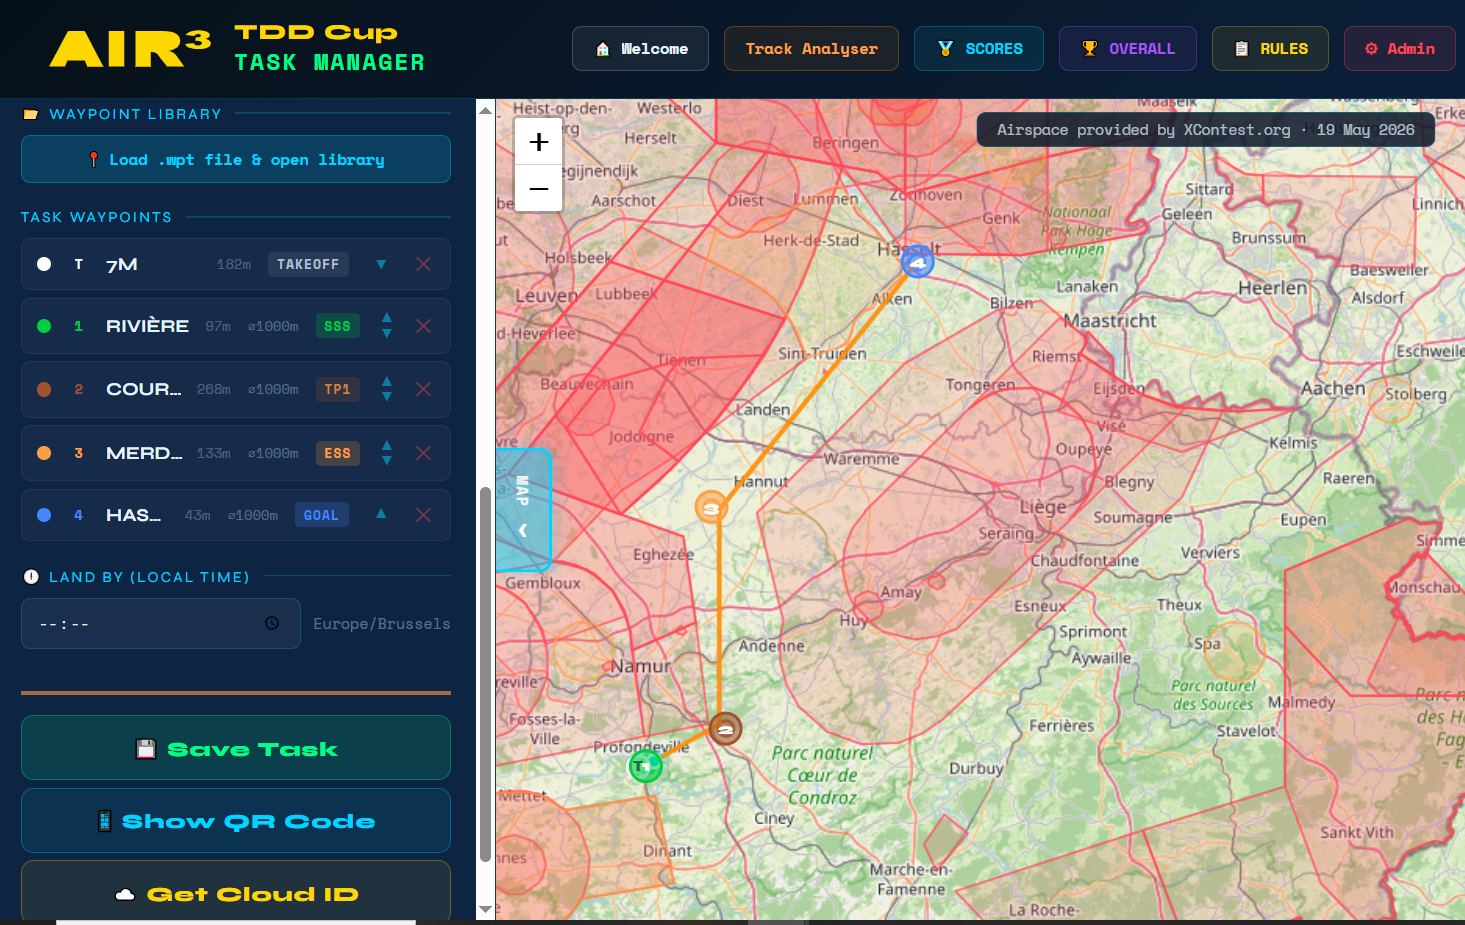
- Create the route from a webpage such as AIR³ TDD Task Manager.
Click on the map on the take off to create your first waypoint, click on the map for each turnpoints and set the radius. Once finished, you can either save the task as a xctsk file, show the QR code or get a cloud ID.
Check more details how to get a task from AIR³ TDD Task Manager here.

- Create the route from another device using XCTrack, generate a QR code and scan it on the receiving device. On the exporting device, once you have created the task, go to Navigation → Competition task Menu (3 dots) → Share task … → Display QR code. On the receiving unit, go to Navigation → Competition task Menu Menu (3 dots) → Load task from … → Scan QR code.


- Create the route from another device using XCTrack, generate a picture with the QR code and load it on the receiving device. On the exporting device, once you have created the task, go to Navigation → Competition task Menu (3 dots) → Share task … → Display QR code → Click on the share icon
 to transfer the picture through any communication mean. On the receiving unit, go to Navigation → Competition task Menu (3 dots) → Load task from … → Read QR code from a file → Click on the saved picture.
 - Create the route from another device using XCTrack, generate a task file and load it on the receiving device. On the exporting device, once you have created the task, go to Navigation → Competition task Menu (3 dots) → Share task … → Save to other applications to share the file through any communication mean. On the receiving unit, go to Navigation → Competition task Menu (3 dots) → Load task from … → Import from a file → Select the file you have just downloaded.

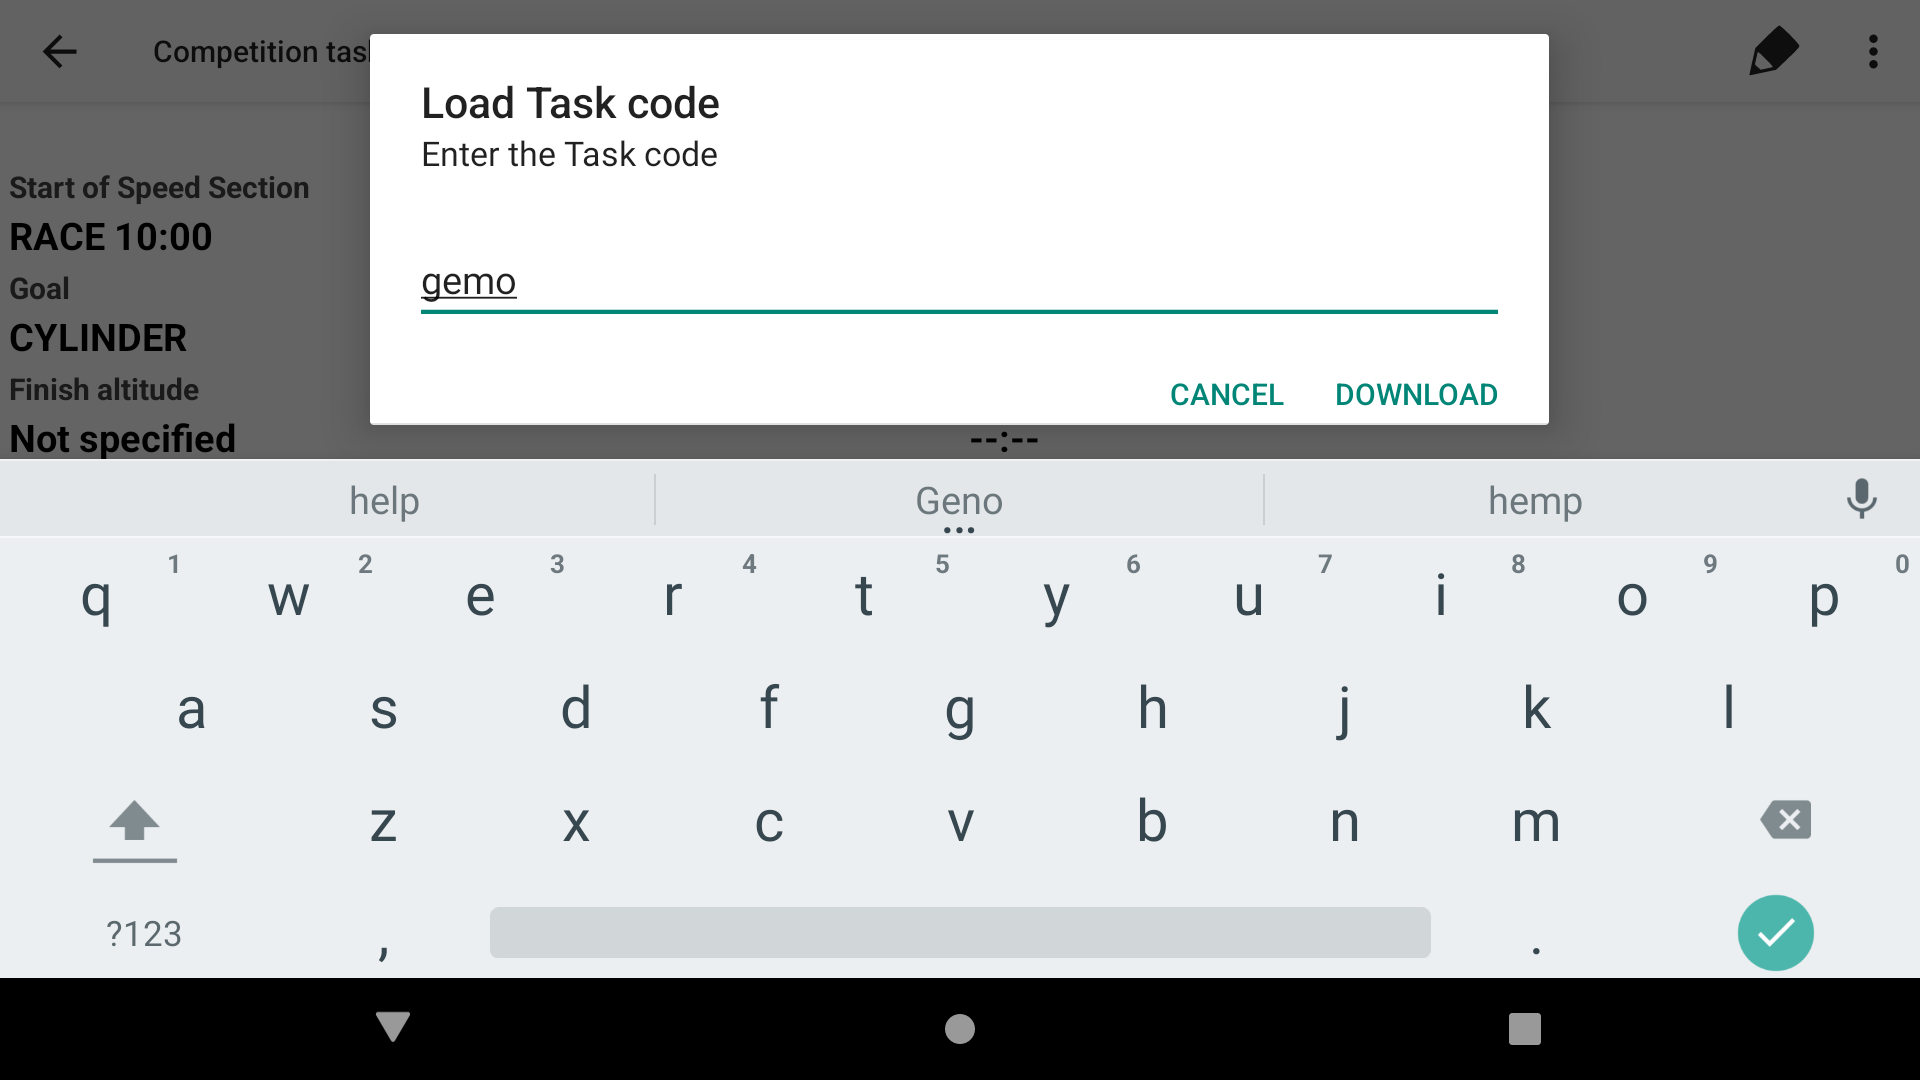
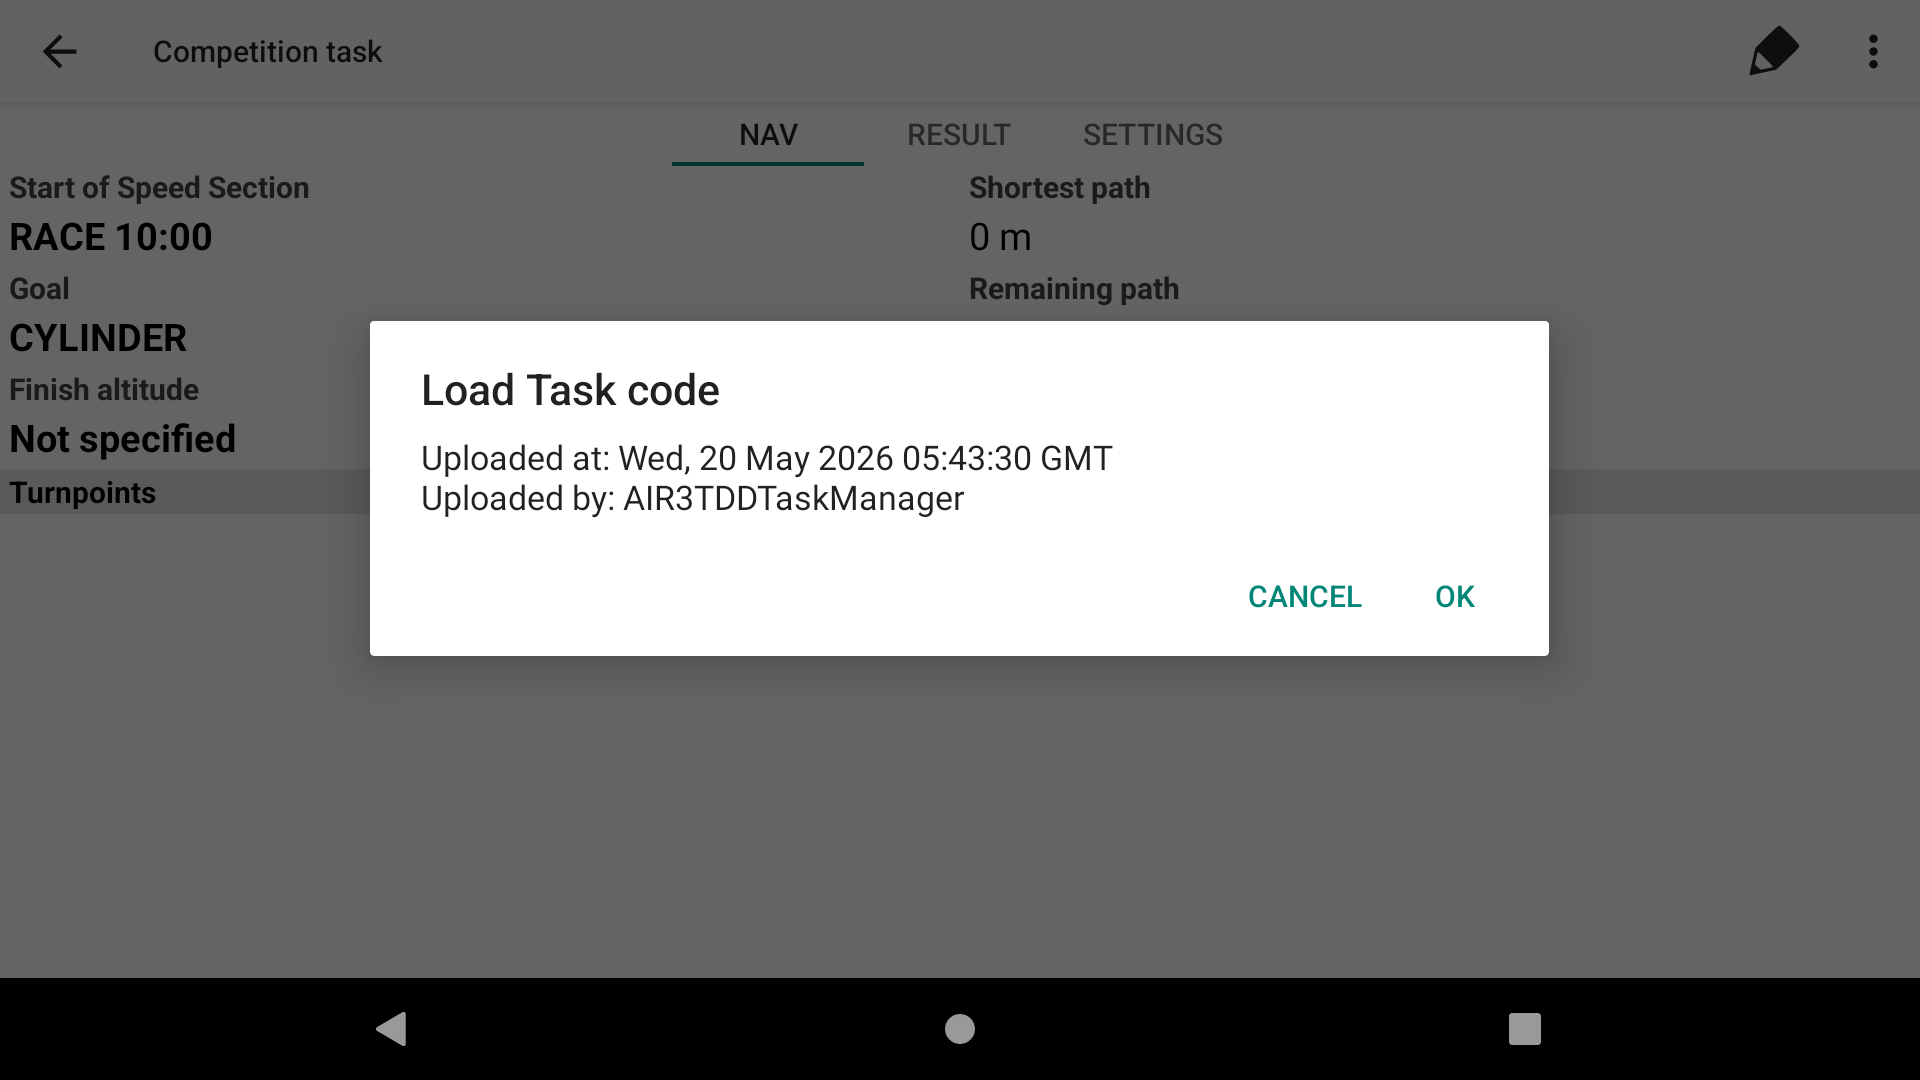
- Create the route from another device using XCTrack, generate a cloud task code and load it on the receiving device. On the exporting device, once you have created the task, go to Navigation → Competition task Menu (3 dots) → Share task … → Upload to cloud → Click on the share URL or share CODE to communicate the task through any communication mean or just communicate the task code. On the receiving unit, go to Navigation → Competition task Menu (3 dots) → Load task from … → Download from cloud → Type the code. If you have shared the URL on the exporting device, open the URL on the receiving device. You can either just type the code as just explained, or download the task file on the unit. Once done, go to Navigation → Competition task Menu (3 dots) → Load task from … → Import from a file → Select the file you have just downloaded.


- Click on the “Add turnpoint” as described above once you are in the Competition task page and add waypoints manually, one by one.
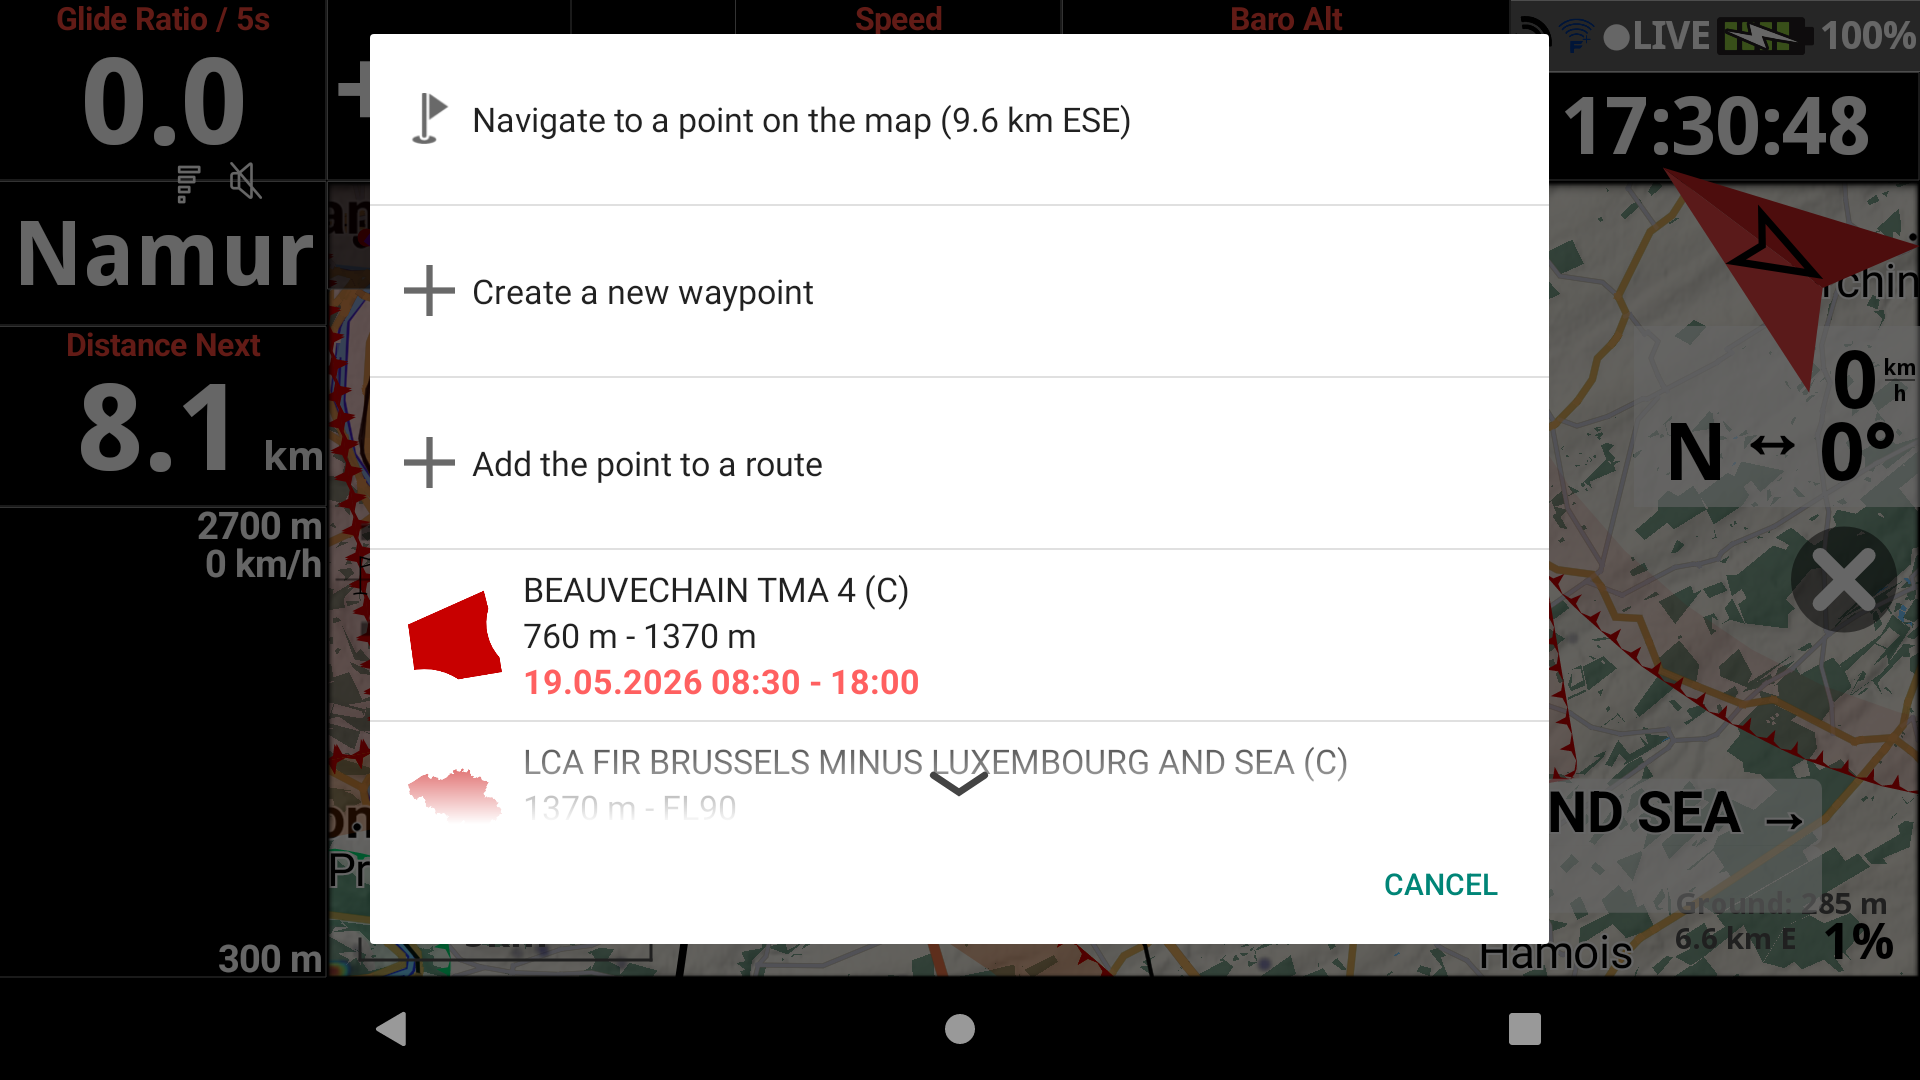
- Use the “add the point to a route” option in the pop-up menu of the Map Panning mode of a XC Map widget or Competition Map widget, as described above to add different waypoints directly from the map.
- Use any of the 6 first methods and enhance the route/task with one of the 2 last methods to add more waypoints.
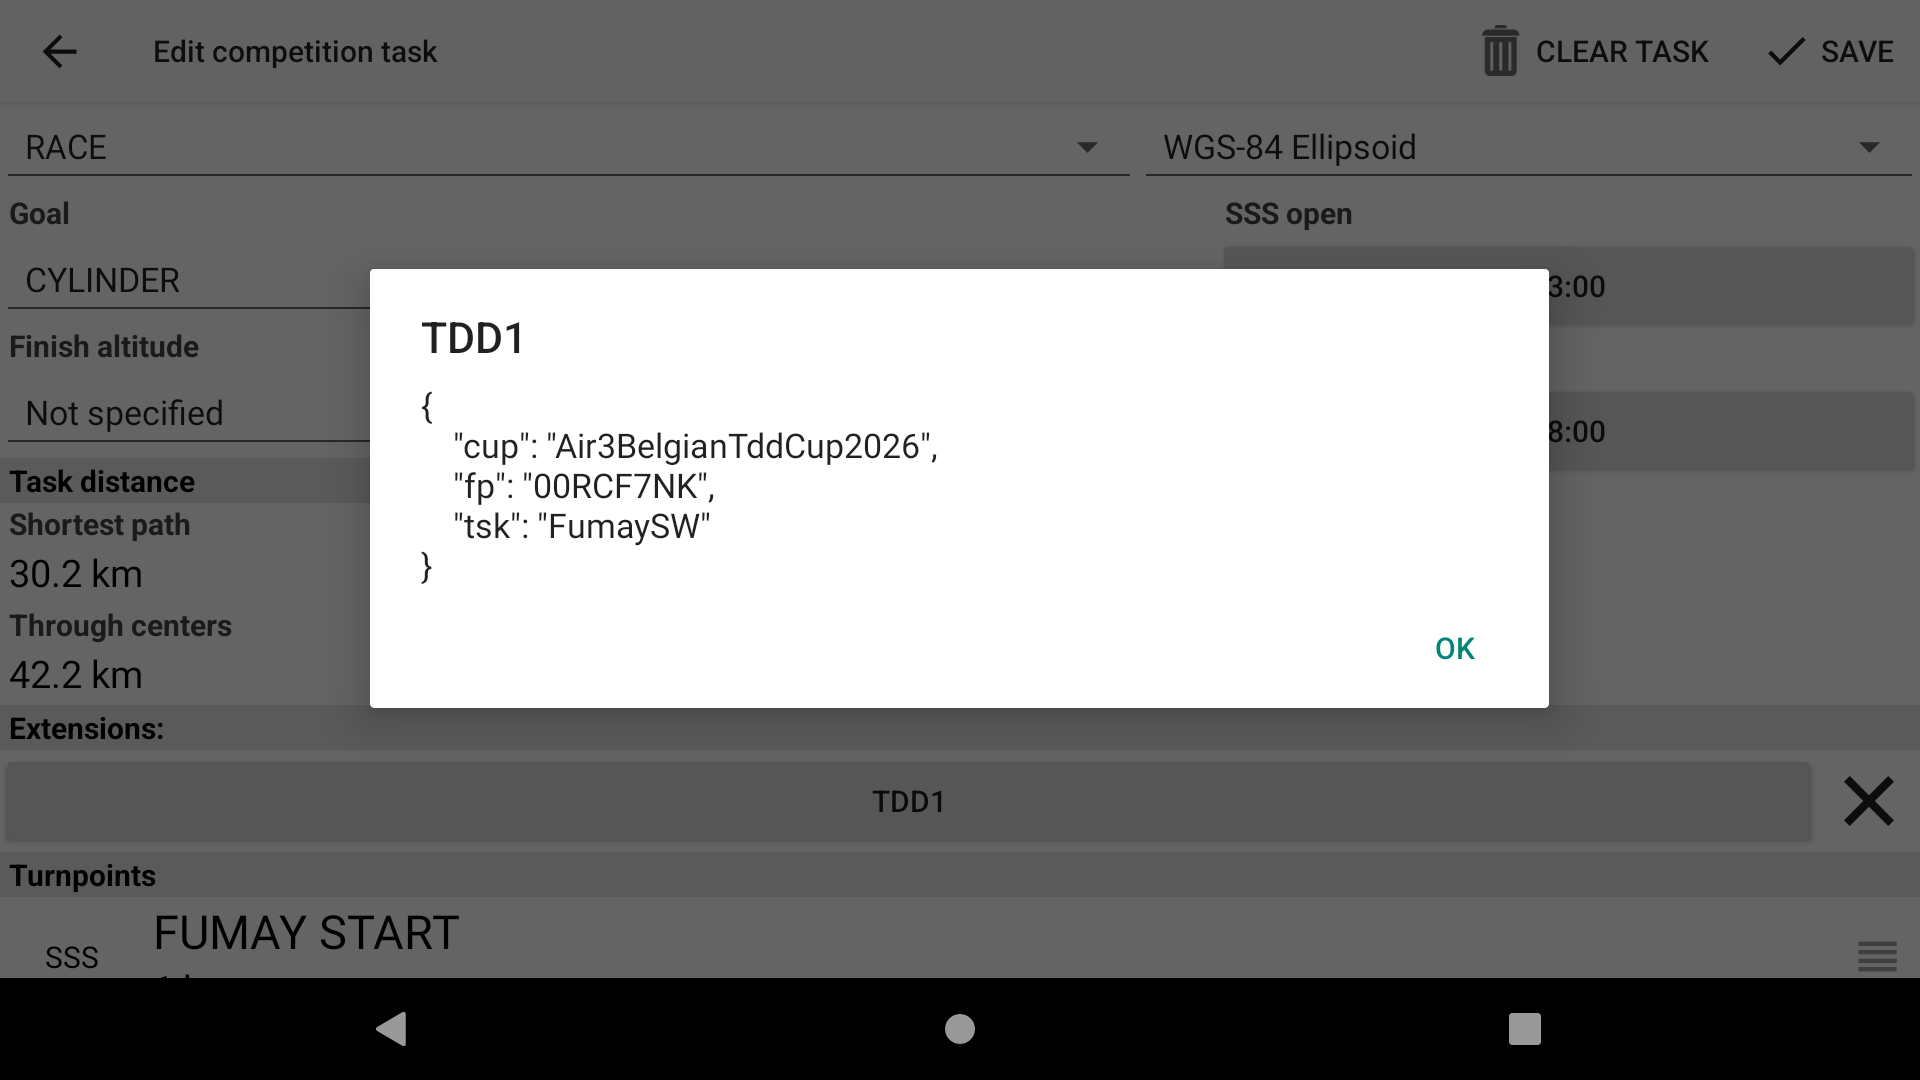
Task extensions
XCTrack supports task extensions. Tools such as the AIR³ TDD Task Manager can generate these task extensions when the task is created.
For example, a task created with this tool and linked to a CUP will contain the CUP, the task name, and the task fingerprint. This information is provided to XCTrack via the xctsk file, QR code scanning, or Cloud code ID.
The IGC file of your flight, generated by XCTrack, will also contain these task extensions. This can simplify the submission process if you are participating in an AIR³ TDD CUP, as you won’t need to select the CUP to which you want to submit your tracklog if it is already provided by the IGC.

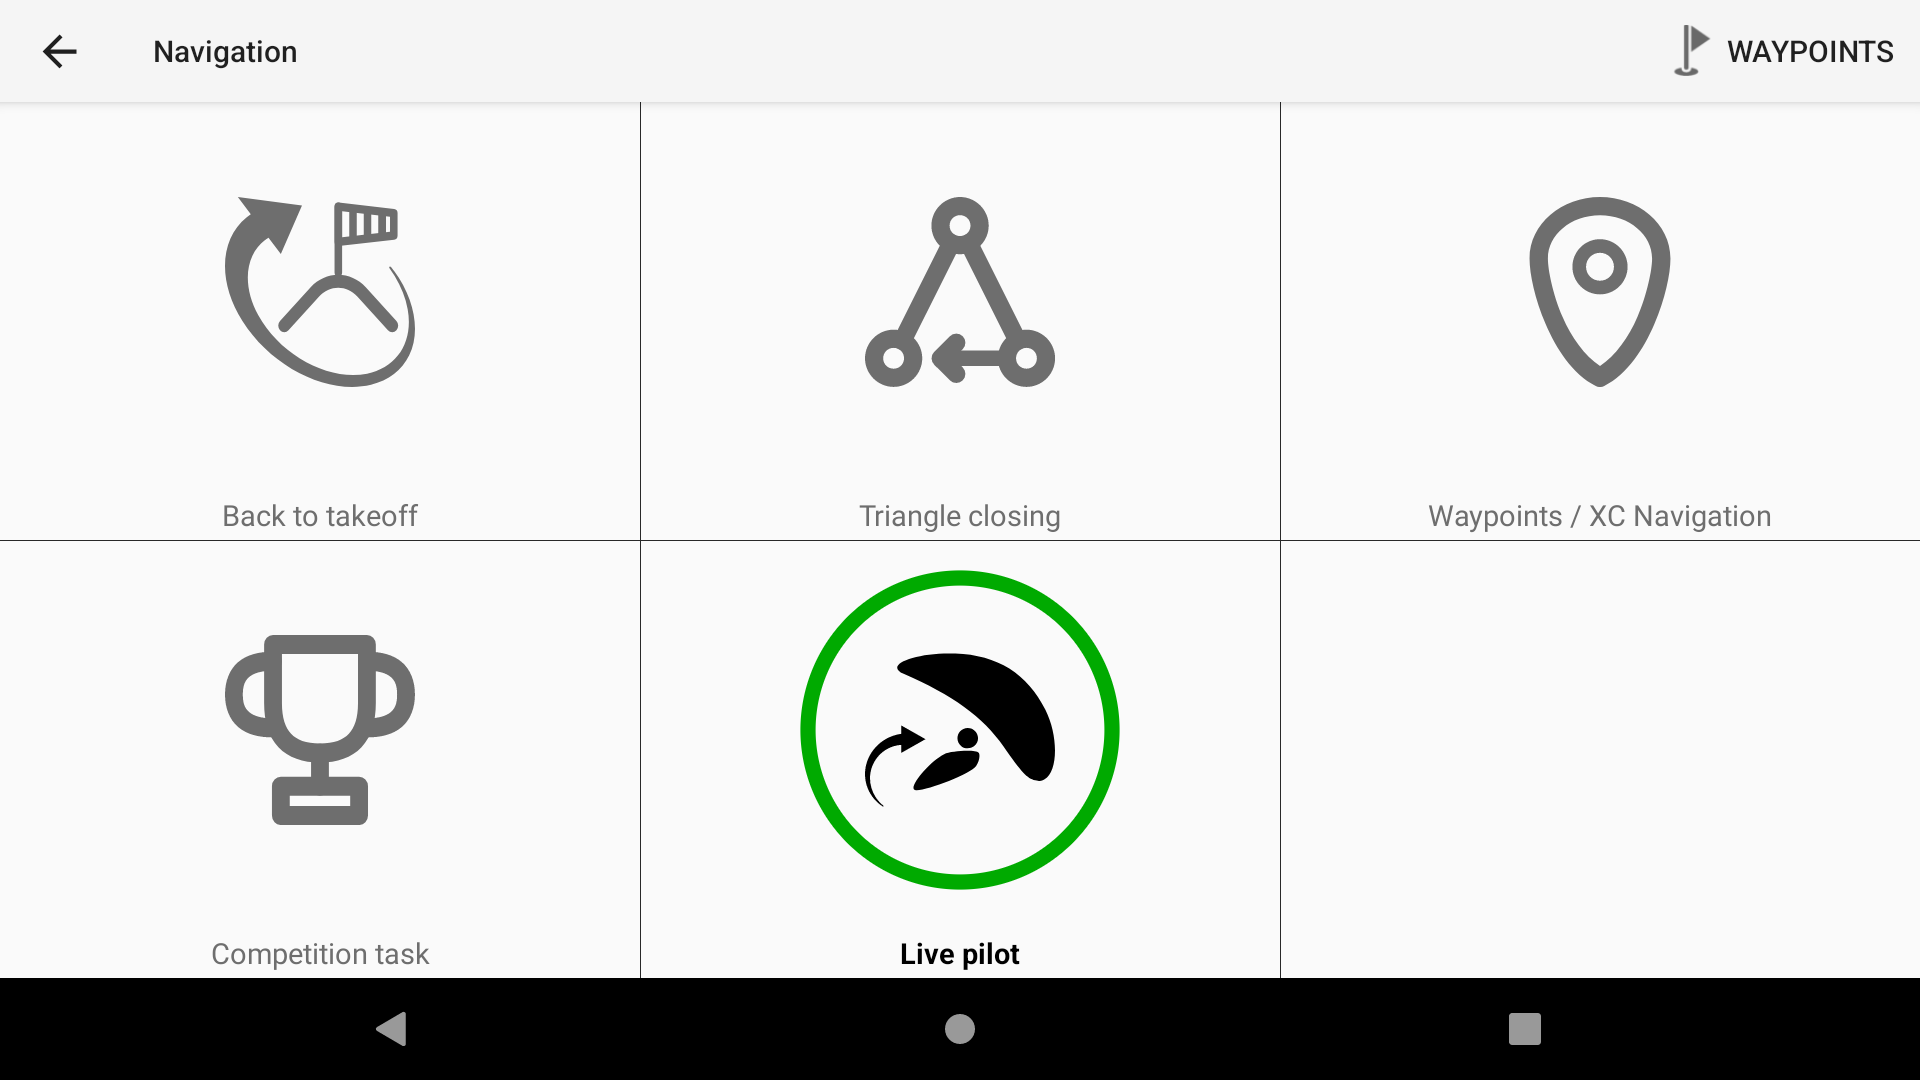
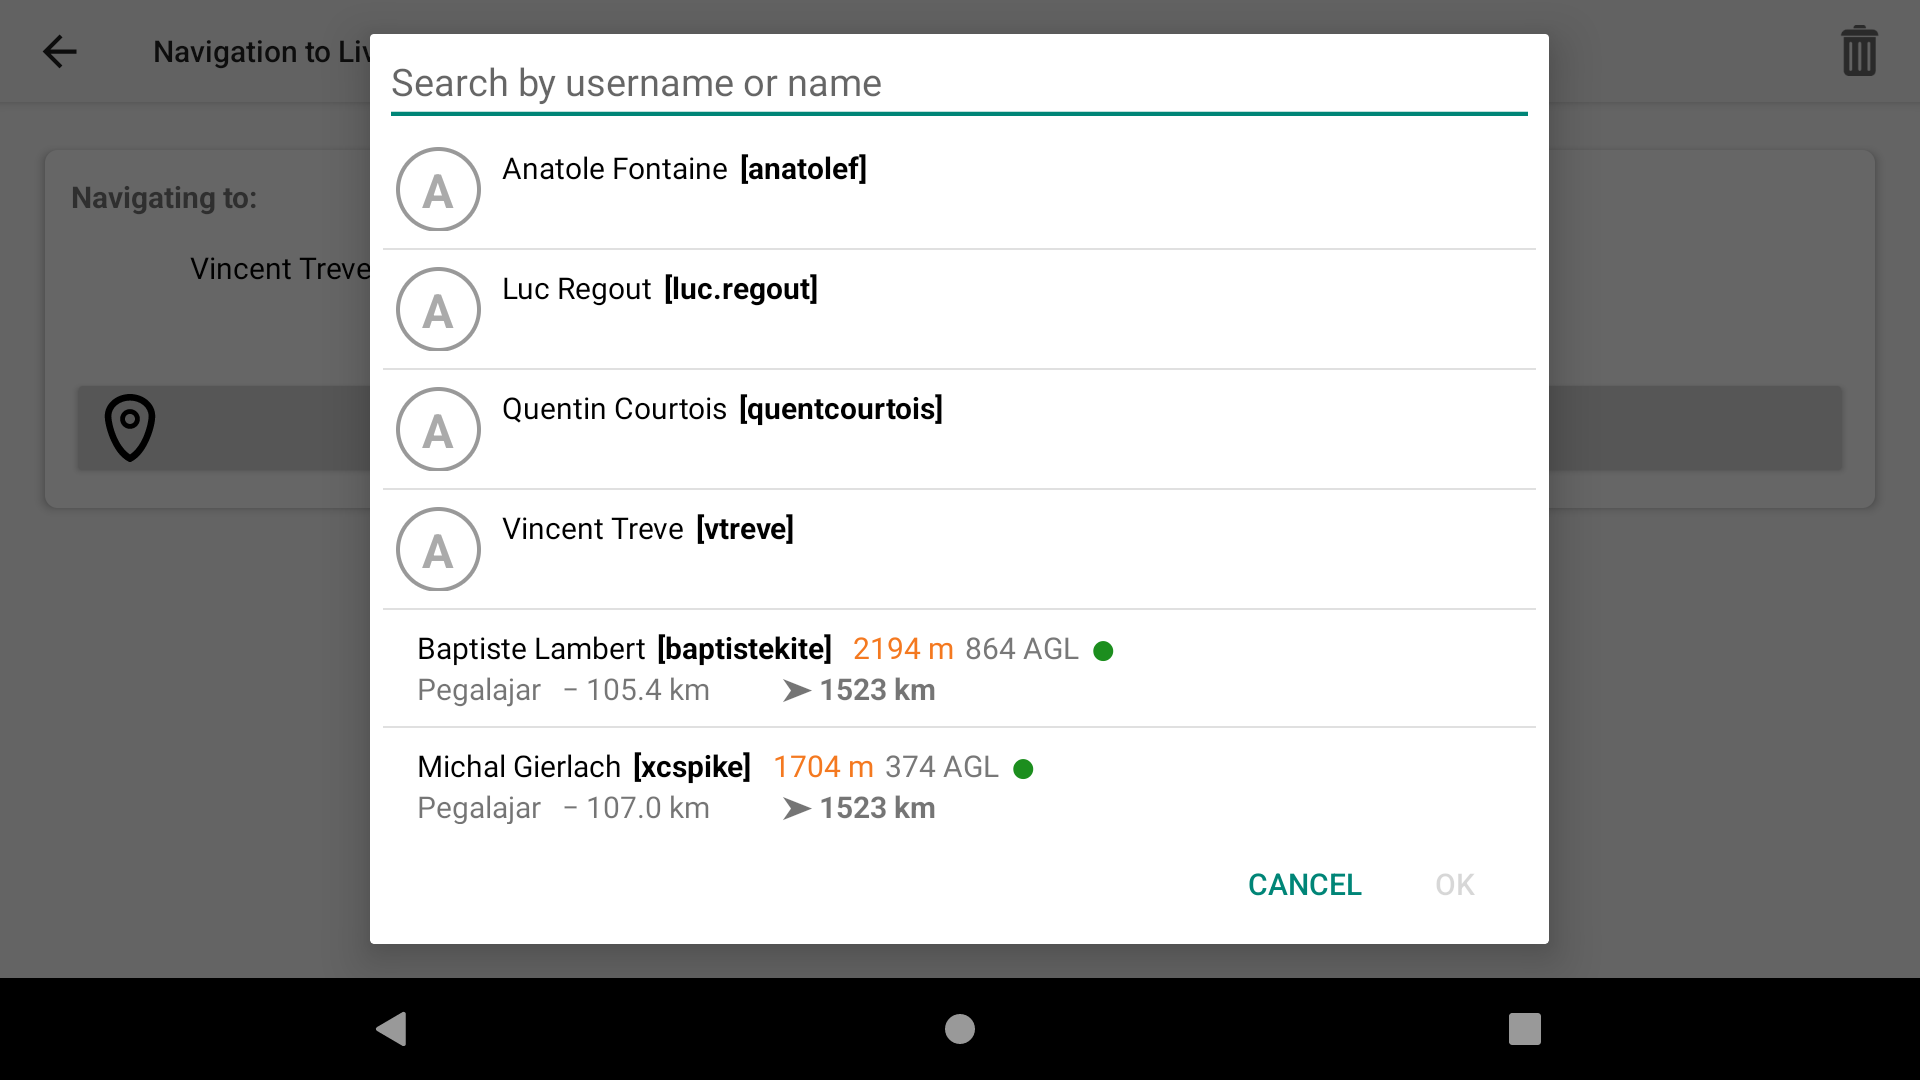
Select Live pilot if you want your navigation to point to the selected live pilot
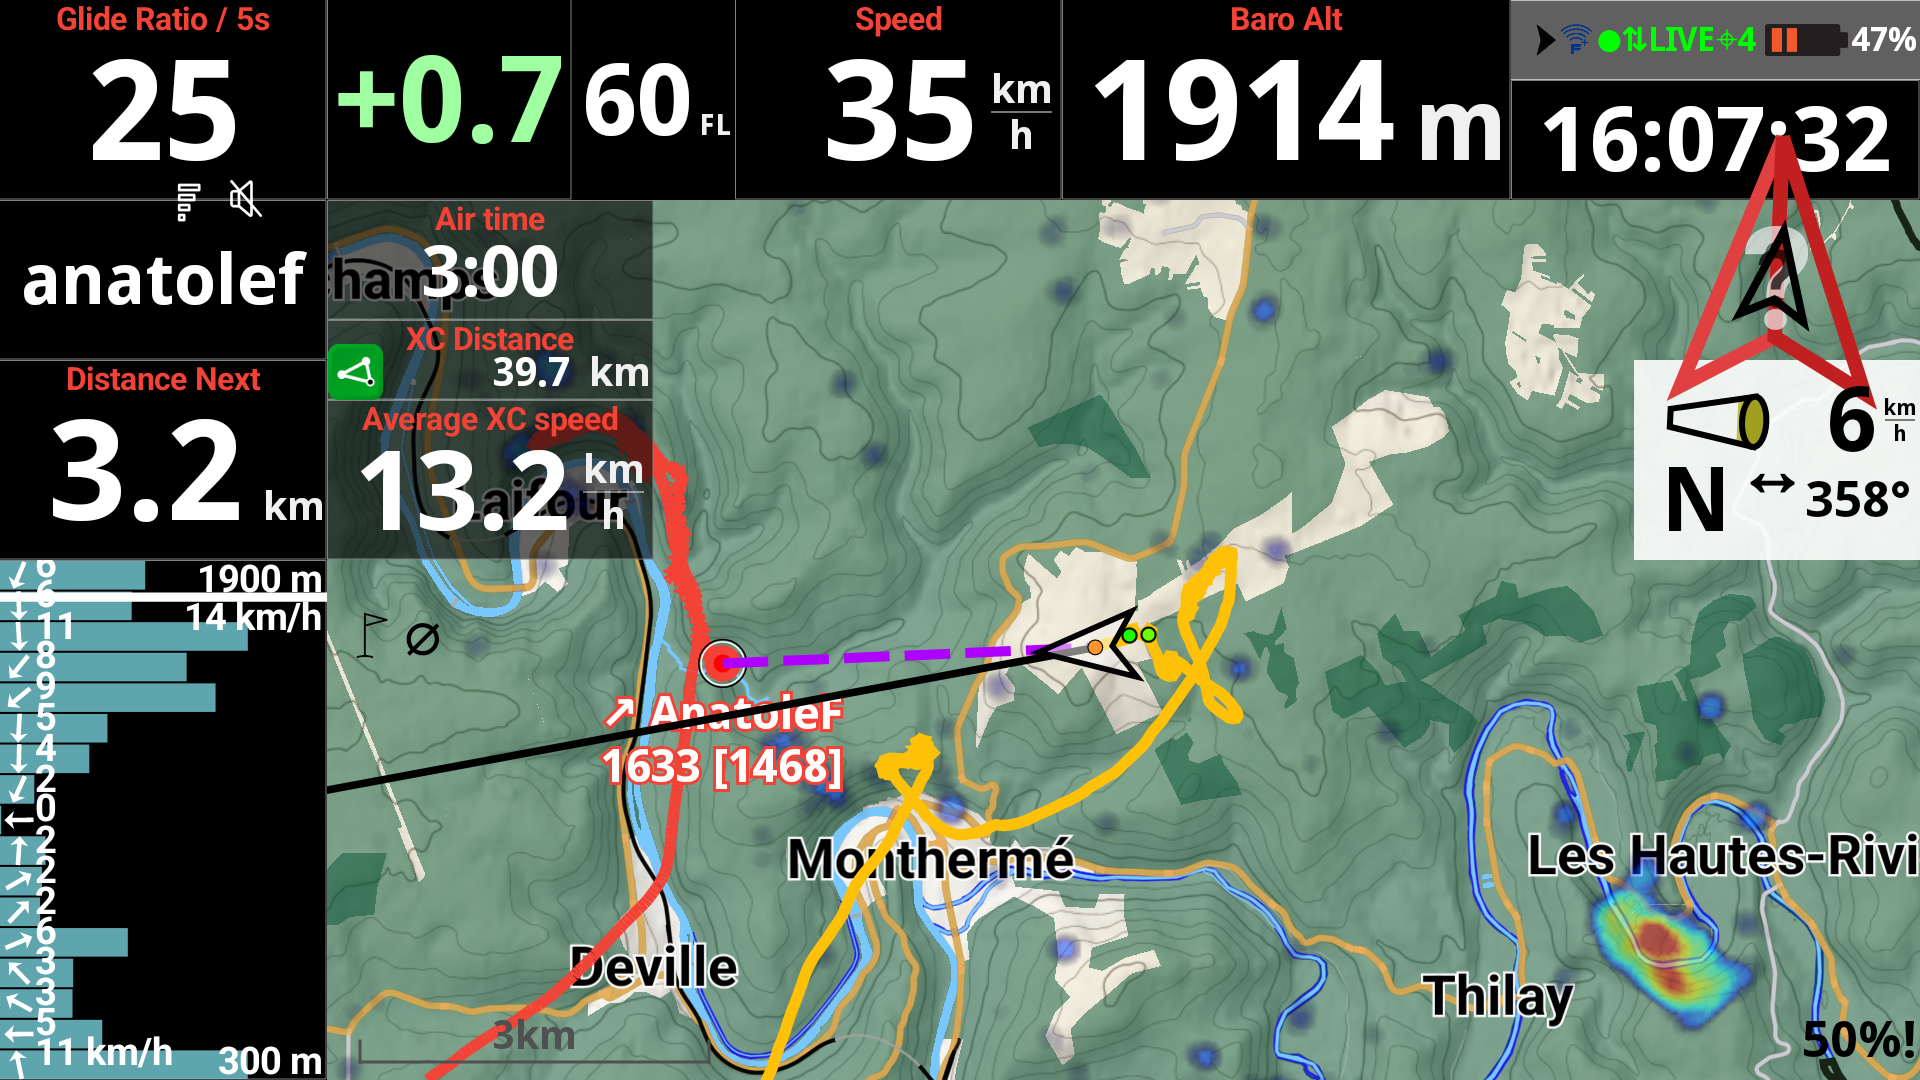
The Live Pilot Navigation mode allows you to see the direction to a specific Live pilot.
To use this feature, you need to set up the Livetracking feature correctly in XCTrack. Make sure you have enabled Livetracking in Menu > Preferences > Livetracking and correctly set up your XC Contest credentials in Menu > Preferences > Pilot & Accounts, and that you are logged in.
If you are having difficulty getting Livetracking to work, check this FAQ: https://www.fly-air3.com/ufaqs/enable-livetracking/.
To select a pilot, click on ‘Choose pilot’.
The first pilots in the list correspond to the pilots in your watchlist, which you can set up in Menu > Livetracking > WATCHLIST.
Otherwise, you can search for any pilot by typing their name or click on ALL Live pilots button to display the current pilot that are flying with Livetracking listed by distance from where you are located.
Once you have selected the pilot you want to follow, just follow the navigation arrow.
XCTrack can locate a pilot’s position in two ways: via the Internet or Fanet.
The internet refresh rate is once per minute, and you and the pilot you are following must have network access. Once the data becomes obsolete, the navigation arrow may become inaccurate.
If your device has Fanet capabilities, such as the PLUS versions of AIR³, the second source is Fanet. The refresh rate is every second. Both devices must have a Fanet module enabled and be in range. For close tracking, it is better to follow the Live pilot via Fanet. The internet source is necessary once the pilot is out of range.
When the data is more than two minutes old, the navigation arrow will change to an empty arrow with a question mark inside, and the navigation line will become a dotted line instead of a solid line. This indicates that the direction may be incorrect due to outdated data from the Live pilot.
You can easily create a route from a webpage such as AIR³ TDD Task Manager
When you are happy with the route, you can either get a cloud ID to fetch the task directly into XCTrack or display the QR code to scan it.

Here are the step by step details:
Open your browser and go to the AIR³ TDD Task Manager.
Select a CUP or select Load or Create a task not linked to a CUP.
Click on the map on the take off to create your first waypoint, click on the map for each turnpoints and set the radius. Once finished, you can either save the task as a xctsk file, show the QR code or get a cloud ID.
With XCTrack, go to Menu/Navigation/Competition task.
Click on the three dots in the top right corner and select ‘Load task from’.
You can then either scan the QR code, download it with Cloud ID, or import it if you have downloaded a xctsk file.
Cloud code steps:
QR code scanning
Fly and enjoy your flight, well prepared. Just follow the direction given by the arrow!
Once the task imported, with XCTrack, you can edit your task (change the type of race, SSS crossing type, radius of each turnpoint,… You can also change the name of the imported waypoints by “copy waypoint to internals” button. You can then edit the waypoint, including changing its name or setting the right altitude.

Next section