Check this FAQ to know more about battery life and maintenance.
Check this FAQ to know more about the best brightness setting for AIR³.
Check this FAQ to know more about readability.
AIR³ 7.2 and 7.3 have a battery of 10.000 mAh. This gives AIR³ a pretty large autonomy. So, how many hours does it mean?
To give a straight quick answer: 10 hours for AIR³ 7.3. But, read more details below to better understand the ins and outs.
Well, the autonomy can be influenced by many parameters. This means the autonomy is not a fixed number of hours.
A first factor that can influence battery life depends on how the battery has been initialized. As explained in this FAQ regarding battery maintenance, the battery capacity is optimal when performing 3 full charge and discharge cycles for the first time.
Using a black theme increases by 30% the autonomy. Not everybody likes it,… but it uses much less energy. This is why AIR³ is preconfigured with an hybrid Black theme with white maps.
The main factor that influences the autonomy is the brightness level.
Most of the time, when using a smartphone outside, the brightness is set to maximum. Otherwise, information is hardly read. This is the case because the screen brightness is weak on such device. This is not the case for AIR³. The FAQ related to the best brightness setting gives you more details about the link between brightness, readability and autonomy.
If you know you are going to fly for a very long flight, here are actually 4 “tips” you should have in mind:
- AIR³ should be fully charged as this is the case with most smartphones or tablets.
- AIR³ 7.3 has an advanced adaptative brightness sensor that adapt the brightness to the current conditions. This will definitly reduce the average brightness level, compared with a flight with full brightness all the time.
- There are brightness widgets and buttons + and – easily accessible. You can adjust energy consumption by increasing or decreasing brightness according to your needs and the duration of your flight.
- Doing a short clic on the power button is turning off the screen (all other features such as tracking, livetracking, accoustic audio remain active). With the screen off, the autonomy can be calculated in days… So, if you are going for a very long flight and have already used an important part of the battery, whenever you have the chance, you can turn off the screen this way and increase by hours the autonomy. A new short clic on the power button will turn on again the screen.
- If you want to use the maximum brightness all the time, you are going to make a very long flight and you don’t want to be bothered by a potential energy shortage, you should use a Power bank, together with the Pogopin USB cable, once you reach a low remaining battery percentage (using the powerbank always connected to the device is not ideal).
CCL, by using AIR³ the recommended way, you should get 10-12 hours of autonomy. Without taking into account these recommendations, depending on your settings and the way you manage the flight, you will get between 6 and 12 hours of autonomy with AIR³ 7.2, between 8 and 14 hours of autonomy with AIR³ 7.3 with no FANET-FLARM Module activated and between 7 and13 hours of autonomy with AIR³ 7.3 + with FANET-FLARM module activated. But most probably, you will be happy with our default settings and the adaptative brightness. This will give you more energy than enough.
Check our Readability matters page to better understand the influence between the tilt and the readability.
For info regarding battery autonomy while flying, check this FAQ.
For more info regarding brightness settings and consequences on battery autonomy while flying, check this FAQ.
AIR³’s lithium ion batteries are expected to provide 300 to 500 full cycles.
Once you receive your brand new AIR³, it is recommended that you perform 3 full discharge / recharge cycles to set the battery capacity to its maximum.
Launch XCTrack, make sure brightness is set to 100% (without being changed by adaptative brightness) and let it run until it reaches 5% or less. Recharge it for 5 hours or more and do it 2 more times.
Lithium batteries today do not have “charge memory” issues like Nicad batteries did in the past. So, this means that you don’t need to fully discharge it before charging it. However, we recommend that you perform a full charge / discharge cycle once every 50 charges to bypass digital memory and recalibrate the power gauge.
Follow also these additional rules:
- If it is not used frequently, it must be charged and discharged once a month
- Do not charge at high temperature or low temperature
- Do not fully charge the battery after it has often reached 0%. Charge at 15% first.
Avoid completely discharging lithium-ion batteries.
If a lithium-ion battery is discharged below 2.5 volts per cell, a safety circuit built into the battery opens and the battery appears to be dead.
The unit will only turn on if the battery is fully charged.
For prolonged storage it is therefore very important not to leave the device discharged. Make sure it is charged to more than 50% of its capacity.
Ideal charge before putting it away, is 80%.
If you are not anymore satisfied with your battery capacity, before concluding it should be changed, it is recommended that you perform 3 full discharge / recharge cycles to re-set the battery capacity to its maximum.
Read above instructions how to proceed with 3 full cycles.
Check if the duration of the discharge increases amongst the different cycles.
With any AIR³, XC Guide, running in the background, can display your position on OGN through an internet connection. With Air³ 7.3+, the FANET and FLARM module would display your position on OGN.
To know how to configure your Air³ to be seen on OGN through internet, read the procedure below or watch the tuto video to learn how to configure your AIR³ to be seen on OGN via XC Guide in the videos tuto page.
In XC guide, tap on the information blue button and scroll the XC guide status windows down to Open Glider Network
Tap on “New ID” and write down the Device ID and Competition ID provided.
Login with your OGN account. Add a new device and fill in the info that you wrote down. Select OGN as device type, select paraglider as aircraft type.
Once done, verify with XC guide that everything is working as expected (third button in the XC guide status window.
Go to Settings/Livetracking/Open Glider Network (OGN) and set your OGN options.


AIR³ has 2 cameras: front and back. Check AIR³ specifications for more details. So, you can take pictures or videos with Air³.
The back camera includes a high-sensitivity sensor that allows to take good pictures when the light is weak. The drawback of this high-sensitivity sensor is a “saturated” picture if you take the picture in light intense scenes or with a flash, if you are too close from the objects you are taking.
The are some workarounds: use the front camera, use the back camera with HDR mode.
This feature has been improved with AIR³ 7.3.
Yes! Of course.

Originally designed for flying, AIR³ is also an ideal tool for many other types of outdoor activities. Based on Android, it can run any Android application. This expands the possible uses without limit. If you need a robust instrument, very readable in direct sunlight, with a large autonomy, waterproof, with a very powerful GPS, etc.. AIR³ will meet your needs perfectly. AIR³ is a mix of GPS, smartphone, tablet, ruggedized for heavy use.

Different brackets have been designed to attach the AIR³ to different supports. For example, the paramotor base can be used to attach the AIR³ to a motorcycle handlebar and use it as a perfect navigation GPS.
Google maps app, OpenStreet maps app (OsmAnd) are for example two very good apps with navigation features and offline maps that will match most of navigation needs.
By default, the free version of OsmAnd allows you to download only 7 offline maps directly from the application. If you need to prepare your trip with more than 7 offline maps, you can either purchase an OsmAnd Pro license, which will allow you to download unlimited maps (and you will benefit from many other very interesting features), or you will need to copy the maps manually. Go to the Maps list on the OsmAnd website, select the map(s) you want to get. Extract the OBF file from the zipped file. Copy this OBF file to the OsmAnd directory: AIR3-7.3/Android/data/net.osmand/files/.
If you want to listen to music while driving, install your favorite music player and connect your headphones to AIR³ via Bluetooth or the 3.5 mm stereo jack.
The answer is YES!
However, you will need to use an eSIM card to convert the AIR³ into an eSIM compatible unit.
The eSIM.me solution has been successfully tested, click here.
With such eSIM card, where ever you go, you can easily get an eSIM profile to obtain an internet and/or a local phone number without the need of an additional physical SIM card.
Valid for AIR³ 7.3 or 7.3+, not 7.2.
A lot of AIR³ pilots are Apple minded. Before going AIR³, they are wondering if they will be able to use AIR³ and if AIR³ is compatible with their Apple computer.
AIR³ is based on Android, but you do not need to be familiar with Android to use AIR³. Unlike other flight instruments, AIR³ is based on current smartphone / tablet technologies. But to use it for flights, you don’t need to know all the ins and outs of Android. Once you get it, you turn it on and off you go flying.
There are many features that you can take advantage of, but you don’t need to activate them to use them.
AIR³ is compatible with any Apple computer just like an Android smartphone. That being said, it doesn’t really tell you if it’s compatible with your Apple computer.
Well, perhaps it’s important to remind you that compatibility between devices is done differently these days. Why is that? Because more and more we are using applications to let devices talk to each other, rather than trying to connect devices to each other with a cable.
For example, with a traditional flight instrument, if you want to load waypoints, share a task or route, upload your track to a competition website, etc., most of the time you need to connect your instrument to your computer by cable and then transfer these files to or from your instrument. With AIR³, most of these actions can be performed directly by connecting to the Internet. AIR³ is a computr by itself.
- To get a waypoint file, just go on the competition website with the browser, get the file on the web and save it in the right folder.
- To share a task, share it by whatsapp, by email, by Messenger or just share it through a QR code.
- To get your track, if you have set to automatically upload your track after landing, you can directly get your track on your Xcontest account either in IGC or KML format. If you have not automatically uploaded, just upload it in your cloud flights so that you can easily get it from any computer.
If you still want to connect the AIR³ to an Apple computer, the easiest way is to use an application based on your local network. You will then see the AIR³ as if it were connected by cable.
You can either create a route manually in Menu/Navigation/Competition task, adding one by one the different turnpoints you want to follow, or create a route easily on a webpage (on a map) and then transfer it to AIR³/XCTrack through QR code.
Watch the tuto video related to that topic in the Videos tuto page. The video shows both methods.
AIR³ is equipped with a performing GPS. However, you may experience some problems to get a good GPS signal in certain cases. Here are a few hints to discover why you would have faced such issue.
- Be sure to try to obtain a GPS position (once the satellites are received correctly) outdoors. A roof above you can affect satellite reception.
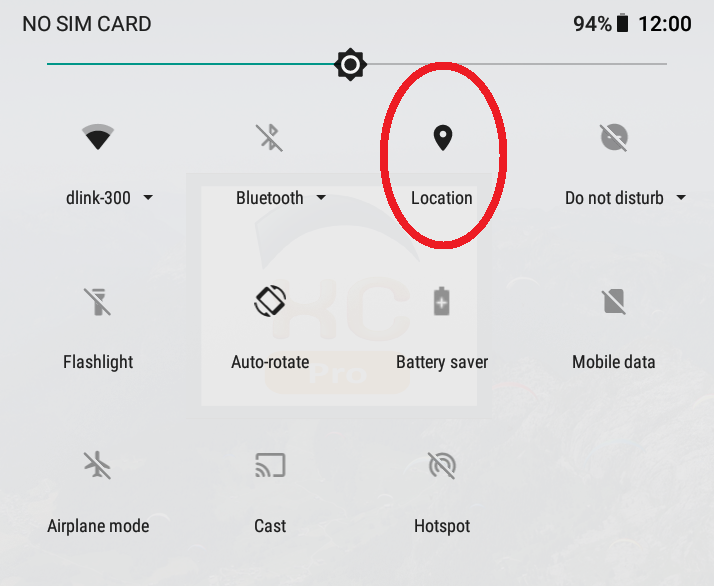
- The first thing to check is that you have location enabled. Swipe from up to down to get the main icons. Make sure the location icon is enabled
- The second thing to check is your time zone. The system will attempt to find satellites based on time zone and exact time. Go to settings/system/date & time and check the set time zone. Select the correct time zone by turning off “Auto Time Zone” if it is not set correctly. Once the correct time zone is set, make sure to enable “Auto Time Zone”.
- The third thing to check is the right time. The best way to set the correct time is to connect the device to Internet so that it can synchronize with a time server. Make sure to “Use network-provided time” in the date and time settings and make sure you have access to Internet (either with a SIM card or by connecting to Internet via Wifi ( via your phone’s hotspot for example if no wifi network is found)). Even a small time difference can delay very much the satellites detection.
- Once the time zone and time are set, launch the app “AndroiTS GPS test” (GPS fox for AIR³ 7.2). Select the list of satellites page to have a clear view on the satellites reception. Wait until you can see a green “ON” on top. Then close this app and launch XCTrack.
- The first time the unit tries to know where it is, it can take more time. This is called “Cold start”. Cold start is strongly reduced if you are connected to the network. If you have no internet, this is not a problem, but note that it can take more time to locate the first time.
- GPS antenna should not be covered. Check that nothing is altering the signal received by the GPS antenna. Here is an example of a metal sticker that reduces the GPS signal received by the antenna.

If you still face issues after following these recommandations, send us a small video through whatsapp showing 1/ the settings of Android Date and time, 2/ the page with the list of satellites in AndroiTS GPS test app (allow minimum a couple of minutes without any shade above you).
By definition, an option is not necessary. However, options are available in case you want to take advantage of specific features. You can find all options here: http://shop.fly-air3.com/shop/category/air3-19.
Check the accessories page to know more about each option.
The Livetracking of XCTrack is a great feature to see, be seen and communicate with others. XCTrack runs on Xcontest LIVE platform.
There are many Livetracking solutions available. XContest Live is probably the most advanced with the largest number of pilots using it.
However, only pilots that are using XCTrack will be displayed on the map unless you use one of the hereunder described methods.
Internet and/or radio module
In order to be seen or see others on the map, you can either use an internet connection, or use an equipment that sends and receives these data through an integrated radio module. This is the case with Flarm and Fanet devices.
FLARM’s main goal is to avoid collisions between aircrafts. FLARM stands for Flight Alarm.
FANET’s main goal is to provide Livetracking features without the need of internet network. FANET stands for Flying Ad-hoc Network.
Livetracking through internet, Flarm, Fanet, ….each solution has its pros and cons. AIR³ 7.3+ has all the Pros of each solution.
To be seen …
First of all, to understand the ins and outs of each solution, we need to differentiate the “see others” from the “to be seen”. In both cases, the time occuring between 2 sets of data informing about the position of each aircraft around should also be taken into account to differentiate the solutions available.
As long as Flarm’s main goal is to avoid collisions , a lot of devices such as AIR³ 7.3+ are able to transmit Flarm data (Flarm Tx).
AIR³ 7.3+ is able to communicate its position to others both through internet and through an integrated radio module (this means even without internet available), both to FLARM and FANET devices.
Through internet, it will be seen by others depending on the configuration: Xcontest Livetracking, OGN, Livetrack24, SportstrackLive,…
The easiest way to be seen by many Livetracking platform is to run XC Guide and configure it accordingly. See more details in the XC Guide specificities for AIR³ page.
If you want to be seen on OGN network, visit the FAQ related to that topic.
See others …
Flarm devices and others (OGN – Flymaster – Livetrack24 – XC Globe – Fanet,…) can be seen on the map of XCTrack Pro during the flight with any AIR³ (not only 7.3+) via XC Guide and an internet connection.
AIR³ 7.3+ is also able to see FANET and Flarm (V2) aircrafts from its integrated radio module.
Note that you will only see other aircrafts if you have activated the “Display nearby pilots” in the map configuration of XC map widget in the Xcontest widgets page or the task map widget in the competition widgets page.
To be able to see others via XC Guide requires an internet connection. This can be obtained either through your SIM card (mostly recommended because it doesn’t require any concern before take off) or by sharing your phone’s internet (hotspot) through WIFI or Bluetooth. Without the need of a Flarm receiving device, this method allows you to get all aircrafts around you on XCTrack map.
Watch a video tuto that shows how to configure XC Guide and XCTrack in the videos tuto page.
Configure XC Guide, XCTrack and AIR³ Manager as described in the XC Guide page.
You can set what you want to display (filters) on the map by changing the settings in XC Guide. Note that XC Guide has to run in the background to let XCtrack get the info to display.
OGN will display the following livetracking pilots:
- Aircrafts using a Flarm
- Flymaster livetracking (to be confirmed)
- All aircrafts using an OGN tracker
- Garmin Inreach
- Spot
- Fanet
- PilotAware
- Spidertracks
In addition, you can configure XC Guide to also display the following livetracking pilots:
- Livetrack24
- Skylines
- Flymaster groups
- Airwhere
- XC Globe
- SPOT & Garmin inReach


If you have lost your AIR³ or if it has been stolen, you can maybe find it back depending on what you have done when you received it and if you have inserted a SIM card or not.
As an Android tablet, you can set a Google account. Make sure to enable location history.
By logging in your Google account, you have two easy way to find your device (if the device is connected to internet):
- https://www.google.com/android/find allows you to quickly find where your device is, play a sound or secure your device (Lock device and sign out of your Google Account. You can also display a message or phone number on the lock screen).
- https://www.google.be/maps . Go to the burger menu while connected with your account and click on “Your timeline”. You can see the latest place saved with the device.
As an Android device, there are also many other ways to find your device. You can install an app such as “Wheres My Droid” that can be used for that purpose.
If you have inserted a SIM card, you can also just simply send a text message or call your device. There are many ways to find it back.
A large number of pilots think the only way to have a good readability is to increase the nits (~ brightness) or to use a eInk screen (black and white). The most important factor is the angle of the screen with the look (perpendicular) and not the nits/brightness).
Read more details about best brightness setting in this FAQ.
Read more details about link between brightness, readability and autonomy in this FAQ.
In the “Readability matters” page, you can see a comparison between AIR³ 7.1 and AIR³ 7.2 (1000 nits). Tilting the screen is the most efficient way to increase readability.
By default, your contacts will not sync unless you install an app that will allow to sync them.
You can either find the Google contacts sync on APKmirror or by following this link.
Use the app corresponding to your Android version.
Yes. AIR³ is an Android tab/phone. Any Android app compatible with the android version of AIR³ will be compatible with AIR³
There is no problem with AIR³ 7.1 and AIR³ 7.2.
With AIR³ 7.3, the technology is different. There are different technologies used for polarisation.
With some polarised glasses, if you use AIR³ in portrait mode, there will be no problem; in landscape mode, the screen will be darker. With other polarised glasses, there will be no problem. So, the only way to answer correctly is to test the glasses with the AIR³ 7.3.
Yes, AIR³ is also a flight computer that computes all the info required to optimize your flight during competition. With a version of XCTrack > 0.6, AIR³ generates an IGC file that corresponds to the FAI standards and therefore belongs to the instrument accepted for FAI category 1 competitions.
See XCTrack in the list of instruments of the FAI instruments list here.
Watch the Competition video tutorial
You can also find more information about competition in the competition section of the Menu/Navigation page of XCTrack Pro Manual, as well as in the details regarding Competition widgets in the Competition subsection of the XCTrack Pro widgets Manual.
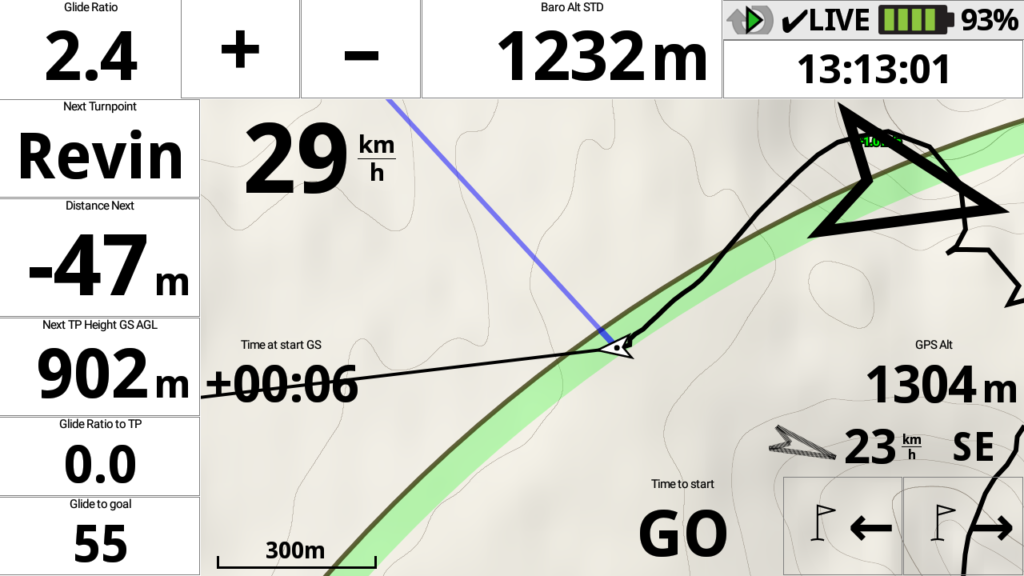
After the start, the green light tells you that you can “GO”
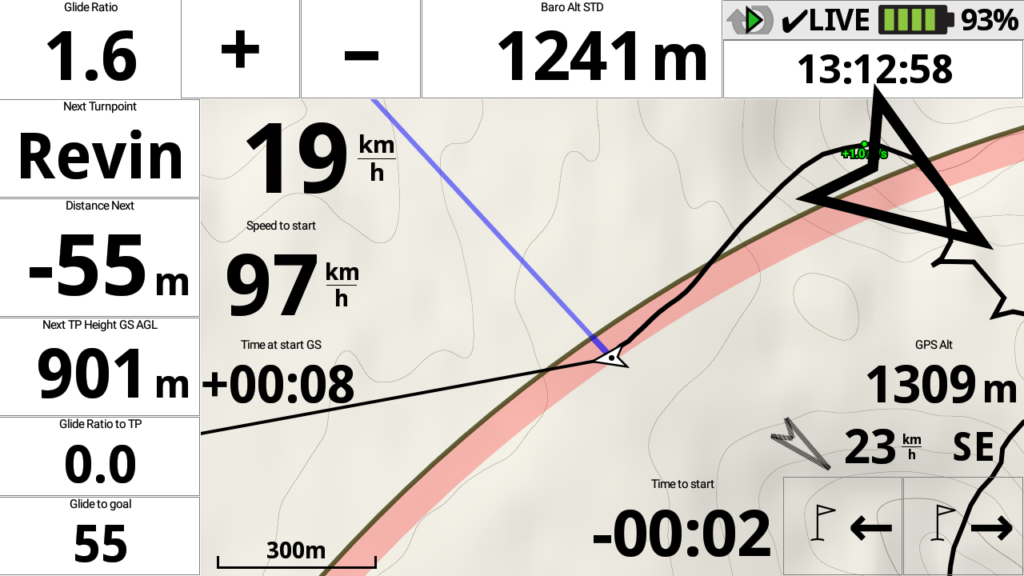
Before the start, you can check the speed required to reach the start line and the remaining time before the start
The automatic zoom will let you check at any time your position towards turnpoints, zooming in when you are approaching the turnpoint, zooming out when necessary.
At any time, keep an eye on the remaining distance to the goal, the glide ratio required to the goal and the glide ratio to the next turnpoint.
Once approaching the goal, keep an eye on the altitude over goal to optimize your score.
Yes. AIR³ is preconfigured with a customized and improved version of XCTrack Pro. It includes a perpetual license of XCTrack Pro. AIR³ is also preconfigured with all the Maps and all the Terrain files of the main countries where it is shipped. You can add easily more maps and more Terrain should you need other regions. Read more in Menu/Preferences/Map details in the XCTrack Pro Manual.
Check the video here how to install additional maps and terrain.
Alternatively, you can also get a 128 Gb SD-card with pre-installed maps of the world.
This SD card contains maps of every country in the world. When you travel to a new country, simply copy the corresponding country into the XCTrack subfolder. Watch this video to find out how.
Yes, who can do more can do less. With the KISS configuration (Keep Interface So Simple), AIR³ is just providing the most needed features once a pilot start requiring his first vario. Through his evolution, the pilot will benefit from the other powerfull features by just using the “Easy” config file or the “Expert” configuration provided with AIR³.
For more details about Flarm, Fanet and Livetracking, check this FAQ.
The Flarm module integrated in AIR³ 7.3+ is using 868 MHz data communication frequency currently.
The Flarm module integrated in AIR³ 7.3+ V2 uses all frequencies used by Flarm worldwide. The module selects automatically the right frequency.
868.2-868.4 MHz (Europe, Africa)
869.2 MHz (New Zealand)
902-928 MHz (North America)
916.2 MHz (Israel)
917-926.6 MHz (Australia, South America)
Yes. AIR³ is using a performing barometer sensor from Te connectivity to determine the altitude and the altitude changes. It can detect an altitude change of less than 10 cm per second.
Here are most of the new or improved features in 7.2, compared with AIR³ 7.1:
- Vario, new pressure sensor: Te connectivity (Vs. Bosch)
- Android 8.1 (Vs. Android 5.1)
- Screen max brightness: 1000 nits (Vs. 400 nits)
- Deca core 2.4 Ghz (Vs. Quad core 1.3 Ghz)
- Ram/Rom: 4 Gb/64 Gb (Vs. 2Gb/16 Gb)
- Battery: 10.000 mAh (Vs. 7.000 mAh)
- Emergency quick button
- Easier to use physical button
The only difference is the Fanet/Flarm module inside the unit.
The consequences are:
- Both modules can transmit and receive Fanet.
- V1 can only transmit Flarm, not receive. V2 can do both transmit and receive Flarm.
- V1 could only use 868 Mhz, which means only EU. However, with the latest firmware upgrade provided in december 2022, the module can now also communicate on other frequencies for Fanet.
V2 can use the different frequencies, both for Fanet and Flarm.
Note that V2 can receive both Fanet and Flarm but, if a Fanet signal is received from a given pilot, the Flarm signal will be ignored as it would become irrelevant.
How to identify if the unit is V1 or V2? There is nothing outside that can differentiate a V1 and a V2. All units produced after november 2022 are V2. All units produced before that date are V1.
Read more details about enabling Fanet and Flarm module in this FAQ.
The AIR³ Manager is a small App developped to manage the basic features of AIR³ besides XCTrack. Look at the AIR³ Manager page and the AIR³ Manager manual.
What is the difference between AIR³ and a low cost phone or tablet on which I can install XCTrack?
If you have reached this page, it means you are headed in the right direction. But you are not there yet. XCTrack is the most efficient and ergonomic flight software. Now using XCTrack is one thing, the hardware that XCTrack runs on is also essential to have a good flight instrument.
Are there many pilots who only use their phone or tablet as the ONLY flight instrument? Probably not, here are some reasons (not sorted by importance) that differentiate AIR³ from such a solution.
- Readability is a key characteristic of a flight instrument. AIR³ has a very bright screen with up to 1000 nits. This gives the possibility of reading information even in the worst cases.
- A large majority of phones or tablets do not have a pressure sensor. Now, having a pressure sensor does not guarantee a good vario. The quality of the sensor is also important, as well as the way the system and the software are using the data coming from the sensor.
- AIR³ is a rugged tablet IP67. This means it is robust, shock proved, water resistant. As long you are very cautious, doing very soft landing and take off, etc, it may not be an advantage but if not, it is one for sure. The counterpart of this is that it is more heavy (strong material, rubber, protection, etc.) than usual instrument.
- AIR³ has a 7″ display, which allows to have very large widgets easily readable, very large Map on screen, etc. This is certainly an advantage, compared with a phone. Most tablets have a 8 or 10″ display. We beleive it is too large and unnecessary. 7″ is the ideal size.
- As explained on the base page, readability is key for a flight instrument. Increasing the brightness is solving only partially the readability of most devices and increase the energy consumption. A special base has been designed for the AIR³ form factor to put AIR³ right in front of your eyes for increased readability. The pilot will be much more satisfied with the readability of AIR³ compared with a phone or tablet. Check also our “readability matters” page.
- AIR³ is the only device sold with a perpetual licence of XCTrack Pro. This gives the opportunity to use certain widgets that are not available in the free version of XCTrack. The set of Pro features will increase in the future and will of course be available for AIR³ users that have a Pro version of XCTrack.
- AIR³ has easily accessible physical buttons to interface with the application. When wearing winter gloves, the interface with the touch screen function may become difficult. With the physical buttons, you can easily zoom in or out, change pages, change the waypoint to follow, increase or decrease the brightness, etc..
- AIR3 Manager is an additional app preinstalled on AIR³ that manages some basic features, including the way to choose XCTrack profile and theme (both applications are communicating with each other so that the user do not need to know all the different settings to change into XCTrack to change profile or theme). AIR³ Manager also offers a way to automatically download the latest openair file validated by the local group of pilots that are concerned by Airspace compliance. See this video that details the way AIR³ is managing AIRPACE.
- AIR³ is sold “Ready to fly”, preconfigured with 4 different profiles and 3 different themes. XCTrack is a very powerfull application but it is sometimes too complex for some users to take advantage of it. With AIR³, no need to learn all the different advanced features of XCTrack to take the best out of it.
- The autonomy of AIR³ is large with 10.000 mAh…It gives the opportunity to keep your phone battery,… and keep having the chance to use your phone once landed.
- AIR³ speaker and microphone gives you the opportunity to call or receive calls, keeping your hands on the breaks. (except to hang on or to execute the preconfigured call widget). Few tablets have the opportunity to use it as a phone. Being able to receive calls and make calls can be very usefull in many situations
- AIR³ 7.3 has a pogopin (magnetic) USB connector. If you need to charge the device in flight with an external battery, you can easily connect. In the event of a hard landing, there is no risk of breakage with the USB connector.
- AIR³ is sold through distribution. This mean that you should have the opportunity to test it before buying it if you are not yet convinced. Not sure which local distributor is selling the AIR³? Contact us. If there is no local dealers yet, take advantage of our “satisfied or refunded” commitment.
AIR³ is provided with a perpetual licence of XCTrack Pro. The licence is linked to the device, not the pilot.
The perpetual licence is generated by a long file name (called Bootstrap file) located in the Bootstrap folder of XCTrack, ending by .xcbs.
That perpetual licence file is based on the IMEI number of the device and is linked to the product name registered in the system. In other words, the licence can only work with the specific AIR³ for which the Bootstrap file has been produced.
Here are a few comments related to the Pro licence mechanism, in case you experience difficulties with XCTrack PRO.
- The device name and product name should be AIR3
- The xcbs file (Bootstrap file) has to be located in the Bootstrap folder of XCTrack (it is case sensitive)
- The xcbs file is directly related to the IMEI number for which it has been produced, make sure to use the right xcbs file
- Check the date and time of the device. Wrong date and/or time may drive to Pro activation failure.
If you have accidentally erased the bootstrap file and you try to activate back the pro licence, here are a few comments to take into account:
- Layout change. First of all, XCTrack needs to recognize the file, check that it is related to the IMEI of the device and the name of the device. The xcbs file contains pages layout made for AIR³. If you see the pages layout that has changed after starting XCTrack, it means that the xcbs file has been recognized by XCTrack. This is the first important step.
- Time check and GPS fix. Once the file has been taken into account, XCTrack licence mechanism will check the date and time of the unit and compare it with the GPS time. Therefore, the date and time has to be set correctly on the device (Check settings/system/date and time), the time zone needs to be set correctly and the unit needs to have a GPS fix (GPS time should be indicated in the widget “Time”). Once the unit has a GPS fix, restart XCTrack.
Note that the name of the xcbs file must remain exactly the same. Make sure you haven’t changed the name.
If you have checked all previous items and still fail to get the Pro features within XCTrack, send us a Video through whatsapp showing the different details explained hereabove, including the full name of the xcbs file.
If, for some reason, you don’t have any xcbs file related to your device in XCTrack’s Bootstrap folder, first check your device’s root folder if you have a folder name that contains numbers. This number should match your IMEI. In this folder you should find the xcbs file. Just copy it to the Bootstrap folder of XCTrack. If you no longer have this folder containing the xcbs file (after a factory reset for example. Note that before performing any factory reset you must first save this xcbs file), then you must contact us to get a new xcbs file. In this case, you must provide us with your IMEI.
IMEI number can be found:
- on the box of the device when you bought it
- on the back of the device
- in Settings/About device/IMEI (depending on Android version, you may need to find it in Settings/System/About device/Status)
- in XCTrack Preferences/About XCTrack by clicking on the XCTrack version and then scrolling down.
- If you still can’t find your IMEI but found the MEID, please provide it to us (MEID is the same as IMEI with missing last number).