
A flight instrument on your wrist: variometer, wind, thermal assistant, navigation and IGC recording on a Wear OS smartwatch, with a companion phone app for settings. This manual covers both.
Contents
- Overview
- Requirements
- Installation
- First launch and permissions
- The watch app
- The phone app
- Settings reference
- How the vario sound works
- Automatic takeoff and landing
- Wind
- Map mode
- Navigation and tasks
- Flight recording
- Altitude reference and units
- Battery and background operation
- Subscription
- Diagnostic log
- Troubleshooting
- FAQ
Overview
AIR³ Vario Watch turns a Wear OS smartwatch into an acoustic variometer. It reads the watch’s barometric pressure sensor many times per second, derives your vertical speed from it, and plays a tone whose pitch and rhythm follow that vertical speed — the sound free flight pilots use to find and centre thermals without looking at an instrument.
That is the core, and it is what you will use it for most. But a variometer on its own has not been a complete flight instrument for a long time, and this one does not stop there. While you fly, the watch also:
- works out the wind, speed and direction, from your own turns — no extra sensor, nothing to set up;
- shows you where the lift was on the turn you have just flown, so you can correct toward it, and draws the turnpoint you are closing in on — map mode;
- points you back to launch, or round a competition task imported from an XCTSK file — see Navigation and tasks;
- records the whole flight as a signed IGC file and sends it to your phone when you land;
- keeps its altitude honest by working out the sea level pressure of the day by itself, before you launch.
All of it runs on the watch, in flight, with the phone left in the car.
What it is not is a screen to stare at. There is no map and no airspace, and there will not be — a 45 mm display is the wrong place for them, and pretending otherwise would make it worse at the thing it is good at. The design goes the other way round: what you need continuously comes as sound, and the screen is for the moments you actually choose to look. That is what makes it something you fly with rather than something you fly around.
The app is built around two devices:
- The watch does all the work in flight: sensors, sound, GPS, automatic takeoff and landing detection, the wind, map mode and navigation. It runs on its own and does not need the phone to be nearby once it is configured. A handful of key settings can also be switched on or off directly on the watch, mid-flight — see Quick toggles on the watch.
- The phone is where you prepare: thresholds, sound behaviour, units, automatic detection, and the competition task you are about to fly — set here and sent to the watch over the Wear OS connection. The subscription is also managed here. Once that is done the phone has no further part to play in the flight.
Two features go beyond what a pressure sensor alone can do. Instant Lift uses the watch’s motion sensors to signal the moment you enter lift, before any pressure change is measurable; it is on by default. Weak Lift gives a voice to the band around zero — sinking a little, holding, gaining a little — where most of a weak day’s usable lift is found; it is off by default, being a choice about how talkative you want the vario to be. Both are described under Settings reference.
It is designed for paragliding and hang gliding, but nothing in it is specific to free flight: any activity where you want to hear whether you are going up or down works the same way.
Requirements
- A smartwatch running Wear OS 5 or later.
- A barometric pressure sensor in the watch. This is what makes a variometer responsive. Without it the app falls back to GPS altitude, which is far slower and much less precise vertically — usable to display an altitude, not really usable as a vario.
- GPS in the watch, for ground speed, heading and automatic takeoff detection. The vario itself works without GPS.
- An Android phone paired with the watch, to change settings and to subscribe.
- An active subscription to use the vario sound and the always-on display (see Subscription).
No barometer? If the watch has no pressure sensor, the main screen shows a warning and the app uses GPS altitude instead. Vertical speed will be sluggish and noisy. A barometric watch is strongly recommended.
What your watch’s hardware determines
This is worth understanding before your first flight, because it sets what you can reasonably expect. AIR³ Vario Watch does not measure anything itself: it reads the sensors your watch already has, and it can only be as good as they are. Two pilots running the same app on two different watches can get noticeably different results, and that difference comes from the hardware, not from the settings.
Four things depend on your watch rather than on the app:
- Pressure sensor quality. This sets how precise and how quick the vario can be. A coarse or noisy barometer produces a vertical speed that either jumps around or has to be smoothed so heavily that it reacts late. The smoothing control lets you choose between those two, but it cannot create precision the sensor never had — and Weak Lift, which works on very small altitude changes, is the first thing to suffer on a poor sensor.
- GPS receiver and antenna. These set your ground speed, heading and position accuracy, and therefore how reliably automatic takeoff works. Some watches hold a good fix under a wing; others lose it in a turn or degrade it once the screen is off.
- Processor and power management. Manufacturers are free to throttle or suspend background apps to protect battery life, and some are aggressive about it. Where that happens, you may hear brief gaps in the sound or see the display update less often, even though the app is doing nothing differently.
- Speaker output. Watch speakers vary enormously in loudness. On some models the vario is perfectly audible in flight; on others it is hard to hear over wind noise at speed.
None of this is something the app can compensate for, which is why it matters that you find out where your own watch sits before you rely on it.
Test it on the ground first Use the sound test to check how loud your watch really is, and the altitude chart to see how clean your pressure sensor is — walk up and down a few flights of stairs and watch how closely the smoothed line follows the raw points. Then fly a few flights alongside an instrument you already trust before treating this one as your primary reference. If the results disappoint you, the honest answer is often that the watch is the limit, not the settings.
The barometer and the wind
There is one more hardware difference, and it catches pilots out because it has no equivalent on a real instrument. A variometer built for flying has its pressure port shielded, placed out of the airflow, or both, precisely because it will spend its life in moving air. A watch has none of that: its port is a small hole in the case, designed for a watch sitting on a wrist. Nobody expected it to be exposed to a 50 km/h airstream.
Air moving across that hole changes the pressure the sensor reads. The barometer cannot tell that apart from a real change of height, so the vario hears it as climb or sink. What you notice is a sound that does not match the air you are in — unstable, oddly loud, sometimes changing the moment you speed up, turn, or move your arm. It is not the app losing its mind, and it is not the sensor failing: it is wind reaching a hole that was never meant to be in the wind.
The test takes ten seconds, on the ground. Open the vario screen and blow gently on the case, across the small hole in it. If the altitude jumps while you blow and settles again when you stop, your watch’s port is exposed and you will hear it in flight. A watch whose port is well placed barely reacts.
Two things help, and they can be combined:
- Wear the watch so that it is shielded. Which way round depends on where the hole is on your model, so find it first — then wear the watch with the hole facing your wrist, or under a sleeve, rather than into the relative wind. On many watches this alone is enough.
- Cover the hole with a scrap of foam, the same open-cell foam used as a windscreen on an outdoor microphone, and for the same reason: it breaks up the airflow without stopping the air. The one rule is that it must never seal the hole — the sensor has to reach the pressure around you, so the foam must stay porous and loosely held. A piece of tape, or foam pressed flat against the case, turns a noisy vario into a vario that reads nothing at all.
Installation
Both apps are published under a single Google Play listing, so you install them from the same place.
- Starting from the watch: open the Play Store on the watch, search for AIR³ Vario Watch and install it. Then open the app and tap the phone icon at the bottom of the screen — this automatically opens the Play Store on your phone with the listing ready to install.
- Starting from the phone: open Google Play on your phone and install AIR³ Vario Watch. Then go to the Play Store on the watch to install the watch app from there.
No automatic notification Older versions of Wear OS used to push a notification to the watch when a paired app was installed on the phone. This no longer happens reliably on current devices. If the watch app does not appear on its own, go straight to the Play Store on the watch.
You need both: the watch app to fly, the phone app to configure it and to subscribe.
First launch and permissions
The first time you open the app on the watch, it asks for two permissions.
| Permission | Why it is needed |
|---|---|
| Location | Ground speed, heading, GPS accuracy, automatic takeoff detection, and GPS altitude when the watch has no barometer. Required while the screen is off, which is why the app runs as a foreground service. |
| Notifications | To show the ongoing notification that keeps the app alive and lets you stop the vario without opening the app. |
Although you can decline both, this is not really recommended. The vario sound will still work from the barometer alone, but you lose ground speed, heading and automatic takeoff.
Once the app is open, the barometer and GPS start reading immediately — before you press anything. That is deliberate: it lets the altitude settle and the GPS get a fix while you are still packing up, so the vario is accurate the moment you start it.
The watch app
Main screen — vario stopped
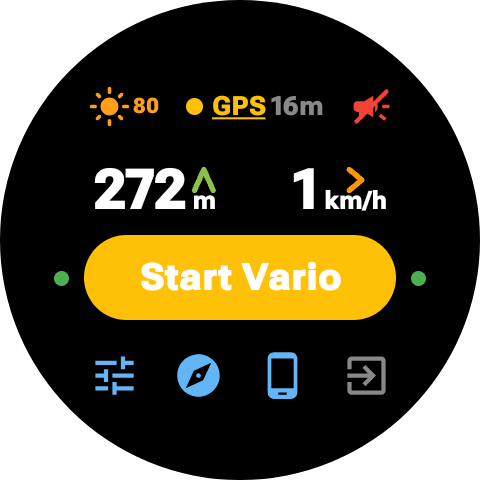
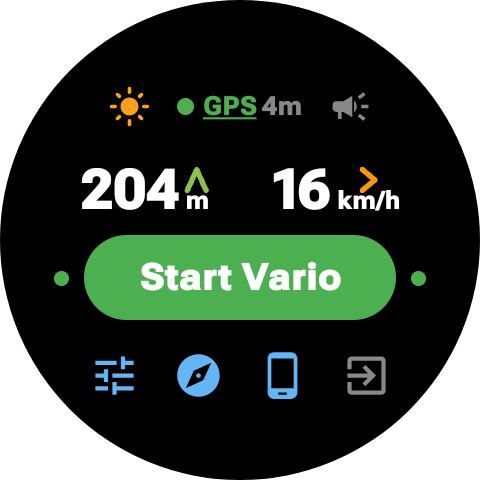
This is what you see when you open the app. From top to bottom:
- Three indicators, side by side across the top. Each is a status light you can also act on, by holding it — see Quick toggles on the watch.
- Sun, on the left — the symbol watches use for brightness. Grey normally, orange when Keep screen on is active, with the fixed brightness percentage beside it when you have chosen one. Hold it to open the display settings on the watch. Without a subscription it stays grey and does not respond.
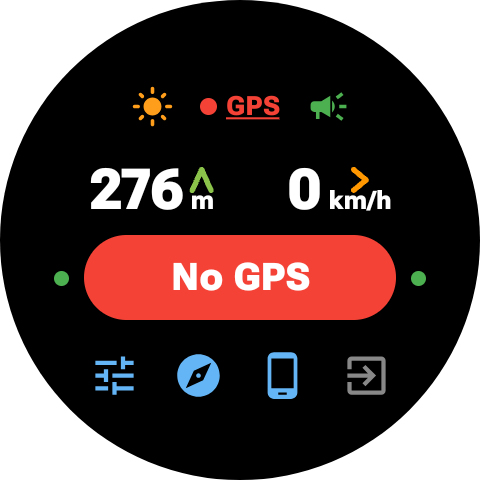
- GPS, in the middle — a coloured dot, the word GPS, and the current accuracy in metres: green for 10 m or better, amber between 10 and 30 m, red for worse than 30 m or no fix at all. If no position update arrives for 15 seconds, the app declares the signal lost: the indicator turns red, the accuracy figure disappears, and the last known speed stops being treated as trustworthy. Holding it does something else entirely — it switches the diagnostic log on or off, and the word GPS is underlined while the log is recording.
- Megaphone, on the right — what the vario will sound like: green for maximum volume, grey for normal volume, red and crossed out for silent. Hold it to cycle through the three.
- Altitude and ground speed, side by side, in the units you chose on the phone. A long press on the altitude opens the QNH adjustment screen.
- A warning line if the watch has no barometer.
- A warning line if battery saver is active on the watch. This matters before launch: battery saver degrades GPS accuracy and update rate, which affects ground speed, automatic takeoff and the wind estimate. The vario sound itself is unaffected.
- The Start button, with a small dot on each side of it.
- A row of four icons along the bottom.
- Sliders — hold to open the Tools menu: the altitude chart and the sound test.
- Compass — hold to choose the navigation mode.
- Phone — tap to open the AIR³ app on your paired phone. Orange when a flight is still waiting to be sent to it.
- Exit — tap to close the app, hold to open the About screen.
The Start button
The button’s colour and label tell you the state of the GPS at a glance, so you know what to expect before launching:
| Appearance | Meaning |
|---|---|
| Grey — Subscribe | No active subscription. Tapping opens the subscription screen. |
| Red — No GPS | No GPS fix yet. |
| Red — Weak GPS | Fix acquired but accuracy is worse than 30 m. |
| Amber — Start Vario | Usable fix, accuracy between 10 and 30 m. |
| Green — Start Vario | Good fix, accuracy 10 m or better. |
The button always works. Even when it reads No GPS, tapping it starts the vario — the sound comes from the barometer and does not need satellites. The warning only tells you that ground speed, heading and automatic takeoff will not be available yet.
Dots beside the button
Two small dots sit outside the button, one on each side and level with its middle — green when the corresponding automatic detection is on, grey when it is off. They tell you what will happen without your having to reach for your phone:
- Left of the button — automatic takeoff. Green means the vario will start by itself when you launch.
- Right of the button — automatic landing. Green means the vario will stop by itself once you are down.
The two dots follow the same left-to-right order as the flight itself, and they stay visible whatever the button says — including Subscribe and No GPS.
A grey dot means that detection is off and you will have to start or stop the vario by hand yourself. This is worth a glance on launch: it is the difference between a vario that arms itself and one that stays silent while you fly away. Hold either dot to switch its detection on or off directly on the watch — see Quick toggles on the watch.
Why hold rather than tap The sliders and the compass respond to a long press only; a short tap does nothing. That is deliberate: these icons sit low on the screen, where a glove or a strap brushes past them, and opening a menu in flight because of that would be worse than having to hold for half a second.
Flight screen — vario running
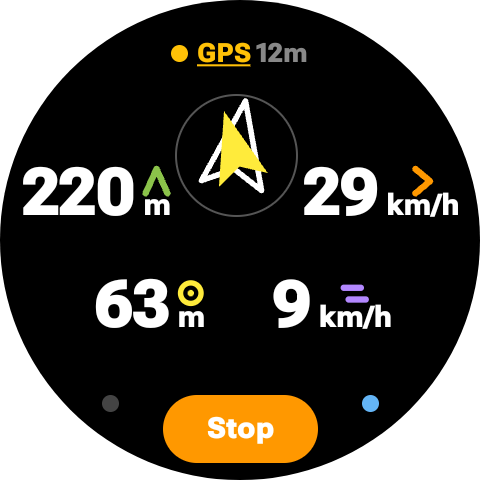
Once started, the screen switches to the in-flight layout:
- Vertical speed is not a number here: it is read on the ring around the rim of the screen.
- Altitude on the left and ground speed on the right, large.
- A long press anywhere on this screen opens map mode, without waiting for it to appear on its own — the navigation view in task mode, the thermal view otherwise. Anywhere means anywhere: the only exceptions are the few targets that have an action of their own — the GPS indicator, the navigation arrow, the Stop button and the two dots beside it.
- Between the two, the navigation arrow, whenever navigation is active. A long press on it opens the list of turnpoints, in task mode.
- Track on the line below, as a cardinal point and a bearing in degrees (for example
NNE 28°). It shows– –when you are too slow or stationary for a reliable track. In task mode the remaining distance takes its place. - Wind beside it: the direction it comes from and its speed. Dashes mean no wind estimate is available yet. Tap it to change what it shows — see Wind. This is the one tap on the flight screen: it changes a display, not a setting, so there is nothing to lose by brushing it.
- A small coloured mark sits above each unit and says which figure that unit belongs to: green for altitude, orange for ground speed, yellow for the distance to the turnpoint, violet for the wind. Two pairs of figures share a unit — altitude and turnpoint distance are both a length, ground speed and wind are both a speed — so the unit alone cannot tell you what you are reading. The mark can, without a word of label and without making the figure any smaller. The same four marks are used in map mode.
- The GPS indicator stays visible at the top.
- An orange Stop button, with two small dots at its upper corners: green on the left for Weak Lift, blue on the right for the automatic thermal view, grey when the corresponding feature is off. Hold either one to switch it — see Quick toggles on the watch.
The climb-rate ring
Vertical speed is drawn as a row of short segments around the very edge of the screen, starting at twelve o’clock. One segment is 0.2 m/s, so five of them make 1 m/s — and since a segment is also six degrees of dial, one metre per second is five minutes on a clock face. Climb fills clockwise in green, sink fills anticlockwise in red. The two never appear together: you are going up or you are going down.
The point of it is that you do not read it. A number has to be focused on and interpreted; a length of green at the top of your wrist is taken in with a glance, the way you read a clock without reading the numerals. The scale saturates at 12 m/s, where the segments would have gone all the way round.
The ring is drawn in map mode too, so the climb is there whichever screen you are on. The dimmed ambient screen keeps the number instead: it has to light as few pixels as possible, and a figure costs less than a ring.
Always-on display

When the screen dims during flight, the app stays on screen instead of dropping back to the watch face. It switches to a simplified, low-power layout showing vertical speed, altitude, ground speed, track and wind in plain white — with the navigation arrow added while navigation is active, and the remaining distance in place of the track in task mode. Nothing on it responds to touch: the wind is shown in whichever format you chose on the flight screen. The full screen comes back as soon as you wake the watch — by raising your wrist, tapping the screen or pressing a button, depending on how your watch is configured.
The sound continues regardless of what the screen is doing. Always-on requires an active subscription; without one, the dimmed screen simply shows a reminder to subscribe.
One limitation is not ours. Wear OS only keeps the always-on screen alive while it detects that the watch is on your wrist. Worn over a jacket sleeve, or with a loose strap, the watch concludes it is not being worn and switches the screen off entirely instead of dimming it — the app never gets the chance to show anything. Nothing in the app can override that, and no watch setting reliably disables it either. See Keeping the screen on for the way round it.
Keeping the screen on
If you fly with the watch over a sleeve, or anywhere the watch cannot feel your skin, turn on Keep screen on (off-wrist) under General on the phone. The screen then stays lit for the whole flight, on or off the wrist, and you get your numbers back.
Two things to know before enabling it. The screen stays fully lit rather than dimmed, so it uses noticeably more battery than the always-on display — start a long flight on a full charge. And because the screen never dims, the ambient layout is not used at all while this is on, even with the watch on your wrist.
A brightness setting appears once it is enabled. Leave Dynamic brightness on and the watch manages brightness as it normally would, adapting to the light around you. Turn it off to pick a fixed level from 10 % to 100 % — lower saves battery, but be careful: what looks comfortable indoors can be unreadable in direct sunlight under a wing.
Like the always-on display, this requires an active subscription. The setting is visible without one, but greyed out.
Stopping the vario
Press Stop. The vario plays its shutdown tone and the app immediately offers to close completely:

- Completely close — stops everything: sound, sensors, GPS, notification. This is what you want after landing; nothing keeps running in the background.
- Cancel — goes back to the main screen with sensors still running, ready to start again.
Worth knowing Stopping by hand also suspends automatic takeoff, so the vario cannot restart itself behind your back while you are packing up. Tapping Cancel on the close screen re-enables it.
An automatic landing stop behaves differently: the vario simply stops and the app returns to the main screen, with no close prompt.
The notification
While the app is open, an ongoing notification sits in the watch’s notification stream, with a stop action. This is what allows the app to keep reading sensors and playing sound with the screen off. It disappears when you close the app completely.
Tools menu
Hold the sliders icon to open it. It gathers the two bench screens — the altitude chart and the sound test — the ones you use on the ground, before launching, rather than in the air. Inside the menu a single tap is enough: the long press has already filtered out anything accidental.
Sound test
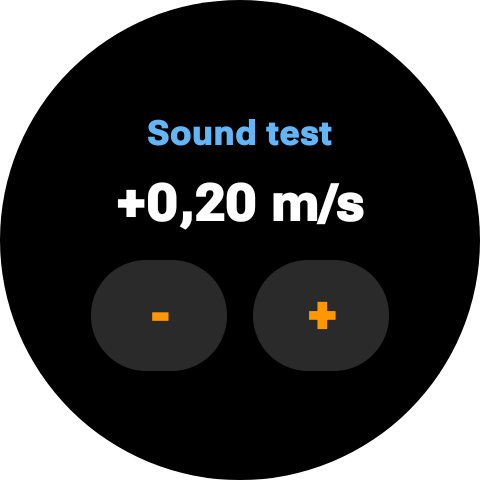
Reachable from the Tools menu. It plays the vario tone for a vertical speed you choose by hand, from −8.0 to +8.0 m/s in steps of 0.1 m/s. This screen is always in m/s, even if you have set the app to feet.
Use it to check the volume before launching, to hear what your climb and sink thresholds actually sound like, and to get familiar with the tone around zero, where the difference between a weak climb and a weak sink matters most. The sound stops as soon as you leave the screen.
Altitude chart and smoothing
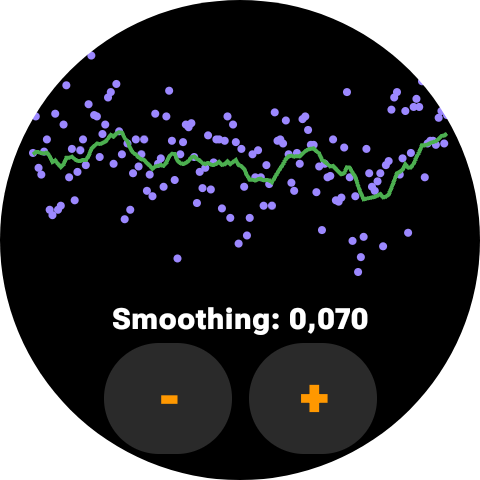
Reachable from the Tools menu. It draws roughly the last 15 seconds of altitude:
- Purple dots — the raw altitude derived from the pressure sensor.
- Green line — the smoothed altitude the vario actually uses.
Below the graph, Smoothing can be adjusted from 0.005 to 0.300 in steps of 0.005; the default is 0.070. Lower values give a calmer, slower vario; higher values give a faster, twitchier one that reacts sooner but also picks up more sensor noise. The value is saved on the watch.
The chart is the honest way to tune this: move the watch, and watch how closely the green line tracks the purple dots.
About
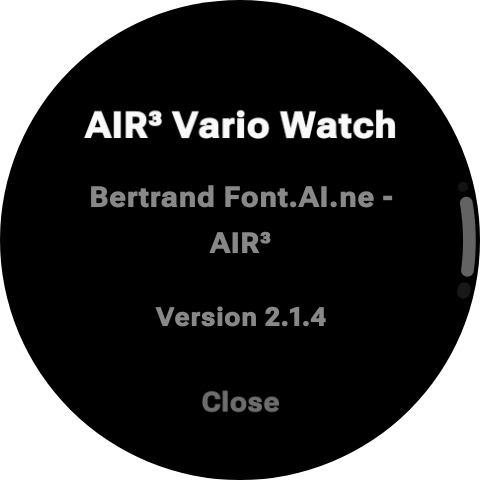
Long press the exit icon. Shows the app name, the author and the installed version number. Tap Close to return.
Quick toggles on the watch
Several of the dots and indicators described above are not just status lights — holding one switches the corresponding setting on or off, directly on the watch, without needing the phone. This is meant for a quick change in flight, not for first-time setup, which is easier to do on the phone.
It is always a long press, never a tap. These targets are small, they are spread over a screen the size of a coin, and in flight they meet gloves, sleeves and straps. A setting that changed on contact would change without your noticing, which is the one thing a vario must not do. The single exception is the wind, which cycles on a tap — it only changes what is displayed, not how the app behaves.
Whichever device you use, the other one catches up: a tap on the watch is sent to the phone the moment it happens if the phone is nearby, and arrives as soon as it reconnects if it is not. A change made on the phone still reaches the watch exactly as before, whether or not you ever use these dots.
| Target | Where | Gesture | What it does |
|---|---|---|---|
| Dot left of the Start button | Main screen, vario stopped | Long press | Switches auto takeoff. Grey when off, not absent. |
| Dot right of the Start button | Main screen, vario stopped | Long press | Switches auto landing. Grey when off. |
| Green dot left of the Stop button | Flight screen, vario running | Long press | Switches Weak Lift. Grey when off. |
| Blue dot right of the Stop button | Flight screen, vario running | Long press | Switches the automatic thermal view. Grey when off. |
| The GPS indicator | Both screens | Long press | Switches the diagnostic log. The word GPS is underlined while it records. |
| Megaphone | Main screen, vario stopped | Long press | Cycles the sound: maximum volume → normal → silent. |
| Sun icon | Main screen, vario stopped | Long press | Opens the display settings: keep screen on and brightness. Inactive without a subscription. |
| The altitude | Main screen, vario stopped | Long press | Opens the QNH adjustment screen. Not available in flight. |
| Anywhere else | Flight screen, vario running | Long press | Opens map mode straight away — the navigation view in task mode, the thermal view otherwise. |
| Anywhere | Map mode | Long press | Changes the scale of the view you are in, for this flight only — see Changing a scale on the watch. |
| Sliders icon | Main screen, vario stopped | Long press | Opens the Tools menu. |
| Compass icon | Main screen, vario stopped | Long press | Chooses the navigation mode. |
| Exit icon | Main screen, vario stopped | Tap / long press | Tap closes the app; long press opens About. |
| The navigation arrow | Flight screen, task mode | Long press | Opens the list of turnpoints, to pick one by hand. |
| The wind figure | Flight screen, vario running | Tap | Cycles how the wind is displayed. Not a setting. |
| Anywhere | Map mode | Tap | Closes it and returns to the flight screen. |
Worth knowing The GPS indicator carries two separate pieces of information: its colour shows GPS accuracy, while the underline beneath the word GPS shows whether the diagnostic log is recording. Holding it changes only the log.
The phone app
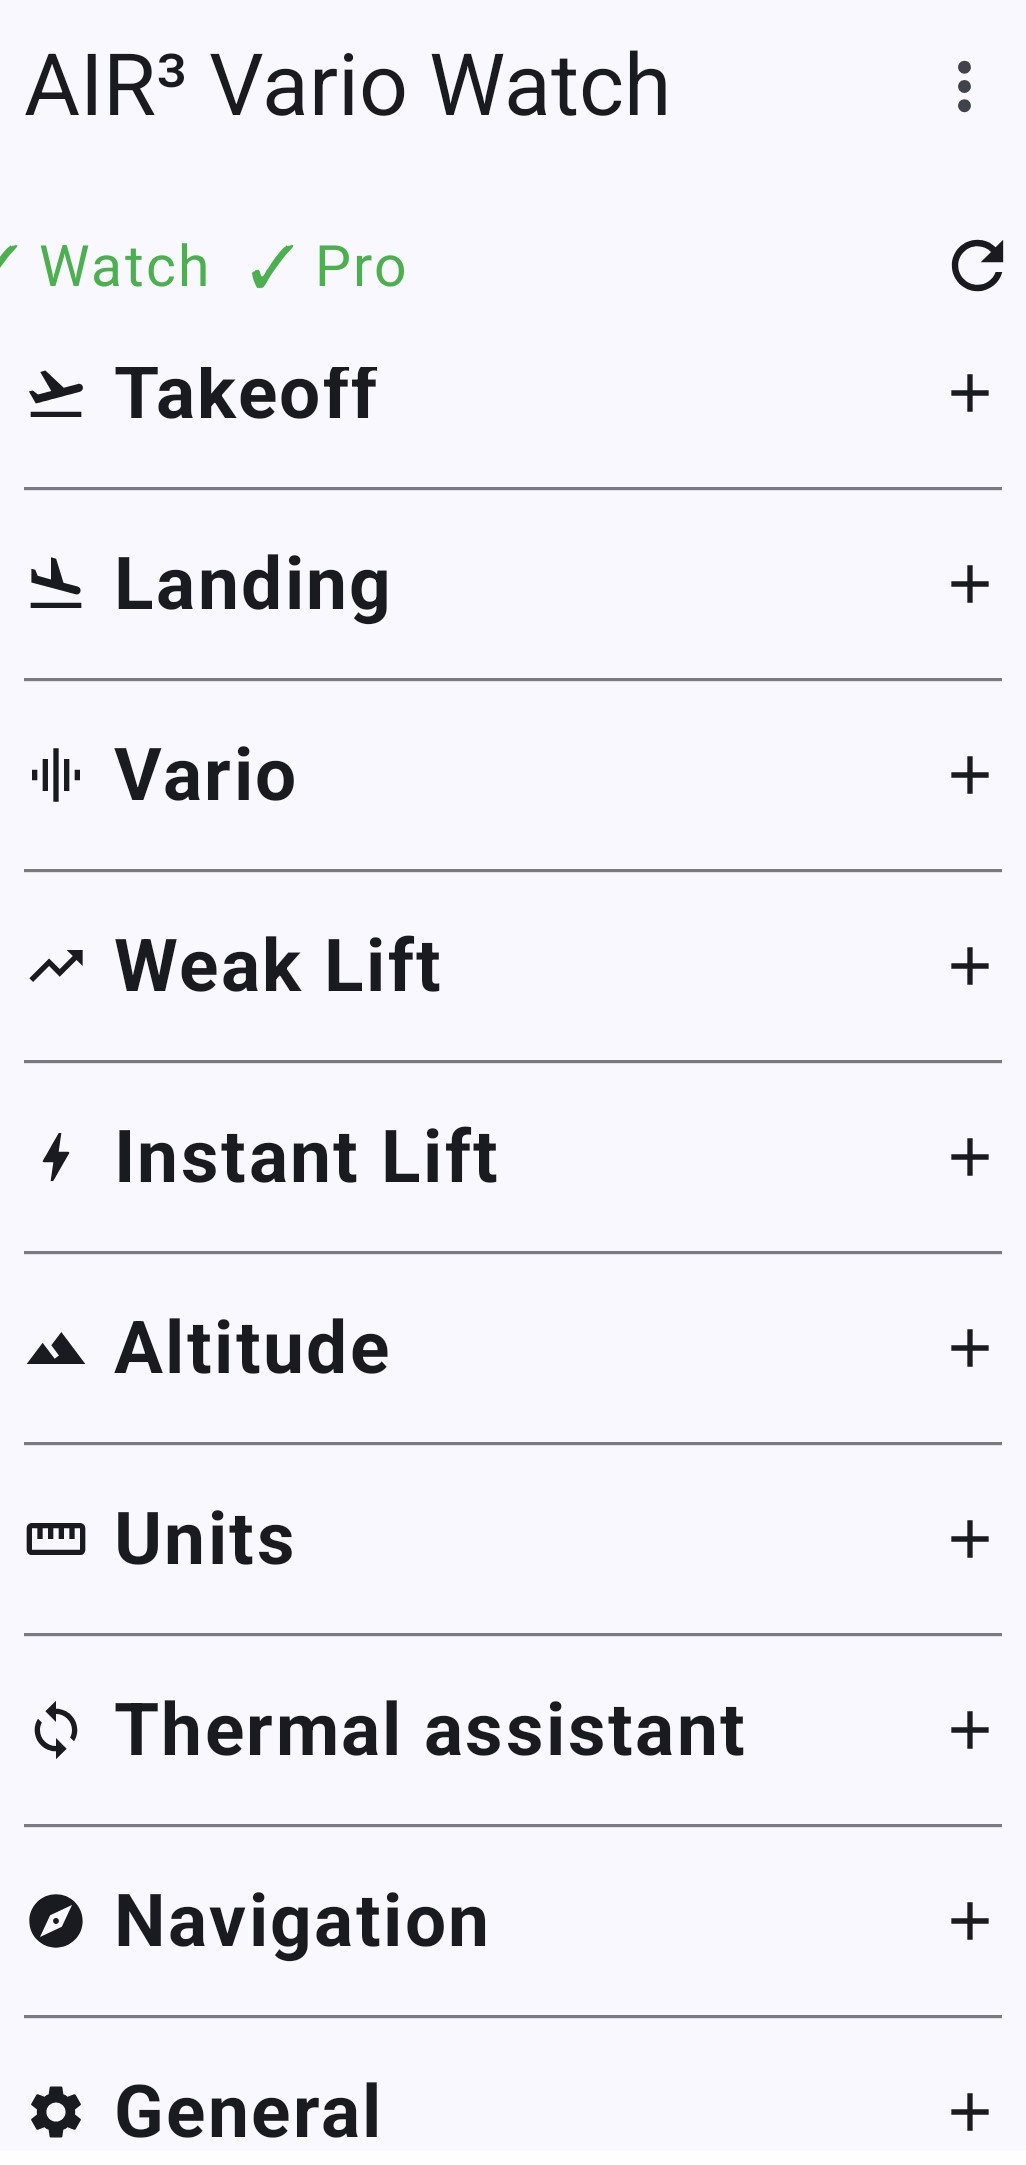
Settings reference
Every setting, with its default and the range you can move it in.
The values below are shown in metric If you choose feet or a non-metric speed unit under Units , the phone app re-expresses every affected setting in your units and steps in whole units of your own system — 1 ft rather than 0.3 ft, 1 mph rather than 1.6 mph. Only the display and the buttons change: what is stored on the watch and what the vario acts on stay metric throughout, so switching units can never alter how the app behaves in flight.

Takeoff
| Setting | Default | Range | What it does |
|---|---|---|---|
| Speed | 10 km/h | 1–60, step 1 | Ground speed above which a takeoff can be detected. |
| Altitude | 2 m | 0.5–20, step 0.5 | Altitude change that also counts as a takeoff, even with no GPS. Also used to confirm you really flew before any landing can be detected. |
| Window | 2.0 s | 0.5–10, step 0.5 | How long the condition must hold before takeoff is confirmed. |
| Auto takeoff | On | On / off | Master switch for automatic start. |

Landing
| Setting | Default | Range | What it does |
|---|---|---|---|
| Speed | 4 km/h | 1–30, step 1 | Ground speed you must stay below to be considered landed. |
| Altitude | 2 m | 0.5–20, step 0.5 | How much altitude may still vary and still count as stable. |
| Window | 4.0 s | 0.5–15, step 0.5 | How long both conditions must hold before landing is confirmed. |
| Auto landing | On | On / off | Master switch for automatic stop. |

Vario
| Setting | Default | Range | What it does |
|---|---|---|---|
| Climb | 0.2 m/s | 0–2.0, step 0.1 | Climb threshold. Vertical speed above this counts as climbing. |
| Sink | −3.0 m/s | −10.0–0, step 0.1 | Sink threshold. Vertical speed below this counts as significant sink. |
| Averaging | 0.20 s | 0.05–2.0, step 0.05 | Averaging window for the vertical speed. Longer is calmer and slower to react. |
| Set maximum volume | On | On / off | Forces the watch media volume to maximum when the vario starts, so you are never airborne with a vario you cannot hear. The megaphone on the watch offers a third choice, silent, which this switch cannot express — turning the switch off leaves a silenced watch silent. |
| Dynamic frequency | On | On / off | Lets each beep slide in pitch toward where your climb is heading. See How the vario sound works. |
| Use GPS altitude | Off | On / off | Uses GPS altitude instead of the barometer. Only useful on a watch without a pressure sensor. |
Weak Lift
An extra layer of sound for the band around zero, below the point where the normal vario starts calling a climb: sinking slightly, holding height, or gaining slightly. That band is where a weak thermal announces itself. Weak Lift works independently of the normal vario tone.
Rather than a continuous tone, it speaks in groups of three. The first two tones set a reference; the third rises above them if you have gained height, drops below them if you have lost some, and matches them if you are holding. You are not listening to a value but to a direction.
It works from the altitude actually gained or lost over its own averaging window, not from a vertical speed. That is the difference that matters: a vertical speed has to be smoothed before it can be trusted, and smoothing is exactly what destroys changes this small.
Worth enabling on weak days and when you are low, where the difference between working a small thermal and landing out is often air that never registers as a climb at all. On strong days it adds sound you may not want. When it is on, the green dot to the left of the Stop button confirms it in flight — hold that dot to switch it off or back on directly on the watch, without needing the phone; see Quick toggles on the watch.

| Setting | Default | Range | What it does |
|---|---|---|---|
| Enable weak lift | Off | On / off | Master switch. |
| Low threshold | −0.8 m/s | −3.0–0, step 0.1 | The bottom of the weak lift band. Sink stronger than this is left to the normal vario tone. |
| Resolution | 20 cm | 5–100, step 5 | How small an altitude change the third tone reacts to. Smaller values make it more talkative. Shown in inches, in steps of 1 in, when the altitude unit is feet. |
| Averaging | 0.40 s | 0.10–2.0, step 0.05 | The window over which the altitude change is measured, separate from the main vario averaging. |
Instant Lift
Uses the watch’s accelerometer and gyroscope rather than the barometer, to signal the moment you enter lift — the physical kick you feel entering a thermal, which arrives before any pressure change is measurable. The watch computes true vertical acceleration from both sensors, so your own turning and wing movement are not mistaken for lift.
The gain is timing: you hear the entry as it happens rather than half a second later, which is when the decision to turn is actually made. That is why it is on by default: it costs nothing in sound you did not want, and it buys you the half-second the decision is made in. On a watch without an accelerometer and a gyroscope it cannot work at all, and the switch is greyed out on the phone.

| Setting | Default | Range | What it does |
|---|---|---|---|
| Enable instant lift | On | On / off | Master switch. Greyed out on a watch without the motion sensors it needs. |
| Sensitivity | 3 | 1–5 | 1 is the most reactive; 5 is the most conservative. |
Altitude
| Setting | Default | Options | What it does |
|---|---|---|---|
| Type | QNH | QNE (1013.25) / QNH | Altitude reference. See Altitude reference and units. |
| Sea Level Pressure | Set by the watch | 900–1050, step 0.25 | Only shown in QNH mode. The watch works this value out by itself before takeoff; changing it here overrides that. The resulting altitude is displayed underneath in both metres and feet as you adjust it, and holding a button scrolls through the values. See Setting it yourself. |
| Use GPS altitude | — | Button | Only in QNH mode. Computes the sea level pressure from the watch’s current GPS altitude and pressure. Available only while the watch is sending a GPS altitude. |
Units
| Setting | Default | Options |
|---|---|---|
| Altitude, vert. speed /s | m | m, ft |
| Horizontal and wind speed | km/h | km/h, m/s, mph, kt |
Changing either one re-expresses the settings that depend on it, throughout the phone app and on the watch. Takeoff and Landing speeds follow the horizontal speed unit; the altitude figures in those sections follow the altitude unit.
One pairing is worth knowing, because it is not obvious: vertical speeds follow the altitude unit, not the speed unit. Choose feet and the climb threshold, the sink threshold and the Weak Lift low threshold are all expressed in ft/s, whatever you have selected for ground speed. Weak Lift resolution switches from centimetres to inches at the same time. Averaging intervals and detection windows are durations, so they stay in seconds.
The increments adapt too. In feet, the altitude settings move by 1 ft rather than the metric 0.5 m, vertical speeds by 0.1 ft/s, and resolution by 1 in — whole numbers in the system you actually think in, rather than the metric fractions they would correspond to.
The watch applies the same units: choose feet and the in-flight screens show altitude in feet and vertical speed in ft/s, switching over as soon as the setting reaches the watch. The one exception is the sound test screen, which stays in m/s whatever you choose — it is a bench-test screen, and its scale is the raw one the vario engine works on.
Why the underlying value may look odd Because the watch always stores metric, a threshold set in feet lands on whatever metric value that corresponds to — 0.1 ft/s is 0.03 m/s, so a climb threshold you set to 0.7 ft/s is stored as roughly 0.21 m/s rather than a round 0.2. This is cosmetic: the vario behaves exactly as the figure you set on screen. It only matters if you switch back to metric and wonder where the round numbers went.
Thermal assistant
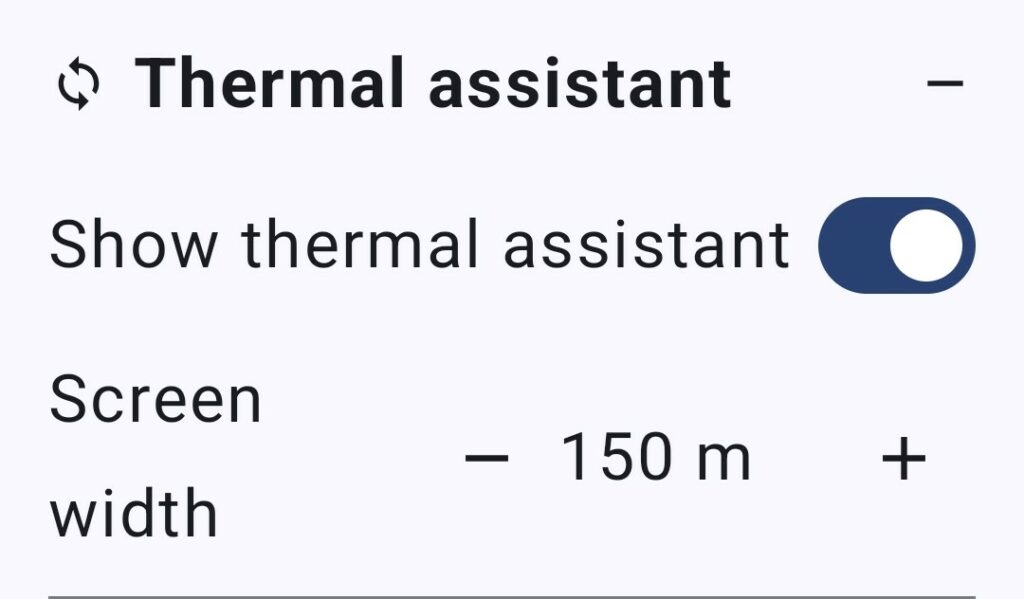
| Setting | Default | Range | What it does |
|---|---|---|---|
| Show thermal assistant | On | On / off | Whether the watch switches to the thermal view of map mode when it detects you are thermalling. Requires a subscription; without one the switch is greyed out. |
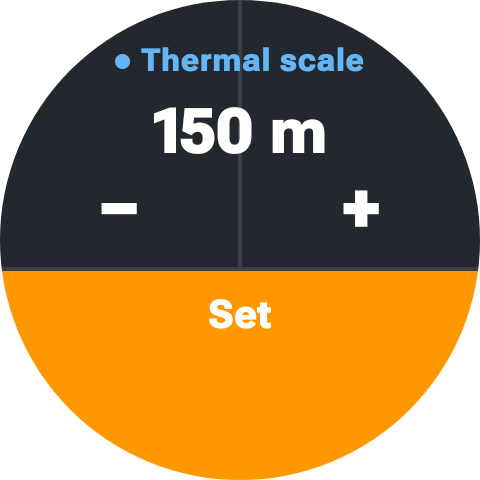
| Thermal scale | 150 m | 100–5000, step 50 / 100 / 250 / 500 | How much ground the width of the watch screen represents in the thermal view. A smaller value makes the spiral fill more of the screen. |
150 m suits a typical paragliding turn. Drop to 100 m to see a tight core in detail; raise it if your circles are wide, or to see more of the five minutes behind you at once. Remember that your position sits in the middle, so the figure is the full width of the screen and you see half of it in any direction: at 500 m, 250 m around you.
The switch is also on the watch — the blue dot beside the Stop button, see Quick toggles on the watch. The scale is the value the watch starts from each time the view opens; it can be zoomed for the current flight from the watch itself, see Changing a scale on the watch.
Navigation
| Setting | Default | Options | What it does |
|---|---|---|---|
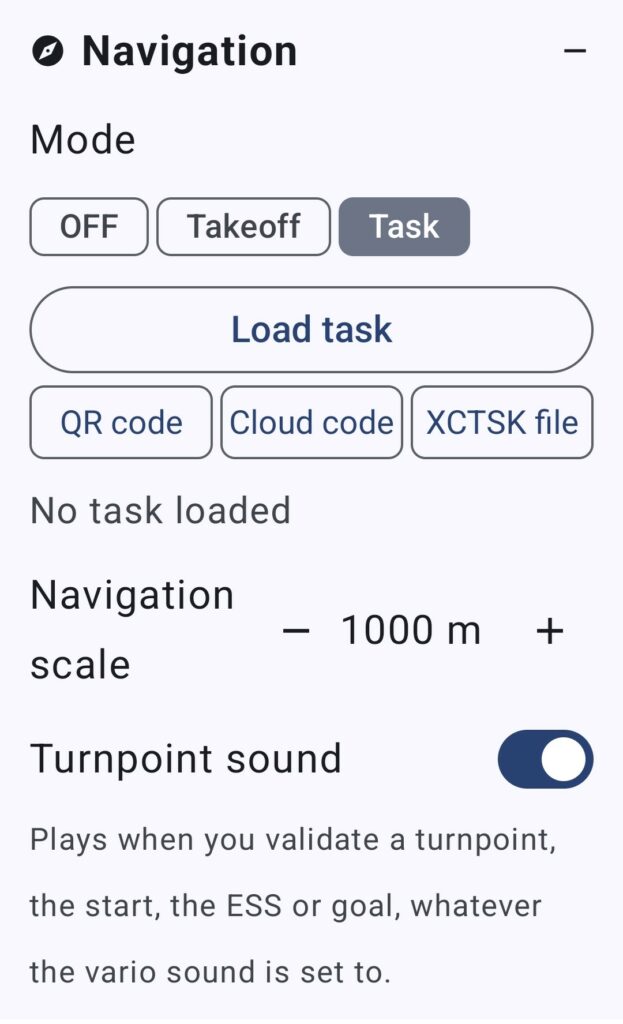
| Mode | Takeoff | OFF / Takeoff / Task | What the watch points at. Task can be selected with no task loaded, which is how you get to the import screen on the watch. See Navigation and tasks. |
| Load task | — | Button | Only in Task mode. Opens the four import sources. |
| Remove task | — | Button | Only in Task mode, with a task loaded. Deletes it from the phone and the watch. |
| Navigation scale | 1000 m | 100–5000, step 50 / 100 / 250 / 500 | Only in Task mode. How much ground the width of the watch screen represents in the navigation view, and with it how early that view appears on its own: the line has to come within about half a screen. Set on the phone only, and zoomable on the watch for the flight — see Changing a scale on the watch. |
| Turnpoint sound | On | On / off | Whether validating a turnpoint plays a sound. The vibration happens either way. Set on the phone only — see Validation. |
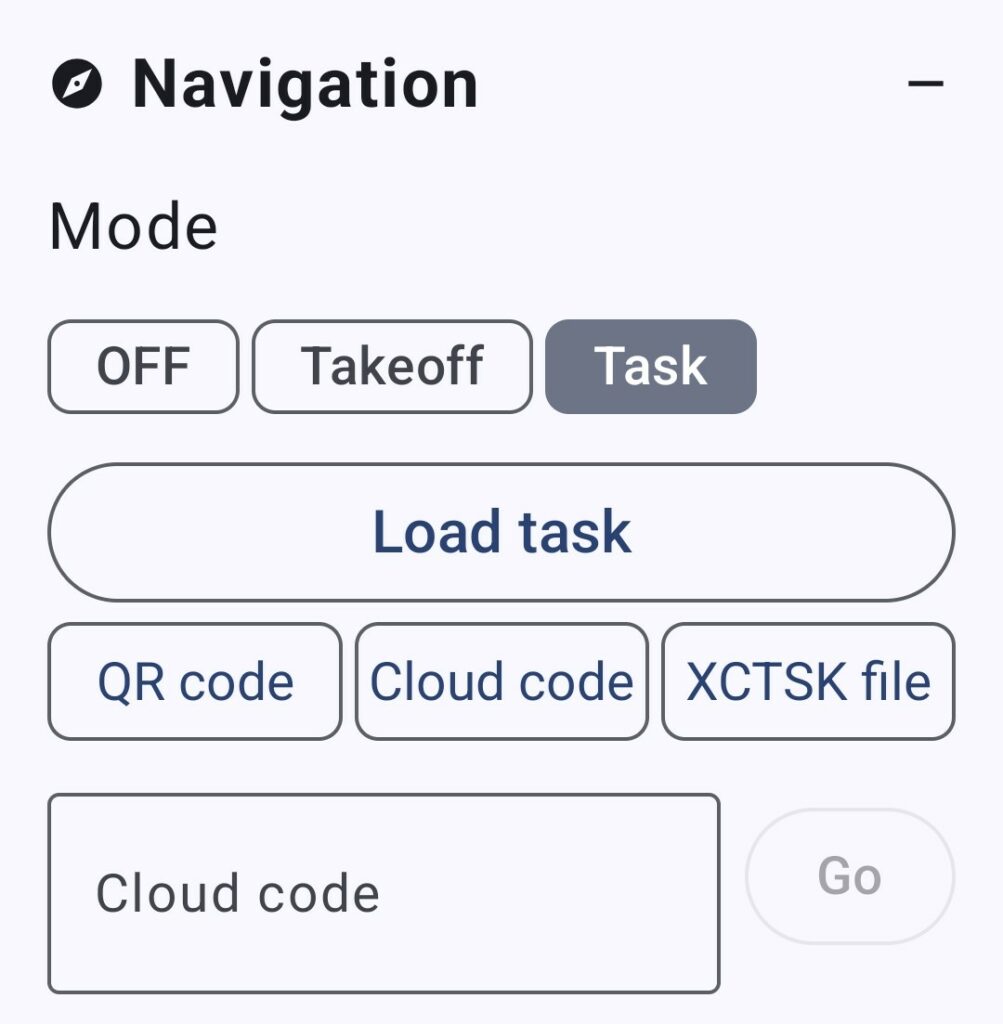
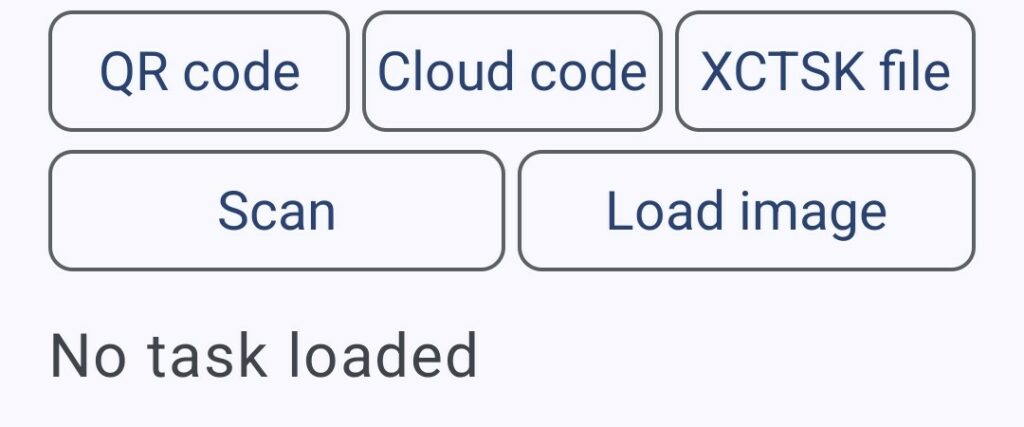
Load task unfolds rather than filling the screen with buttons you do not need: it offers QR code, Cloud code and XCTSK file, and only the one you choose opens further. (The watch has Cloud code of its own, under the navigation icon.) QR code then asks whether to Scan with the camera or Load image from a screenshot you were sent; Cloud code gives you a field and a Go button. Everything folds away again as soon as a task has loaded.
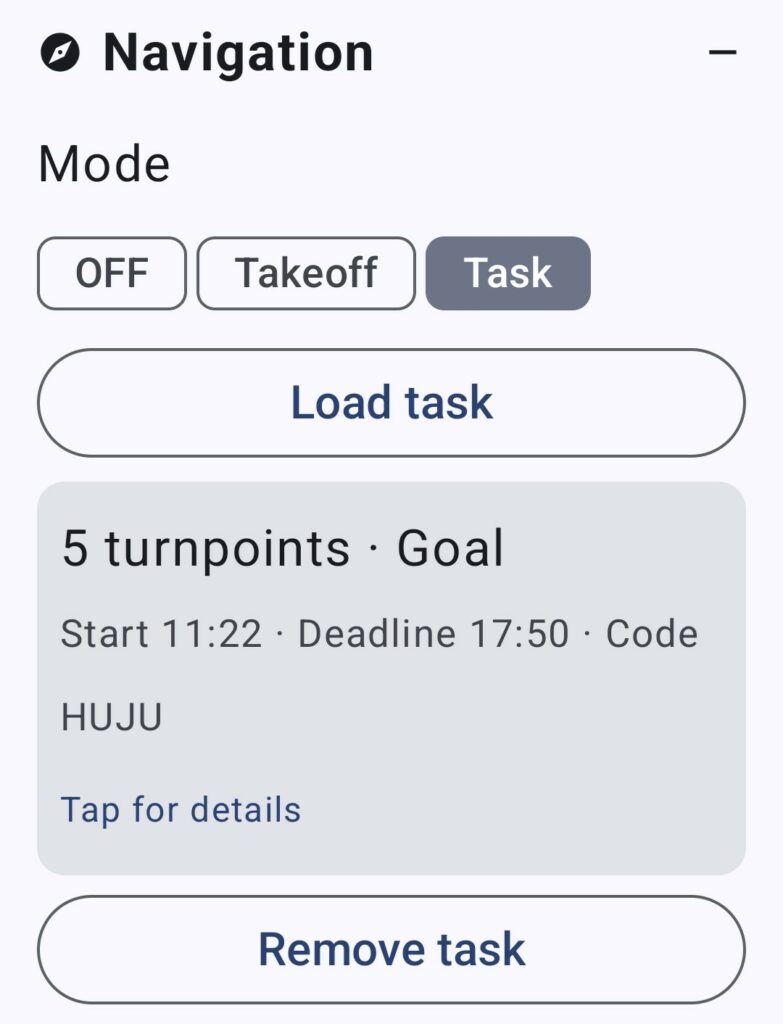
Once loaded, the task is summarised on a card: the number of turnpoints, the name of the last one, the start time and the land-by time. Tap the card to open the detail, where each radius and both times can be changed. If a task is already loaded, importing another one asks you to confirm the replacement first — a task imported by mistake at a briefing should not silently overwrite the one you are about to fly.
General
| Setting | Default | Range | What it does |
|---|---|---|---|
| Auto-close timeout | 10 min | 2–30, step 1 | How long the app may sit idle before closing itself. See Battery and background operation. |
| Diagnostic log | Off | On / off | Records what the watch was measuring during each flight. See Diagnostic log. |
| Keep screen on (off-wrist) | Off | On / off | Keeps the watch screen lit for the whole flight, whether or not the watch is detected on your wrist. Requires a subscription. See Keeping the screen on. |
| Dynamic brightness | On | On / off | Only shown when the above is on. Leaves brightness to the watch, including its automatic adaptation to ambient light. |
| Screen brightness | 100 % | 10–100, step 10 | Only shown when dynamic brightness is off. The fixed level the screen holds during the flight. |
| Open Tracklog folder | — | Button | Opens the folder holding your IGC files. See Flight recording. |
| Open Logs folder | — | Button | Opens the folder holding the diagnostic log files. |
| Delete All logs | — | Button | Deletes every diagnostic log file. There is no confirmation and no undo. |
How the vario sound works
Two things change with your vertical speed: the pitch and the rhythm.
Climbing, the tone is high and broken into beeps. The stronger the climb, the higher the pitch and the shorter and closer together the beeps — so a strong thermal sounds fast, a weak one slow. Sinking, the tone drops low and stretches into a long, almost continuous growl that gets deeper the faster you go down. Between the two, around zero, the sound is quiet and unhurried.
The transition is continuous rather than stepped: the pitch and rhythm shift smoothly as your vertical speed changes, which is what lets you hear a climb strengthening or fading rather than only hearing that it exists.
Dynamic frequency
With Dynamic frequency on, each beep does not hold a single pitch: it slides toward the pitch of the vertical speed you are heading for, based on the current trend. A climb that is strengthening sounds like a rising beep, one that is fading sounds like a falling beep. It tells you where the air is going, not only where it is — useful when centring a thermal, since you hear the improvement before the average catches up. Turn it off for a plainer, more traditional tone.
Start and stop tones
The vario plays a short confirmation sound when it starts and another when it stops. With automatic takeoff enabled, this is how you know the vario has armed itself without looking at the watch.
Automatic takeoff and landing
The point of these is that you never have to remember to start or stop the vario. Both need an active subscription.
Automatic takeoff
With Auto takeoff on, the watch starts the vario by itself when either of two conditions holds for the whole takeoff window:
- By GPS speed — your ground speed stays at or above the takeoff speed. This is the normal case for a running launch.
- By altitude — your barometric altitude changes by at least the takeoff altitude value. This works without GPS and covers cases where you gain height without much ground speed.
Either one is enough on its own.
Choosing the takeoff window The GPS updates about once a second, so a window shorter than a couple of seconds gives the speed test very few samples to work with. Two seconds or more is a sensible floor. If your vario starts while you are walking around launch, raise the takeoff speed rather than shortening the window.
Automatic takeoff is suspended after you stop the vario by hand, and stays suspended until you tap Cancel on the close screen or reopen the app.
The dot to the left of the Start button confirms it — green when enabled, grey when not. Hold it to turn automatic takeoff off or back on directly on the watch; see Quick toggles on the watch.
Automatic landing
With Auto landing on, the watch stops the vario when it is satisfied you are on the ground. The test is deliberately conservative, because a vario that stops mid-flight is worse than one that keeps beeping on the ground. Four things must all be true:
- The vario has been running for at least 5 seconds.
- You actually flew — your altitude has changed since the vario started by at least the Takeoff → Altitude value. Until that happens, no landing can be detected at all. This is what stops a ground test or a forgotten vario from “landing” on its own.
- Your altitude has been stable for the whole landing window — the total variation stays within the landing altitude tolerance.
- Your ground speed is below the landing speed throughout — counting only readings the GPS itself reports as precise.
That last point matters more than it looks. When GPS reception drops — under a wing, in a valley, in a turn — the watch reports a speed of 0 km/h simply because it has nothing better to say. Taken at face value, that looks exactly like standing still in a field. So the app tracks how confident the GPS is in each speed reading and discards the ones it cannot trust, rather than reading them as proof that you have stopped. When speed is unusable, stable altitude alone has to carry the decision — and since gaining or losing height is precisely what flying does, that remains a demanding test to pass in the air.
When all four hold, the vario stops, plays its shutdown tone, and the app returns to the main screen. The app itself stays open, and closes on its own once the auto-close timeout expires.
The dot to the right of the Start button confirms whether automatic landing is enabled — green when it is, grey when it is not. Hold it to turn it off or back on directly on the watch; see Quick toggles on the watch.
Wind
During flight the watch works out the wind and shows it on the right of the flight screen, opposite your track. It needs no extra sensor, no setup and no setting: it is simply there once it has something to work from.
What it works from is your changes of direction. Your wing flies at a roughly constant speed through the air, so your ground speed rises and falls depending on where you are pointed relative to the wind. Turn far enough and both the strength and the direction of the wind follow from that. Which means:
- You will see dashes until you have turned enough. A full 360 in a thermal gives it everything it needs; a couple of separate turns during a transition also work. Flying straight from launch, there is nothing to measure and the watch says so rather than guessing.
- In straight flight the figure holds. It is the last measurement, not a live one. Speeding up or slowing down on a glide does not change it — that alone cannot tell the watch anything about the wind.
- It refreshes every time you turn, so it follows the wind as it changes with altitude and along your route.
- A result that does not add up is discarded rather than displayed. You may occasionally see the figure stop updating for a while; that is the watch declining to show you something it does not believe.
The direction shown is the one the wind comes from, as in every weather report: E means an easterly, blowing from east to west. The speed uses your chosen horizontal speed unit.
The speed always comes first, because it is the figure you look for. Tap the wind to change what follows it: a cardinal point, a bearing in degrees, or nothing at all — speed alone, which leaves it as large as the screen allows. The two forms of the direction are alternatives rather than a pair, because fitting both onto that line shrank all of it below the size at which any of it could be read in flight. The choice is remembered between flights.
Treat it as an indication The estimate is only as good as the turns you have flown and the GPS behind them, and it describes the air you have just been flying in — not the air a few hundred metres lower, or over the next ridge. Use it to inform a decision, not to commit to one.
Map mode
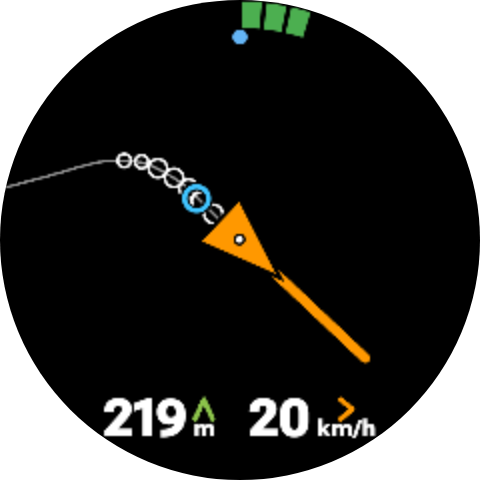
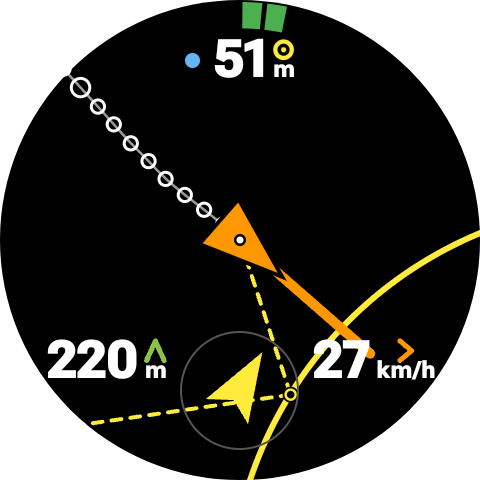
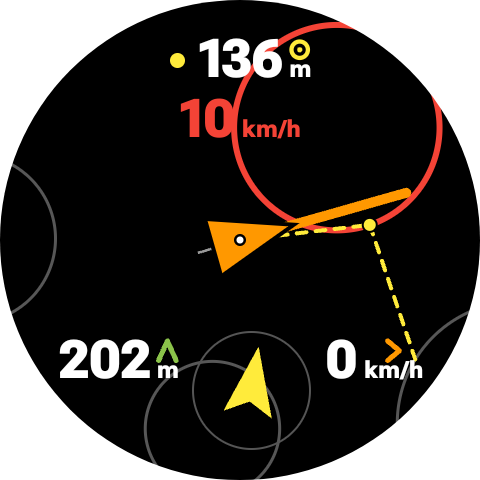
Map mode is the watch’s drawn view, seen from above, with your own position in the middle of the screen and north at the top. A small white dot marks exactly where you are. An orange triangle around it shows where the wing is pointing, and an orange line runs out from it along your track over the ground. There is no terrain and no ground map — only what is needed to place yourself.
It has two views, each with its own purpose, its own trigger and its own scale. A coloured dot at the top of the screen says which one you are looking at: blue for the thermal view, yellow for the navigation view. Beside it sits the figure that matters in that view.
The thermal view
The vario tells you what the air is doing now. The thermal view tells you what it was doing where you have already been — which is what you need to centre. It draws the last five minutes of your track.
Only the climbing parts are marked. Where you were going up, a white circle is drawn on the track, and the stronger the climb the larger the circle. Where you were not, the track is a plain thin line. So a turn that worked leaves a row of fat circles on one side and bare line on the other, and the correction is obvious: shift toward the circles.
A blue circle marks the estimated core. It is the weighted centre of everything that was going up in the last minute and a half, with the strongest climbs counting for most — in other words, the spot the circles are gathering around. Fly toward it. It is drawn hollow, so the track underneath stays readable through it. It appears only once there is enough recent climb for it to mean something, and it moves as the thermal does.
The trace is drawn in the air rather than over the ground. The watch removes the drift it has measured as wind, so a thermal drifting downwind shows as concentric circles stacked on one spot instead of the long spiral your GPS track actually made. That is the difference between a picture you can read at a glance and one you have to interpret.
It appears by itself. When the watch recognises that you are thermalling — turning consistently and not sinking — it switches to this view without being asked, and goes back to the flight screen when you leave the thermal. You do not have to reach for the watch at the one moment you least want to.
Its scale is Thermal scale, 150 m across the screen by default — about one paragliding turn.
Worth knowing The picture is built from the same wind estimate as everything else, so it is at its best once you have turned enough for the wind to be known. Early in a flight, before any wind estimate exists, the circles are positioned from the raw ground track and a drifting thermal will still look like a spiral.
The navigation view
Only in task mode. It draws the turnpoint you are flying to, so that crossing the line is something you see rather than something you deduce from a shrinking number.
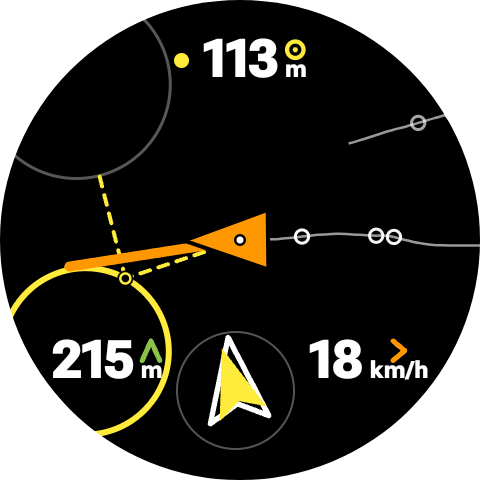
The cylinder you are heading for is drawn as an arc across the screen while it is still too large to fit, and as a full circle once it does. Its colour says what it is: yellow for an ordinary turnpoint, blue for goal, and for the start red before its opening time, green after. The turnpoints that come later in the task are drawn in grey — so whatever else is on the screen, no grey line can be mistaken for the one you have to cross.
The distance to the edge is written at the top, metre by metre, and it is the distance to the edge — not the optimised figure from the flight screen. Before the start you get two figures instead of one: how far the optimised start point is, and the speed you would need to be on the line when it opens.
A dashed line runs from your position to the point the watch is aiming at on that cylinder — the optimised point, not the centre; see The distance is the optimised one. A small marker sits on the cylinder where that point is, and from there a second dashed segment carries on toward the next turnpoint and stops. The two segments together are the shape of the corner you are about to fly: line your orange track up with the first one and you arrive exactly at the point the distance is counting down to. At goal there is only one segment, there being nothing after it.
Before the gate opens, the marker on the start circle is a solid dot: the exact spot to be at when the start time comes. Once it has passed, the marker becomes a hollow circle like every other turnpoint.
It appears by itself. As you close in and the line comes within about half a screen, the watch switches to this view on its own, and leaves it once you are clearly away from the turnpoint again. You can dismiss it with a tap; if you then keep closing and come within 200 m of the line, it comes back — that last part of a cylinder entry is exactly where you want to be looking at it.
Its scale is Navigation scale, 1000 m across the screen by default. That setting is what decides how early the view appears, so it is both a zoom and a warning distance.
Which view, and how to open it
Both triggers can be true at once — thermalling just short of a turnpoint is a normal thing to be doing. The thermal view wins: while you are turning, the climb is the problem to solve, and the line is not going anywhere. It gives way to the navigation view as soon as you stop circling.
You can also open it yourself, without waiting for either trigger: a long press anywhere on the flight screen. In task mode that opens the navigation view, otherwise the thermal view.
The rest of the screen carries what you still need while you are in there. The climb-rate ring runs around the rim. Along the bottom sit your altitude and your ground speed, with the navigation arrow between them when navigation is active — and a long press on that arrow opens the list of turnpoints, exactly as it does on the flight screen. The whole centre is left to the drawing.
Tap anywhere to go back to the flight screen.
Changing a scale on the watch
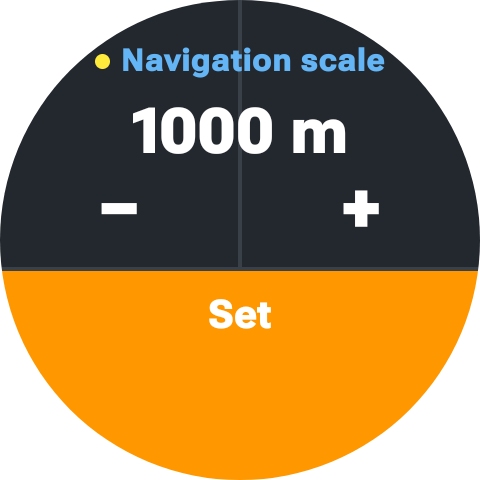
Hold anywhere in map mode to change the scale of the view you are in. That is deliberate: you discover that the scale is wrong while looking at the drawing, not while reading a settings screen.
The screen that opens says at the top which scale you are setting — Thermal or Navigation, with the same blue or yellow dot as the view itself — and the current value under it. Below that, the whole dial is the control, with no small buttons to aim at on a moving wrist:
- the top left half of the screen decreases the scale;
- the top right half increases it;
- the orange band along the bottom confirms and takes you straight back to the drawing.
A single tap moves one step; holding runs through the values, slowly at first and then faster, so the far end of the range is a second or two away rather than a dozen presses.
The step grows with the value, so the numbers stay round and the range stays short whichever end you are at: 50 m below 500, 100 m from 500 to 1000, 250 m from 1000 to 2000, and 500 m above that. The ladder is the same in both directions — 2000 comes back down to 1750, not to 1500 — so a scale you overshoot is one press away from where it was.
The change lasts for as long as you stay on the view It is a zoom, not a setting: the watch does not send it to the phone and does not remember it. Close map mode and open it again and you are back on the value from the phone. That is what you want in flight — a quick look at a wider area should not quietly change how your instrument behaves for the rest of the season. Change the setting on the phone when you want a different starting point.
Navigation and tasks
The watch can point you somewhere. There is no map and there never will be — a 45 mm screen is the wrong place for one — but an arrow and a distance are enough to get you back to launch, or round a competition task.
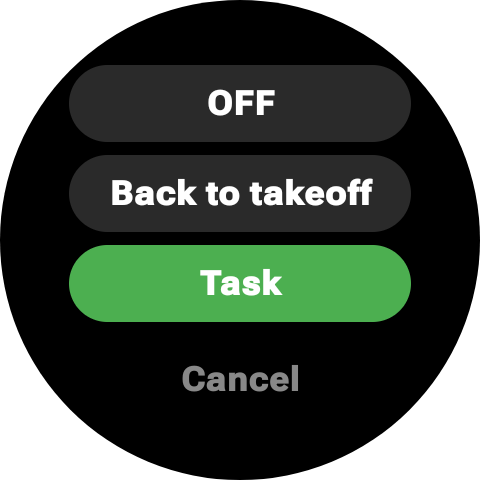
Three modes, chosen from the navigation icon on the watch or from Navigation on the phone:
- OFF — nothing is displayed, and the flight screen keeps your track and your wind as usual.
- Back to takeoff — the watch records where you launched, the moment the vario starts, and points back to it. Nothing to prepare, and it is the mode most flights need.
- Task — follows a sequence of turnpoints, validating each one as you cross it, from the start gate through to goal. This is the competition side of the app, and it is also useful for a route you have drawn yourself.
If you fly for pleasure, the first two are all there is to know: choose Back to takeoff once and forget about it. Everything from Importing a task onwards is for pilots flying a task, and nothing of it appears on screen until a task is loaded.
The arrow
In flight the arrow sits between your altitude and your ground speed, in a small circle. The top of that circle is your heading — the direction the wing is pointing, not the direction you are travelling over the ground. Everything inside it is drawn in that frame.
There are two arrows in the circle, and they answer two different questions:
- The solid yellow arrow points at the turnpoint. That is where it is, relative to where you are pointing. It is always there.
- The hollow white arrow is the heading to hold so that the wind drift still carries you onto the turnpoint. It only appears once the watch knows the wind and your airspeed — before that there is nothing to correct with, and you fly on the yellow arrow alone.
In practice you fly the hollow one: keep it at the top of the circle and you are on the optimal heading, with the yellow arrow sitting off to the windward side by however much the wind is pushing you. The gap between the two arrows is the drift correction, read directly.
In task mode the remaining distance replaces your track at the bottom of the screen — in course it is the figure you use, and the direction is already given by the arrow. In back to takeoff mode your track stays where it is and only the arrow is added. Under a kilometre the distance is given in metres, metre by metre, so the last part of a cylinder entry is readable rather than a figure stuck on 0.1 km. Once you reach goal the arrow disappears: there is nothing left to point at.
The arrow is also drawn on the dimmed ambient screen, in white and without its circle, and along the bottom of map mode — so it is there whichever screen you happen to be on.
Importing a task
Tasks are imported on the phone, under Navigation, in whichever of four ways suits where the task came from:
- Scan a QR code with the phone camera — the usual case at a competition briefing, where the task is on a screen or a printed sheet.
- Read a QR code from an image already on the phone — a screenshot, or a photo someone sent you.
- Enter a cloud code — the short code produced by the XContest task manager, which fetches the task over the internet.
- Open an .xctsk file from the phone’s storage.
Whichever route you use, the task is sent to the watch and kept there, so the phone can stay in the car. A copy of every imported task is archived in Downloads → AIR³ Vario Watch → Tasks, which is handy for keeping the tasks of a competition week.
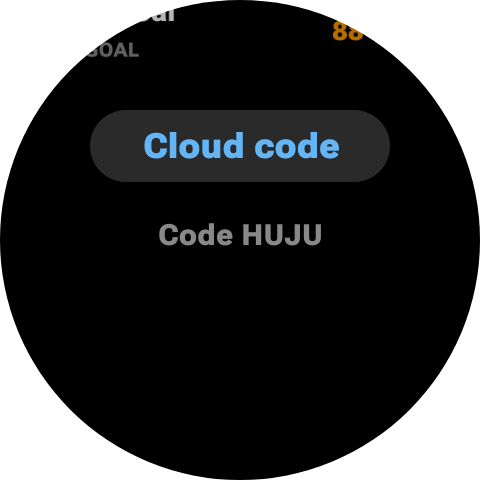
The watch can also import a task on its own, without the phone. Tap the navigation icon, then Cloud code, and type or dictate the code the task manager gave you. The watch fetches the task itself, which means it needs an internet connection of its own at that moment — its Wi-Fi, its mobile data, or the connection it borrows from a paired phone. This is the one import route that works when the phone has stayed behind, and it is also the quickest when a briefing hands out a code rather than a QR sheet.
Importing a task when one is already loaded asks you to confirm the replacement first, on the watch as on the phone — a task imported by mistake at a briefing should not silently overwrite the one you are about to fly. When a task came from a cloud code, that code is shown with the task on both devices, so you can check at a glance that you are carrying the right one.
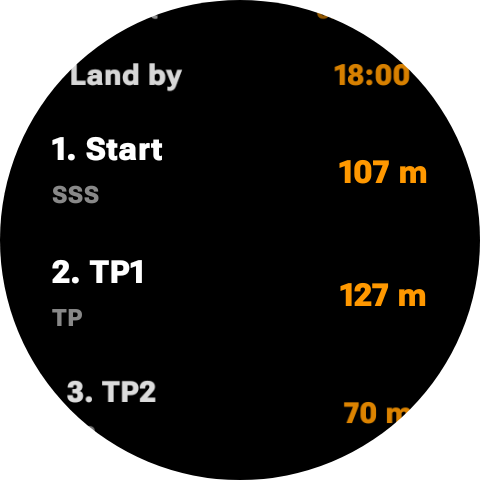
Turnpoints, and editing them
The loaded task can be reviewed and edited on either device: the list of turnpoints with each radius, the start open time and the land-by time. Radii move in steps of 50 m and the two times in steps of 5 minutes, and each step lands on a round value rather than adding to the one before — a radius imported as 407 m becomes 450, not 457, and a start at 11:22 becomes 11:25. On the watch, the buttons accelerate if you hold them, because moving a radius 50 m at a time otherwise takes a while. Edits made on one device reach the other as soon as the two are connected — if the phone is not nearby when you change something on the watch, the change is waiting for it when it reconnects.
You can also select a turnpoint by hand rather than let the sequence decide, which is what you want after missing one, or when you only care about one point of the task. On the watch the list opens from the task screen, with Close at the top of it, and a long press on a turnpoint makes it the one the arrow follows.
The start gate
The start cannot be validated before its open time, so crossing the start line early does nothing and the watch keeps waiting for the real crossing. Until the gate opens, the start line is drawn red; it turns green the moment the clock passes the open time. One glance tells you which side of the clock you are on, without reading a time.
Until the gate opens, the watch aims at the optimised start point of the task: the point on the start cylinder that the shortest route through the whole task passes through. It depends on the geometry of the task and on nothing else, so it is the same point for every pilot flying that task, and it never moves. The distance you read before the start is the distance to it.
From that distance comes the speed to start: the ground speed you would have to hold, from where you are now, to be on the line exactly when it opens. It is the figure that tells you whether to keep climbing or to start running, and it is colour-coded — comfortable, or beyond what you can fly. Above 150 km/h it stops pretending and shows a blinking - -: the gate will open before you can get there, and you have simply lost the start.
Because the target is a fixed point rather than a recomputed one, neither figure wanders while you wait: they follow your position and nothing else, so circling in a thermal does not make them flicker. Fly away from the start and the speed climbs, which is exactly the warning you want; turn back and it settles again.
Once the start is crossed, both the speed to start and the start line are gone, and the watch switches to its ordinary task behaviour: from there on the point it aims at is recomputed from where you actually are. Expect the distance to jump a little at that moment — it is changing what it measures.
Validation
A turnpoint is validated when you cross the edge of its cylinder, in either direction — there is no entry or exit to get right. The watch confirms it with a vibration and a sound, and moves the arrow to the next one.
That sound does not follow the vario. Silencing the vario with the megaphone on the watch leaves the turnpoint sounds playing: crossing a line is an event you want to be told about, and it is the opposite of the continuous tone you silenced. If you want the lines announced silently, turn Navigation → Turnpoint sound off on the phone — the vibration stays, so nothing is lost but the noise.
There are four different sounds, so you know what you have just validated without looking at the screen — which matters most at the moments you are least likely to be looking:
- A turnpoint — two short rising notes.
- The start — three rising notes. You are on the clock.
- The ESS — two notes alternating twice, deliberately not a rising figure, because the end of speed section is not the end of the task. Your time is taken, and you still have to reach goal.
- Goal — four rising notes ending on a long one. There is nothing after it.
The ESS and goal are read from the task file, so a task where the two are the same cylinder gives you the goal sound, and a task with an ESS short of goal gives you both, in order.
The distance is the optimised one
The figure on screen is not the distance to the middle of the next cylinder. The watch computes the shortest route through all the cylinders still ahead of you, and shows the distance to the point on the next cylinder that route passes through — the same optimisation a scoring server applies to your track afterwards. It is recomputed as you fly, so it follows your position rather than a plan made at the start.
In practice this means the arrow does not send you to the centre of a large cylinder you only have to clip, and the distance you read is the distance you actually have to fly.
The start is the one exception, and deliberately so. Before the gate opens, the route is optimised for the task alone and not for where you happen to be, which gives a fixed point to aim at while you wait — see The start gate. Everything after the start is recomputed from your own position, every second.
Arriving at a turnpoint
The optimised distance tells you how far there is left to fly, but it does not tell you where the line is. Those are two different questions, and close in it is the second one that matters: a large cylinder can be a few kilometres of optimised distance away while its edge passes a hundred metres from your wingtip.
So when the edge of the cylinder comes within reach, the watch opens the navigation view of map mode by itself and draws it, in the air around you, at the same scale as your track. You can see which way the line runs, how far off it is, and what turn puts you across it — and the dashed route line shows you the exact point on it the distance is counting down to.
How early that happens follows the navigation scale: the cylinder is shown once the line is inside roughly half of it, which is the point where it can actually be drawn on screen. At 500 m you get a late, tight view; at 2000 m you see the line coming from a long way out.
Once you cross, the next turnpoint takes over — normally far enough away that there is nothing to draw, and the watch goes back to the flight screen. You can tap to close the view yourself at any time; if you then keep closing on the line and come within 200 m of it, it comes back.
This is an aid, not a competition instrument The watch has no airspace, no map and no official timing. Validation happens on the watch’s own GPS, with the accuracy that GPS has, and it is your IGC track that counts for scoring — not what the watch told you in flight. Fly the task with the instrument the competition expects, and use this as the thing on your wrist that tells you where to point.
Flight recording
Every flight is recorded as an IGC file, the standard format used by free flight logbooks, online contests and analysis software. There is nothing to switch on: recording starts with the vario and stops with it.
The file contains one position per second with both barometric and GNSS altitude, and is signed with a G-record — the integrity signature that lets a scoring server verify the track has not been edited after the flight.
When the vario stops, the watch sends the file to your phone, which saves it in your Downloads folder. General → Open Tracklog folder on the phone takes you straight there. If the phone was out of range at landing, the file stays on the watch: the phone icon on the watch’s main screen turns orange to tell you so, and tapping it sends the file before opening the phone app.
Sessions that were not flights are not saved, which keeps your folder free of tracks you would only have to delete. A file is written once the session has lasted at least 30 seconds, has reached at least 10 km/h at some point, and shows at least 20 m between its lowest and its highest altitude. A vario left running on the ground, a sound test on the sofa, or a start and stop within a few seconds meets none of those and produces nothing.
The altitude condition is the one worth knowing about, because it is what separates a flight from a drive: 20 m is less than any flight and more than the noise of a barometer sitting still. It is also independent of automatic landing — a flight you stop by hand is recorded exactly like one the watch ended itself.
Your name and glider can be written into the file header. Set them under the ⋮ menu on the phone, in Pilot details; most contests expect them.
Altitude reference and units
A barometer measures pressure, not height. To turn pressure into altitude, the app needs to know what pressure to treat as sea level.
- QNE uses the international standard value of 1013.25 hPa. The result is a pressure altitude — the same reference everyone else in the air is using, and what you want for airspace.
- QNH uses the actual sea level pressure of the day. The result matches real height above sea level, so it agrees with the altitude marked on your map. This is the default, and the watch works the value out by itself — see below.
QNH is the default, and in most cases you will never have to touch it.
The watch sets it for you
From the moment you open the app, the watch compares what its barometer reads with the altitude reported by the GPS, and sets the sea level pressure so that the two agree. It does this on its own, with nothing to press.
Three things are worth knowing about how it behaves:
- The altitude may move during the first minutes. A GPS fix takes time to settle, and the watch keeps improving its reference as the fix gets better, so the altitude can shift by a few metres — occasionally more — while you are getting ready. This is normal and it converges.
- It stops at takeoff. Once the vario starts, the reference is fixed for the rest of the flight. Your altitude will never jump mid-thermal.
- Expect it to be close, not exact. GPS altitude typically carries ten to twenty metres of error, so treat the result as a good starting point. If you know the elevation of your launch, setting it yourself is always more accurate.
Setting it yourself
On the watch: long press the altitude on the main screen, before starting the vario. The screen shows the altitude and the pressure that produces it, with a minus and a plus button — hold either one to scroll. Tap Set to apply, or Cancel to leave it alone. Adjust until the altitude matches the elevation of the site you are standing on.
On the phone: the same adjustment lives under Altitude → Sea Level Pressure, with the resulting altitude shown in both metres and feet as you turn the value. The Use GPS altitude button fills it in from the watch’s current GPS altitude, which is the same thing the watch does by itself — useful mainly to redo it on demand.
Whichever you use, setting the value by hand tells the watch to stop adjusting on its own: your figure stays until you change it, or until you restart the app.
Each flying day starts fresh Sea level pressure changes from one day to the next, so a value set yesterday is no longer right today. Restarting the app clears the manual setting and lets the watch calibrate again — deliberately, so that you are never flying on a reference that belongs to another day.
In QNE mode none of this applies: the reference is the fixed international value and the watch never adjusts it.
Altitude can be displayed in metres or feet, and ground speed in km/h, m/s, mph or knots. Both are set on the phone and applied on the watch immediately. Vertical speed follows the altitude unit rather than the speed unit — see Units.
Battery and background operation
A vario is demanding: the barometer, GPS and audio all run continuously, and the app holds the watch awake so the sound never stops when the screen dims. Expect noticeably shorter battery life than a normal day of watch use, and start a long flight on a full charge.
Two things keep this under control.
The auto-close timeout
If the app is open but the vario is not running, it closes itself completely after the timeout — 10 minutes by default, adjustable from 2 to 30 minutes on the phone. This is the safety net for the app left open in your pocket after landing.
The timer restarts on any interaction: opening a screen, pressing a button, receiving a setting from the phone. And it never runs while the vario is active — a long flight will not close the app on you.
Closing it yourself
The reliable way to stop everything is the exit icon followed by Completely close. That releases the sensors, GPS and audio and removes the notification. Simply swiping the app away leaves the service running.
Subscription
AIR³ Vario Watch is free to install and free to try. An annual subscription, purchased through Google Play, unlocks the flying features.
| Free | Requires a subscription |
|---|---|
| Altitude display Ground speed and heading GPS status and accuracy Sound test Altitude chart and smoothing All settings on the phone | The vario sound Automatic takeoff and landing Always-on display in flight Keeping the screen on off-wrist Wind speed and direction Map mode Navigation and competition tasks IGC flight recording |
Subscribing
Subscribe from the phone app: tap Subscribe in the banner at the top of the settings screen and complete the Google Play purchase. The subscription is tied to your Google account, so it covers both apps.
Tapping Subscribe on the watch does not open a purchase screen there — it opens the AIR³ app on your paired phone, where the purchase happens. This is a Wear OS limitation, not a step you can skip.
How the watch knows
The watch checks its own Google Play subscription status directly, and re-checks every 24 hours, so an expired or cancelled subscription is picked up without you doing anything. The phone also forwards its status to the watch, which is what makes a fresh purchase appear on the watch quickly.
If the watch has been offline for a long time, open the app while it is connected to the phone to let it re-check.
Diagnostic log
If the app does not behave the way you expect — the vario starting or stopping at the wrong moment, for instance — you can have it record a log file to help you understand what happened.
Turn it on under General → Diagnostic log on the phone, or hold the GPS indicator at the top of either watch screen to switch it on or off directly there — see Quick toggles on the watch. It is off by default and only records while the vario is running. Each flight is recorded as a self-contained session: the settings in force at the time, how and why the vario started, what the sensors were reading second by second, what the altitude reference was doing and how each wind estimate was arrived at, and how and why it stopped. That is usually enough to see which threshold needs adjusting rather than having to guess.
The settings recorded at the start of each session are written in the units you had selected, so a log read months later still matches what you saw on screen.
The watch sends the log to the phone during and after each flight, and the phone saves it as a plain text file in your Downloads folder, grouped by day. Open Logs folder takes you there. Delete All logs removes them all at once, with no confirmation and no undo. Diagnostic logs are separate from your IGC files, which have their own folder and their own button.
A log holds your settings and sensor readings only — no track and no position.
Troubleshooting
The phone says “No watch connected”
Check that the watch is paired and connected in your companion app (Wear OS or Galaxy Wearable) and that Bluetooth is on. Then tap the refresh button next to the message. Settings cannot be sent while this line is red.
A setting flashes red when I change it
The setting did not reach the watch. Check the connection line at the top, then change the value again. If several settings in a row fail, restarting both apps usually clears it.
My settings did not arrive on the watch
The Wear OS link between phone and watch can take a moment, and occasionally needs a nudge. Confirm the watch is connected, then re-send the setting by changing it and changing it back. Settings already accepted are stored on the watch and are not lost.
I cannot hear the vario
- Check the megaphone at the top of the watch’s main screen. If it is red and crossed out, the vario is silenced — hold it twice to come back to maximum volume.
- Check that the watch is not in silent or theatre mode.
- Check the watch media volume, or turn on Set maximum volume on the phone so the app raises it for you.
- If you are wearing Bluetooth headphones paired to the watch, the sound goes there instead of the speaker.
- Use the sound test to confirm audio works at all before blaming the vario.
The vario will not start
If the button reads Subscribe, there is no active subscription. Otherwise the button starts the vario in any GPS state — a red No GPS label does not block it.
The app closed by itself
That is the auto-close timeout: the app was open with the vario stopped for longer than the configured delay. Raise it under General → Auto-close timeout on the phone if you want more time.
The vario started while I was still on launch
Automatic takeoff triggered on your walking speed or on an altitude change. Raise Takeoff → Speed, raise Takeoff → Altitude, lengthen Takeoff → Window, or turn Auto takeoff off and start the vario by hand.
The vario stopped in flight
Automatic landing needs stable altitude and a trustworthy low ground speed together, so this is unlikely — losing GPS reception on its own will not do it. It can still happen in very smooth air at low ground speed, typically in a weak, flat thermal. Increase Landing → Window, decrease Landing → Speed, or turn Auto landing off. You can always restart from the main screen.
If it keeps happening, turn on the diagnostic log and fly again — the log will show the exact altitudes and speeds behind the decision, which is a far better basis for adjusting your thresholds than guesswork.
The vario sounds strange in flight, and the air does not
If the sound is unstable in a way the air does not justify — reacting when you accelerate, when you turn, or when you move your arm — the relative wind is probably reaching the watch’s pressure port. Land, open the vario screen, and blow gently across the small hole in the case: if the altitude jumps, that is your answer. See The barometer and the wind for what to do about it.
The vertical speed is jumpy, or too slow to react
Adjust Vario → Averaging on the phone, and the smoothing value on the watch’s chart screen. Longer averaging and lower smoothing give a calmer vario; the opposite gives a faster one. The chart screen lets you see the effect directly.
If no combination gives you both a quick and a clean reading, you have reached the limit of your watch’s pressure sensor rather than a limit of the settings — see What your watch’s hardware determines.
FAQ
Do I need my phone with me when I fly?
No. The watch app is fully standalone. Configure it once from the phone and leave the phone in the car.
Does it work without GPS?
Yes. The vario sound comes from the barometer alone. Without GPS you lose ground speed, heading and automatic takeoff by speed — but automatic takeoff by altitude still works.
Does it record my flight?
Yes. Each flight is saved as a signed IGC file and sent to your phone when you land — see Flight recording.
Can it navigate a competition task?
It can point you round one. Import the task — from the phone, or on the watch alone with a cloud code — and the watch gives you an arrow to the next turnpoint, the optimised distance left to fly, a speed to start before the gate opens, the line itself drawn in the air as you close in, and a distinct sound for a turnpoint, the start, the ESS and goal, so you know what you validated without looking. See Navigation and tasks. What it does not have is a map, airspace, or official timing, so it complements the instrument the competition expects rather than replacing it.
Can I use it for something other than free flight?
Yes. Anything where hearing your vertical movement is useful — gliding, ballooning, or any activity where you want to track altitude changes — works the same way.
Why does it need location permission?
For ground speed, heading and automatic takeoff detection, and for altitude when the watch has no barometer. Since these must keep working with the screen off, the app runs as a foreground service with an ongoing notification.
Why does it work better on my friend’s watch than on mine?
Because the app reads whatever sensors your watch provides. Barometer precision, GPS reception, speaker loudness and how aggressively the manufacturer suspends background apps all vary between models, and all of them show up in flight. See What your watch’s hardware determines.
Can I change the tones?
The tones themselves are fixed, but what you hear and when is yours to shape: climb and sink thresholds, averaging, dynamic frequency, Weak Lift and Instant Lift all change the behaviour of the sound.